Getting free VPS from Oracle Cloud

There is new always-free offer on Oracle site:
– AMD Epyc CPU: 2 servers, each with: 1 core, 1 GB ram, 50 GB HDD, 480 mb/s connection
– Ampere ARM CPU: 4 servers, each with: 1 core 2.8GHz, 6 GB ram, 50 GB HDD, 1gb/s connection
– 10 TB/month transfer limit for all your machines together

These 4 Ampere servers you can combine into 1 server: 4×2.8GHz, 24 GB ram, 50 GB HDD with 4gb/s connection!
You can also create 6 VPSes for 6 small projects.

Registration:
https://www.oracle.com/pl/cloud/free/
You will have to add credit card to account. Virtual/prepaid cards are not accepted. Revolut virtual card generated in smartphone application is not accepted, but physical Revolut card is ok.

It takes around 15 minutes to activate account after you register.

How to order free 4 core VPS and unlock internet access

When you order any dedic or VPS, it always comes with all internet access opened by default. Here we get machine with almost everything closed (except port 22 for SSH). Every port is blocked in Oracle Cloud panel and in Ubuntu.
If you install nginx on it, it will say in webbrowser that site is offline. Read next 16 steps to unlock all ports.

Go to https://cloud.oracle.com/ and login to your account. Click on ‘Create a VM instance’.

Click on ‘Edit Image and shape’.

Click on ‘Change image’.

Select ‘Canonical Ubuntu’ and click ‘Select image’.

Click on ‘Change shape’.
1. Select shape ‘Ampere’
2. Unroll options
3. Change OCPUs number to 4, it will automatically change RAM to 24 GB
4. Tick ‘VM.Standard.A1.Flex’
5. Click ‘Select shape’

For next step machine configuration step, you must have SSH key pair. If you already have one, you can skip next 3 steps.

To generate key pair you need ‘Git Bash’. You can download it here: https://git-scm.com/download/win

Run Git Bash using Windows Search. Just type ‘git’, it should find it.

In Git Bash window type:

ssh-keygen.exe -t rsa

It will generate SSH key pair and save it in your Windows user directory, in subdirectory .ssh. This directory may be hidden (depends on Windows settings), so you can’t easily navigate there. In this case, you can open any directory in Windows explorer, click on address bar, type:

%HOMEPATH%/.ssh

and click Enter. It should open folder with your id_rsa.pub file. You can copy it on desktop or to Downloads folder, to make it easy to find.

On Oracle page scroll to ‘Add SSH Keys’ and select option ‘Upload public key files (.pub)’.

Select file ‘id_rsa.pub’ we generated in previous 3 steps in file picker (button ‘Browse’). Oracle will upload it to your new VPS. Git Bash with automatically login to your server using this key – using all keys which are in .ssh directory – when you use ‘ssh’ command in it.

Your machine should change status to ‘Running’ within 1 minute. On right top side of page, there will appear IP of your server. Copy it. We will use it later.

There will also appear ‘Virtual cloud network’ with some random name. Click on it.

Click on Subnet name – again some random value.

Click on Default Security List name – again some random value.

Click ‘Add Ingress Rules’.

In ‘source CIDR’ type:

0.0.0.0/0

and click ‘Add Ingress Rules’.

Network TCP – like Tibia and www – traffic is unlocked in Oracle Cloud panel. You may also unblock UDP protocol traffic, if you plan to host TeamSpeak or other application which uses UDP.

Now we got to unlock traffic in Ubuntu. Open Git Bash and type:

ssh ubuntu@x.x.x.x

with your server IP in place of x.x.x.x, like ssh ubuntu@138.3.243.101
On first connection it will ask you, if you are sure that you connected to valid server. Type ‘yes’ and press Enter.

You are now connected to your VPS, but you still can’t run web server or OTS on it. Type:

sudo su
iptables -I INPUT -j ACCEPT
iptables-save > /etc/iptables/rules.v4

It will unlock all incoming traffic in Ubuntu.

[OTS] Lists of unique numbers kept in ‘player storage’

Friend asked me about code to keep ‘auto loot lists’ in storage. So player can configure few lists of items and then just switch between them, when he goes to other spawn with different loot.

-- config
local listsStartStorage = 550000000
local maximumListsCount = 10
local maximumElementsPerList = 100

-- variables for calculations
local listOffset = maximumElementsPerList + 1

function lists_getLists(player)
    local result = {}
    for i = 1, maximumListsCount do
        result[i] = lists_getListElementsCount(player, i)
    end

    return result
end

function lists_getListElementsCount(player, listId)
    local startStorage = listsStartStorage + listOffset * listId
    return math.max(0, player:getStorage(startStorage))
end

function lists_getListElements(player, listId)
    local result = {}
    local startStorage = listsStartStorage + listOffset * listId
    local listElementsCount = lists_getListElementsCount(player, listId)
    for i = startStorage + 1, startStorage + listElementsCount do
        table.insert(result, player:getStorage(i))
    end

    return result
end

function lists_removeAllListElements(player, listId)
    local startStorage = listsStartStorage + listOffset * listId
    local listElementsCount = lists_getListElementsCount(player, listId)
    for i = startStorage + 1, startStorage + listElementsCount + 1 do
        player:setStorage(i, -1)
    end
    player:setStorage(startStorage, -1)
end

function lists_getListElement(player, listId, elementKey)
    local elementStorage = listsStartStorage + listOffset * listId + elementKey
    return player:getStorage(elementStorage)
end

local function lists_assertListId(listId)
    assert(listId >= 1, 'minimum list id is 1')
    assert(listId <= maximumListsCount, 'maximum list id is 1' .. maximumListsCount)
end

local function lists_assertElementKey(elementKey)
    assert(elementKey >= 1, 'minimum list element id is 1')
    assert(elementKey <= maximumElementsPerList, 'maximum list element id is ' .. maximumElementsPerList)
end

-- this is for internal use only, should not be used by user
local function lists_setListElement(player, listId, elementKey, elementValue)
    lists_assertListId(listId)
    lists_assertElementKey(elementKey)
    local elementStorage = listsStartStorage + listOffset * listId + elementKey
    player:setStorage(elementStorage, elementValue)
end

-- this is for internal use only, should not be used by user
local function lists_setListElementsCount(player, listId, count)
    lists_assertListId(listId)
    lists_assertElementKey(count)
    local startStorage = listsStartStorage + listOffset * listId
    player:setStorage(startStorage, count)
end

function lists_addListElement(player, listId, elementValue)
    local elements = lists_getListElements(player, listId)
    for k, v in pairs(elements) do
        if v == elementValue then
            return
        end
    end

    local elementsCount = lists_getListElementsCount(player, listId)
    lists_setListElement(player, listId, elementsCount + 1, elementValue)
    lists_setListElementsCount(player, listId, elementsCount + 1)
end

function lists_removeListElement(player, listId, elementValue)
    local elements = lists_getListElements(player, listId)
    local elementToRemovePosition = nil
    for k, v in pairs(elements) do
        if v == elementValue then
            elementToRemovePosition = k
            break
        end
    end

    if elementToRemovePosition then
        local elementsCount = lists_getListElementsCount(player, listId)
        for i = elementToRemovePosition + 1, elementsCount  do
            local nextElementValue = lists_getListElement(player, listId, i)
            lists_setListElement(player, listId, i - 1, nextElementValue)
        end
        lists_setListElement(player, listId, elementsCount, -1)
        lists_setListElementsCount(player, listId, elementsCount - 1)
    end
end

TESTS:

Player = {}
function Player:new()
    o = {storages = {}}
    setmetatable(o, self)
    self.__index = self
    return o
end

function Player.getStorage(self, k)
    if (self.storages[k]) then
        return self.storages[k]
    end
    return -1
end

function Player.setStorage(self, k, v)
    if (v == -1) then
        v = nil
    end
    self.storages[k] = v
end

function Player.dumpStorages(self)
    local storages = 'storages: '
    for k, v in pairs(self.storages) do
        storages = storages .. k .. '=' .. v .. ', '
    end
    print(storages)
end

local function printPlayerListsElementsCount(player)
    local playerLists = lists_getLists(player)
    for k, v in pairs(playerLists) do
        local listElementsString = ''
        for k2, v2 in pairs(lists_getListElements(player, k)) do
            listElementsString = listElementsString .. ' ' .. k2 .. '=' .. v2 .. ', '
        end
        print ('list', k, 'elements', v, 'values', listElementsString)
    end
end

player = Player:new()

print()
player:dumpStorages()
print('start - empty list')
printPlayerListsElementsCount(player)

print()
player:dumpStorages()
lists_addListElement(player, 2, 2001)
lists_addListElement(player, 2, 2002)
print('added 2 elements to list 2')
player:dumpStorages()
printPlayerListsElementsCount(player)

print()
player:dumpStorages()
lists_addListElement(player, 1, 1001)
lists_addListElement(player, 1, 1002)
lists_addListElement(player, 1, 1003)
lists_addListElement(player, 1, 1004)
lists_addListElement(player, 1, 1005)
print('added 5 elements to list 1')
player:dumpStorages()
printPlayerListsElementsCount(player)

print()
player:dumpStorages()
lists_removeListElement(player, 1, 1001)
print('removed first element from list 1')
player:dumpStorages()
printPlayerListsElementsCount(player)

print()
player:dumpStorages()
lists_removeListElement(player, 1, 1005)
print('removed last element from list 1')
player:dumpStorages()
printPlayerListsElementsCount(player)

print()
player:dumpStorages()
lists_removeListElement(player, 1, 1003)
print('removed middle element from list 1')
player:dumpStorages()
printPlayerListsElementsCount(player)

print()
player:dumpStorages()
lists_removeAllListElements(player, 1)
print('removed all elements from list 1')
player:dumpStorages()

You can paste code and tests to online tool like: https://www.tutorialspoint.com/execute_lua_online.php

Compile otservbr and TFS 1.3 on Ubuntu 20.04 and Debian 10/11

Dockerfiles tested on 2021-08-24. You can comment otservbr / forgottenserver part to compile just one sources.

Ubuntu 20.04

FROM ubuntu:20.04

RUN apt-get update

ARG DEBIAN_FRONTEND=noninteractive
ENV TZ=Europe/London

RUN apt-get -y install tzdata

# 1: forgottenserver (TFS)
RUN apt-get -y install git cmake build-essential libluajit-5.1-dev zip ca-certificates pkg-config autoconf libmariadb-dev-compat libboost-date-time-dev libboost-filesystem-dev libboost-system-dev libboost-iostreams-dev libpugixml-dev libcrypto++-dev libfmt-dev

RUN cd /home/ && git clone --depth 1 https://github.com/otland/forgottenserver.git

RUN cd /home/forgottenserver/ && mkdir build && cd build && cmake ..
RUN cd /home/forgottenserver/build/ && make -j 16

# 2: otservbr-global
RUN apt-get install -y git cmake build-essential libluajit-5.1-dev zip ca-certificates curl zip unzip tar pkg-config yasm autoconf

RUN cd /home/ && git clone https://github.com/microsoft/vcpkg && cd vcpkg && ./bootstrap-vcpkg.sh
RUN cd /home/vcpkg/ && ./vcpkg --triplet x64-linux install boost-asio boost-filesystem boost-iostreams boost-lockfree boost-system boost-variant cryptopp curl jsoncpp libmariadb pugixml spdlog

RUN cd /home/ && git clone --depth 1 https://github.com/opentibiabr/otservbr-global.git && cd otservbr-global && git checkout develop
RUN cd /home/otservbr-global/ && mkdir build && cd build && cmake -DCMAKE_TOOLCHAIN_FILE=../../vcpkg/scripts/buildsystems/vcpkg.cmake ..
RUN cd /home/otservbr-global/build/ && make -j 16

Debian 11

FROM debian:11

RUN apt-get update

ARG DEBIAN_FRONTEND=noninteractive
ENV TZ=Europe/London

RUN apt-get -y install tzdata

# 1: forgottenserver (TFS)
RUN apt-get -y install git cmake build-essential libluajit-5.1-dev zip wget ca-certificates pkg-config autoconf libmariadb-dev-compat libboost-date-time-dev libboost-filesystem-dev libboost-system-dev libboost-iostreams-dev libpugixml-dev libcrypto++-dev libfmt-dev

RUN apt remove -y libfmt-dev
RUN cd /root/ && wget https://github.com/fmtlib/fmt/releases/download/7.1.3/fmt-7.1.3.zip && unzip fmt-7.1.3.zip
RUN cd /root/fmt-7.1.3/ && mkdir build && cd build && cmake .. && make -j 16 && make install

RUN cd /home/ && git clone --depth 1 https://github.com/otland/forgottenserver.git

RUN cd /home/forgottenserver/ && mkdir build && cd build && cmake ..
RUN cd /home/forgottenserver/build/ && make -j 16

# 2: otservbr-global
RUN apt-get install -y git cmake build-essential libluajit-5.1-dev wget zip ca-certificates curl zip unzip tar pkg-config yasm autoconf

RUN apt remove -y cmake
RUN cd /root/ && wget https://github.com/Kitware/CMake/releases/download/v3.21.1/cmake-3.21.1.tar.gz
RUN cd /root/ && tar -zxvf cmake-3.21.1.tar.gz && cd cmake-3.21.1 && ./bootstrap -- -DCMAKE_USE_OPENSSL=OFF && make -j 16 && make install

RUN cd /home/ && git clone https://github.com/microsoft/vcpkg && cd vcpkg && ./bootstrap-vcpkg.sh
RUN cd /home/vcpkg/ && ./vcpkg --triplet x64-linux install boost-asio boost-filesystem boost-iostreams boost-lockfree boost-system boost-variant cryptopp curl jsoncpp libmariadb pugixml spdlog

RUN cd /home/ && git clone --depth 1 https://github.com/opentibiabr/otservbr-global.git && cd otservbr-global && git checkout develop
RUN cd /home/otservbr-global/ && mkdir build && cd build && cmake -DCMAKE_TOOLCHAIN_FILE=../../vcpkg/scripts/buildsystems/vcpkg.cmake ..
RUN cd /home/otservbr-global/build/ && make -j 16

Debian 10

FROM debian:10

RUN apt-get update

ARG DEBIAN_FRONTEND=noninteractive
ENV TZ=Europe/London

RUN apt-get -y install tzdata

# 1: forgottenserver (TFS)
RUN apt-get -y install git cmake build-essential libluajit-5.1-dev zip wget ca-certificates pkg-config autoconf libmariadb-dev-compat libboost-date-time-dev libboost-filesystem-dev libboost-system-dev libboost-iostreams-dev libpugixml-dev libcrypto++-dev

RUN apt remove -y libfmt-dev
RUN cd /root/ && wget https://github.com/fmtlib/fmt/releases/download/7.1.3/fmt-7.1.3.zip && unzip fmt-7.1.3.zip
RUN cd /root/fmt-7.1.3/ && mkdir build && cd build && cmake .. && make -j 16 && make install

RUN cd /home/ && git clone --depth 1 https://github.com/otland/forgottenserver.git

RUN cd /home/forgottenserver/ && mkdir build && cd build && cmake ..
RUN cd /home/forgottenserver/build/ && make -j 16

# 2: otservbr-global
RUN apt-get install -y git cmake build-essential libluajit-5.1-dev wget zip ca-certificates curl zip unzip tar pkg-config yasm autoconf

RUN apt remove -y cmake
RUN cd /root/ && wget https://github.com/Kitware/CMake/releases/download/v3.21.1/cmake-3.21.1.tar.gz
RUN cd /root/ && tar -zxvf cmake-3.21.1.tar.gz && cd cmake-3.21.1 && ./bootstrap -- -DCMAKE_USE_OPENSSL=OFF && make -j 16 && make install

RUN cd /home/ && git clone https://github.com/microsoft/vcpkg && cd vcpkg && ./bootstrap-vcpkg.sh
RUN cd /home/vcpkg/ && ./vcpkg --triplet x64-linux install boost-asio boost-filesystem boost-iostreams boost-lockfree boost-system boost-variant cryptopp curl jsoncpp libmariadb pugixml spdlog

RUN cd /home/ && git clone --depth 1 https://github.com/opentibiabr/otservbr-global.git && cd otservbr-global && git checkout develop
RUN cd /home/otservbr-global/ && mkdir build && cd build && cmake -DCMAKE_TOOLCHAIN_FILE=../../vcpkg/scripts/buildsystems/vcpkg.cmake ..
RUN cd /home/otservbr-global/build/ && make -j 16

[OTS] Check monsters spawn time in spawn.xml

This script reads spawn.xml file and list monsters sorted by spawn time. You can easily detect monsters with too low or too high spawn times.

<?php

$spawnsFile = 'ots-spawn.xml';

function element_attributes($element_name, $xml)
{
    if ($xml == false) {
        return false;
    }
    $found = preg_match(
        '#<' . $element_name .
        '\s+([^>]+(?:"|\'))\s?/?>#',
        $xml,
        $matches
    );
    if ($found == 1) {
        $attribute_array = array();
        $attribute_string = $matches[1];
        $found = preg_match_all(
            '#([^\s=]+)\s*=\s*(\'[^<\']*\'|"[^<"]*")#',
            $attribute_string,
            $matches,
            PREG_SET_ORDER
        );
        if ($found != 0) {
            foreach ($matches as $attribute) {
                $attribute_array[$attribute[1]] =
                    substr($attribute[2], 1, -1);
            }
            return $attribute_array;
        }
    }
    return false;
}

$monsters = [];

foreach (file($spawnsFile) as $lineNo => $line) {
    $line = trim($line);
    if (substr($line, 0, 8) === '<monster') {
        $monsterAttributes = element_attributes('monster', $line);
        if (is_array($monsterAttributes)) {
            if (isset($monsterAttributes['name']) && isset($monsterAttributes['spawntime'])) {
                $name = $monsterAttributes['name'];
                $spawnTime = $monsterAttributes['spawntime'];

                $monsters[] = [
                    'line' => $lineNo,
                    'name' => $monsterAttributes['name'],
                    'spawnTime' => (int)$monsterAttributes['spawntime'],
                ];
            }
        }
    }
}

usort($monsters, function ($a, $b) {
    return $a['spawnTime'] < $b['spawnTime'];
});

foreach ($monsters as $monster) {
    echo $monster['line'] . ',' . $monster['name'] . ',' . $monster['spawnTime'] . PHP_EOL;
}

[OTClient] Generate full minimap for your server

Example for Tibia version 8.54

TO GENERATE MINIMAP FOR BIG MAPS – LIKE RL TIBIA – YOU NEED TO COMPILE 64-bit VERSION OF OTCLIENT!
Loading big map requires few GB RAM. 32-bit (x86) version of OTClient can load maps up to ~40MB OTBM. Using it with bigger map will result in not loading whole map -> there will be places missing on minimap!

Put client Tibia.spr and Tibia.dat files in data/things/854/

Put server files items.otb, world.otbm (map) and map .xml files in data/things/854/

Run OTClient and open Terminal (CTRL+T in client). Type:

g_game.setClientVersion(854)
g_things.loadOtb('things/854/items.otb')
g_map.loadOtbm('things/854/world.otbm')
g_minimap.saveOtmm('minimap.otmm')

If you are using OTClient_mapgen v4 ( https://github.com/gesior/otclient_mapgen/releases ):

prepareClient(854, 'things/854/items.otb', 'things/854/world.otbm', 1, 1)
saveMinimap('minimap.otmm')

Close client.

Your minimap file will be in folder:

  • Windows: %HOMEPATH%/otclient (paste it as path to folder in Windows Explorer)
  • Linux: $HOME/.otclient (cd to it)

Copy it to data folder of OTClient. OTClient searches for files first in this folder. That way you can share it with players as part of your client.

[TFS 1.x+] How to NOT write LUA scripts or how to crash server by LUA script

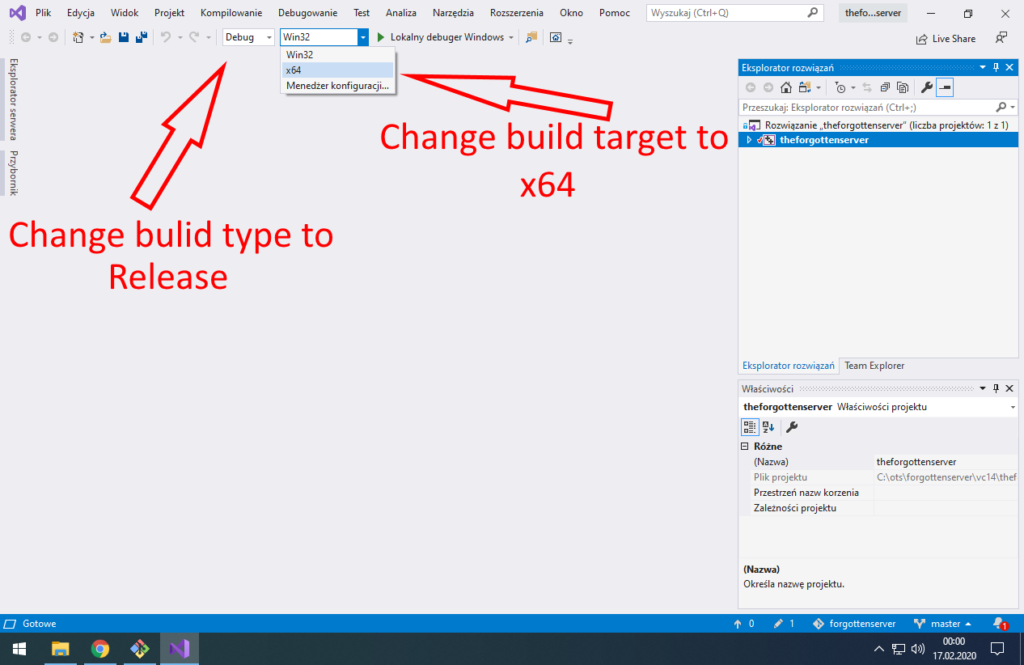
There are many tutorials about writing scripts for TFS 1.x, so I decided to write short tutorial how to NOT write scripts for TFS 1.x.
In this tutorial I will describe two common mistakes that result in server crash!

First thing that everyone notice when they change engine from TFS 0.x to 1.x are objects in LUA.
There are many of them, but most popular are: Player, Monster, Npc, Creature, Tile, Item, Container, Position

Thing that most scripters don’t know, is that, these objects are directly bind to address in RAM memory (to C++ objects).
If you try to use C++ object (ex. get name of player) that was deleted, it results in server crash. Bad thing about it is: you cannot check, if object was deleted in C++!
C++ programmers are used to take care of not using deleted objects. LUA scripters in all old engines always get nice error message, when they use variable that does not exist (ex. Creature not found).

There are 2 common mistakes that result in crash. Worst thing about them is that, they don’t crash server always. You can write code like that, test it, put it on your server, many players will use it.. and after week you get random crash.

PROBLEM 1

Passing object to addEvent – addEvent is function that execute given function with some delay. Example – print text after 5 seconds:

function executeMeLater()
    print('printed after 5 seconds!')
end

addEvent(executeMeLater, 5000)

You can pass arguments to function executed with delay:

function executeMeLater(param1, param2)
    print(param1)
    print(param2)
end

addEvent(executeMeLater, 5000, 'test string', 12345)

It will print after 5 seconds:

test string
12345

What is a problem with passing object to it? Object – in RAM memory – can be already deleted!
Example talkaction that crash server:

function buggedEvent1(player)
   print('Execute bugged event 1')
   print(player)
end

function buggedEvent2(hiddenPlayerObject)
   print('Execute bugged event 2')
   print(hiddenPlayerObject.myPlayerVariable:getName())
end

function onSay(player, words, param)
   print('onSay, player name: ' .. player:getName())
-- TRY 1
   addEvent(buggedEvent1, 4000, player)

-- TRY 2
   local hiddenPlayerObject = { myPlayerVariable = player }
   addEvent(buggedEvent2, 5000, hiddenPlayerObject)
   return true
end

What it does, if player stays online for 5 seconds after executing this talkaction:

onSay, player name: Gesior

Lua Script Error: [TalkAction Interface]
data/talkactions/scripts/crashAddEvent.lua:onSay
luaAddEvent(). Argument #3 is unsafe
stack traceback:
    [C]: in function 'addEvent'
    data/talkactions/scripts/crashAddEvent.lua:14: in function <data/talkactions/scripts/crashAddEvent.lua:11>
Execute bugged event 1
268435457
Execute bugged event 2
Gesior

As you can see, there is a simple protection against passing objects as arguments to addEvent. Passing it directly as argument, results in changing object Player to old ‘cid’ version (player temporary ID number).
In second event example I put object Player inside table to bypass protection code. That way I could use ‘:getName()’ on object, as it was not converted to ‘cid’ number.

What it does, if player relog within 5 seconds after executing this talkaction:

onSay, player name: Gesior

Lua Script Error: [TalkAction Interface]
data/talkactions/scripts/crashAddEvent.lua:onSay
luaAddEvent(). Argument #3 is unsafe
stack traceback:
    [C]: in function 'addEvent'
    data/talkactions/scripts/crashAddEvent.lua:14: in function <data/talkactions/scripts/crashAddEvent.lua:11>
Gesior has logged out.
Execute bugged event 1
268435456
Execute bugged event 2
Segmentation fault (core dumped)

SERVER CRASHED!
It tried to load passed Player object (use ‘:getName()’ on it). Player did relog, so given instance of Player was removed in C++.
gdb report after crash:

#0  0x0000000000000000 in ?? ()
No symbol table info available.
#1  0x000055d4fed50615 in LuaScriptInterface::luaCreatureGetName(lua_State*) ()
No symbol table info available.
#2  0x00007f8865d55e37 in ?? () from /usr/lib/x86_64-linux-gnu/libluajit-5.1.so.2
No symbol table info available.
#3  0x00007f8865da327c in lua_pcall () from /usr/lib/x86_64-linux-gnu/libluajit-5.1.so.2
No symbol table info available.
#4  0x000055d4fedc9274 in LuaScriptInterface::protectedCall(lua_State*, int, int) ()
No symbol table info available.
#5  0x000055d4fedca368 in LuaScriptInterface::callFunction(int) ()
No symbol table info available.
#6  0x000055d4fed39af2 in LuaEnvironment::executeTimerEvent(unsigned int) ()
No symbol table info available.
#7  0x000055d4fed1eb6e in void std::__invoke_impl<void, void (LuaEnvironment::*&)(unsigned int), LuaEnvironment*&, unsigned int&>(std::__invoke_memfun_deref, void (LuaEnvironment::*&)(unsigned int), LuaEnvironment*&, unsigned int&) ()
No symbol table info available.
#8  0x000055d4fed1bcac in std::__invoke_result<void (LuaEnvironment::*&)(unsigned int), LuaEnvironment*&, unsigned int&>::type std::__invoke<void (LuaEnvironment::*&)(unsigned int), LuaEnvironment*&, unsigned int&>(void (LuaEnvironment::*&)(unsigned int), LuaEnvironment*&, unsigned int&) ()
No symbol table info available.
#9  0x000055d4fed16be2 in void std::_Bind<void (LuaEnvironment::*(LuaEnvironment*, unsigned int))(unsigned int)>::__call<void, , 0ul, 1ul>(std::tuple<>&&, std::_Index_tuple<0ul, 1ul>) ()
No symbol table info available.
#10 0x000055d4fed1048d in void std::_Bind<void (LuaEnvironment::*(LuaEnvironment*, unsigned int))(unsigned int)>::operator()<, void>() ()
No symbol table info available.
#11 0x000055d4fed09916 in std::_Function_handler<void (), std::_Bind<void (LuaEnvironment::*(LuaEnvironment*, unsigned int))(unsigned int)> >::_M_invoke(std::_Any_data const&) ()
No symbol table info available.
#12 0x000055d4febfaec8 in std::function<void ()>::operator()() const ()
No symbol table info available.
#13 0x000055d4febfa9fe in Task::operator()() ()
No symbol table info available.
#14 0x000055d4febfac2c in Dispatcher::threadMain() ()

PROBLEM 2

Keeping object in variable for future use in script.
There is example of common usage in script – keeping last player who executed script (who went into some room, who used some lever):

local lastPlayer = nil

function onSay(player, words, param)
   print('onSay, player name: ' .. player:getName())
   if lastPlayer ~= nil then
      print('onSay, last player name: ' .. lastPlayer:getName())
   end
   lastPlayer = player
   return true
end

You can execute this code as many times you want and it will work fine.. until you relog or player that used it as last, logout and someone else execute it.
gdb report after crash:

#0  0x00007ff55a471d20 in ?? ()
No symbol table info available.
#1  0x000055dffa717615 in LuaScriptInterface::luaCreatureGetName(lua_State*) ()
No symbol table info available.
#2  0x00007ff560fd0e37 in ?? () from /usr/lib/x86_64-linux-gnu/libluajit-5.1.so.2
No symbol table info available.
#3  0x00007ff56101e27c in lua_pcall () from /usr/lib/x86_64-linux-gnu/libluajit-5.1.so.2
No symbol table info available.
#4  0x000055dffa790274 in LuaScriptInterface::protectedCall(lua_State*, int, int) ()
No symbol table info available.
#5  0x000055dffa791368 in LuaScriptInterface::callFunction(int) ()
No symbol table info available.
#6  0x000055dffa5f8554 in TalkAction::executeSay(Player*, std::__cxx11::basic_string<char, std::char_traits<char>, std::allocator<char> > const&, SpeakClasses) const ()
No symbol table info available.
#7  0x000055dffa5f81c1 in TalkActions::playerSaySpell(Player*, SpeakClasses, std::__cxx11::basic_string<char, std::char_traits<char>, std::allocator<char> > const&) const ()
No symbol table info available.
#8  0x000055dffa827c4f in Game::playerSaySpell(Player*, SpeakClasses, std::__cxx11::basic_string<char, std::char_traits<char>, std::allocator<char> > const&) ()
No symbol table info available.
#9  0x000055dffa827910 in Game::playerSay(unsigned int, unsigned short, SpeakClasses, std::__cxx11::basic_string<char, std::char_traits<char>, std::allocator<char> > const&, std::__cxx11::basic_string<char, std::char_traits<char>, std::allocator<char> > const&) ()
No symbol table info available.

How to make scripts safe? Pass cid/guid/itemid/position, not object.
Problem 1 script – safe version:

function buggedEvent1(player)
   print('Execute bugged event 1')
   print(player)
end

function buggedEvent2(hiddenPlayerObject)
   print('Execute bugged event 2')
   -- FIX: TRY TO CREATE OBJECT 'PLAYER' FROM IT'S CID
   local myPlayer = Player(hiddenPlayerObject.myPlayerVariable)
   -- FIX: IT WILL CREATE OBJECT 'PLAYER' OR RETURN 'nil'
   if myPlayer then
      -- FIX: 'if' CHECKED THAT 'myPlayer' IS NOT 'nil',
      -- SO CREATING OBJECT 'PLAYER' WORKED
      -- WE CAN USE 'getName'
      print(myPlayer:getName())
   end
end

function onSay(player, words, param)
   print('onSay, player name: ' .. player:getName())
   -- TRY 1
   addEvent(buggedEvent1, 4000, player)

   -- TRY 2
   -- FIX: PASS ID (cid) OF PLAYER, NOT OBJECT
   local hiddenPlayerObject = { myPlayerVariable = player:getId() }
   addEvent(buggedEvent2, 5000, hiddenPlayerObject)
   return true
end

Problem 2 script – safe version:
Version with player ID (in old scripts called ‘cid’). It’s temporary player ID. It changes when player relog/die:

local lastPlayerCid = nil

function onSay(player, words, param)
   print('onSay, player name: ' .. player:getName())
   -- FIX: TRY TO CREATE OBJECT 'PLAYER' FROM IT'S CID
   local lastPlayer = Player(lastPlayerCid)
   -- FIX: IT WILL CREATE OBJECT 'PLAYER' OR RETURN 'nil'
   if lastPlayer then
      print('onSay, last player name: ' .. lastPlayer:getName())
   end
   -- FIX: STORE ID OF PLAYER (cid), NOT OBJECT
   lastPlayerCid = player:getId()
   return true
end

Version with player GUID. It’s player ID from database. It never changes.

local lastPlayerGuid = nil

function onSay(player, words, param)
   print('onSay, player name: ' .. player:getName())
   -- FIX: TRY TO CREATE OBJECT 'PLAYER' FROM IT'S GUID
   local lastPlayer = Player(lastPlayerGuid)
   -- FIX: IT WILL CREATE OBJECT 'PLAYER' OR RETURN 'nil'
   if lastPlayer then
      print('onSay, last player name: ' .. lastPlayer:getName())
   end
   -- FIX: STORE ID OF PLAYER (cid), NOT OBJECT
   lastPlayerGuid = player:getGuid()
   return true
end

There are 2 main reasons for using ID version:

  • It’s sometimes useful to know that player did relog/die (change ID). If he went to no-logout zone and his ID changed, it means he died.
  • It also works for Monster, Npc and Creature objects. You can store ID of monster/npc/player and load it same way – some LUA scripts work for monsters (ex. movements).

There is one reason for using GUID:

  • Some scripts need to know if player is online, even if he did relog.

[OTClient] Compile on Linux Ubuntu 18.04

Install required libraries:

sudo apt-get install -y build-essential cmake git-core libboost-all-dev libphysfs-dev libssl-dev liblua5.1-0-dev libglew-dev libvorbis-dev libopenal-dev zlib1g-dev g++ make cmake automake libogg-dev libncurses5-dev mercurial

Replace physfs from Ubuntu repository to version that works:

hg clone -r stable-3.0 http://hg.icculus.org/icculus/physfs/ && cd physfs && mkdir build && cd build && cmake .. && make && sudo make install && sudo mv /usr/local/lib/libphysfs.a /usr/lib/x86_64-linux-gnu/.

Download OTClient:

git clone git://github.com/edubart/otclient.git

Go into otclient directory:

cd otclient

Edit file CMakesList.txt
Find:

set(CMAKE_CXX_LINK_FLAGS "${CMAKE_CXX_LINK_FLAGS} -Wl,-Map=${PROJECT_NAME}.map")

Replace with:

set(CMAKE_CXX_LINK_FLAGS "${CMAKE_CXX_LINK_FLAGS} -fPIC -no-pie -Wl,-Map=${PROJECT_NAME}.map")

Compile OTClient:

mkdir -p build && cd build && cmake .. && make

DONE! You can run OTClient (it’s in build directory):

./otclient

Gesior2012 – block using monster names as new player name

In acc. maker in file system/load.compat.php find function check_name_new_char and above return true add:

    if (stripos(",The Queen of Banshee,Rook,Orc,",
            ',' . $name . ',') !== false) {
        return false;
    }

Line where you need to paste it: https://github.com/gesior/Gesior2012/blob/268f477369c5c4a8ba88084224142941cba15654/system/load.compat.php#L142

List of monsters of your OTS you can generate using http://halp.skalski.pro/2020/05/21/ots-generating-list-of-monster-names/

From Windows 10 to OTS development machine for dummies

I made this tutorial on clean machine just after installing Windows 10 Pro (64bit) on 2020-02-16.
Installing everything took around 1 hour.
In this tutorial we will use Visual Studio 2019, not 2017 recommended for TFS compilation. It will work!

What do you need before start?

  • Windows 10
  • Web Browser (tutorial created with Google Chrome)

What will you have after completing this tutorial?

  • GIT client integrated with Windows 10
  • ‘linux console’ integrated with Windows 10
  • Visual Studio 2019 Community with C++ dev tools – IDE that let you compile TFS/OTClient easily (generate ‘.exe’ file)
  • vcpkg – C++ Library Manager for Windows, it will let you compile TFS/OTClient without searching for C++ libraries for hours
  • IDEA Community Edition with EmmyLUA plugin – free version of IDE that let you manage ‘data’ folder easily (XML and LUA files)
  • MariaDB database, PHP 7.4 and Apache2 server – website for your OTS
  • The Forgotten Server 1.2+ running on your PC
  • Gesior2012 for TFS 1.2+ running on your PC

1. Install GIT for Windows with environment integration

Download it from site (version 64-bit Setup): https://git-scm.com/download/win
‘Setup’ version will integrate Git with Windows explorer.

Download 64-bit Git for Windows Setup.
Unselect GUI option. It’s useless. You will have better Git GUI in IDEA.
Change line ending to ‘as is’. On GitHub most of code uses Unix-style endings.

2. Install Visual Studio 2019 Community with C++

Download it from site: https://visualstudio.microsoft.com/vs/

Select “Community” version. It will start download. After download run installer.
Select packet “Programming classic applications in C++”.
Select packet “English language”. It’s required to install TFS compilation libraries.
After installation run Visual Studio for first time to make it configure itself.
You don’t need Microsoft Account to use it. Click ‘Not now, maybe later’.

3. Install vcpkg – C++ library manager for Windows

Open Git Bash (‘linux console’) in folder ‘C:\’
Type in console: git clone https://github.com/Microsoft/vcpkg.git
git clone https://github.com/Microsoft/vcpkg.git
Type in console: cd vcpkg
cd vcpkg
Open website: https://github.com/Microsoft/vcpkg and find newest tagged version

Link: https://github.com/Microsoft/vcpkg
Newest tagged version should be stable. I tried master branch and it did not work with all libraries. You can always use old version, not newest. I used for this tutorial: 2020.01

Type in console: git checkout 2020.01
git checkout 2020.01

It will switch version of vcpkg to version from 2020.01

Type: ./bootstrap-vcpkg.bat
./bootstrap-vcpkg.bat

To build vcpkg. You must do it after downloading from GitHub and after every version change.

Run Windows PowerShell as Administrator (another black console..)
Change path in console to vcpkg path
Type: cd C:\vcpkg
cd C:\vcpkg
In console type: .\vcpkg integrate install
.\vcpkg integrate install

This will integrate vcpkg C++ library manager with Visual Studio we installed before.
After integrating with Visual Studio close PowerShell. We don’t need administrator rights anymore.

If you closed Git Bash console we opened at start, open it again in vcpkg folder.
Copy current libraries list from official TFS wiki (for 64-bit): https://github.com/otland/forgottenserver/wiki/Compiling-on-Windows-%28vcpkg%29

Libraries list at 2020-02-17:

vcpkg install boost-iostreams:x64-windows boost-asio:x64-windows boost-system:x64-windows boost-filesystem:x64-windows boost-variant:x64-windows boost-lockfree:x64-windows luajit:x64-windows libmariadb:x64-windows pugixml:x64-windows mpir:x64-windows cryptopp:x64-windows
Type in console: ./ and paste list

./ means ‘run’

We got all libraries for TFS!

4. Download TFS and compile engine

Create folder:

C:\ots
Open Git Bash in folder C:\ots
Download newest TFS. Type: git clone https://github.com/otland/forgottenserver.git
git clone https://github.com/otland/forgottenserver.git
C:\ots\forgottenserver\vc14\theforgottenserver.sln

It will open TFS project in Visual Studio.

Click ‘OK’ when VS ask you about changing target platform.

Change build type to Release and build target platform to x64.
Previously we installed C++ libraries for 64-bit platform – we can compile only 64-bit version.

If you plan to do many changes in sources and compile in often, you may try to use Debug build type.
It should link faster and reduce time of building solution.

Start compilation of TFS. It can take few minutes.
Open folder: C:\ots\forgottenserver\vc14\x64\Release
C:\ots\forgottenserver\vc14\x64\Release
Copy all .dll files and .exe file to folder: C:\ots\forgottenserver\
C:\ots\forgottenserver\
TFS is ready. Now we need to install database server and import TFS database schema.

5. Install MariaDB, PHP and Apache2 servers

Download newest XAMPP for Windows.

Link: https://www.apachefriends.org/download.html

During installation deselect components we won’t use for OTS development.
Start Apache, MySQL and open phpMyAdmin site (database administration site).

If Apache fails to start, it’s probably because some other application is already using port 80.
Common problem is Skype. Turn off Skype, start Apache, start again Skype – you got website and Skype working.

In phpMyAdmin open page with new user account configuration.
Type username forgottenserver
Type secure password for that user
Check ‘Create database with same name and grant all access.’
New database will appear in left panel. Click it and go to Import page.
Choose file: C:\ots\forgottenserver\schema.sql
C:\ots\forgottenserver\schema.sql

and click Import.
We got database for our OTS! Time to configure game server.

Open folder C:\ots\forgottenserver and copy file config.lua.dist to config.lua

6. Install IntelliJ IDEA, configure game server and run it for first time!

What is IntelliJ IDEA? It’s IDE for Java and Android development.
What is IDE? It’s ‘Integrated Development Environment’.
Why do I need it? To develop code faster, automatically detect simple bugs and make cleaner code.

Choose folder: C:\ots\forgottenserver
C:\ots\forgottenserver
Open IntelliJ IDEA Settings
Go to Plugins and install EmmyLua
Restart IDE to make it work with LUA
Configure your password to database user forgottenserver in file config.lua
Your server is running!

7. Install website (Gesior2012)

Open folder: C:\xampp\htdocs
 C:\xampp\htdocs
Remove all files from C:\xampp\htdocs
Open Git Bash in folder C:\xampp\htdocs
Type: git clone https://github.com/gesior/Gesior2012.git .
git clone https://github.com/gesior/Gesior2012.git .

Yes. There is space and dot at end. We want to download Gesior2012 to current folder. Not to folder C:\xampp\htdocs\Gesior2012

Type: git checkout TFS-1.2
git checkout TFS-1.2

Change Gesior2012 version to TFS-1.2 (exactly change git branch to TFS-1.2)
Same as we did during vcpkg installation. Download from GitHub with git clone and then change version.

From now you will edit every directory in IntelliJ IDEA 🙂

PHP files are not colored in IntelliJ IDEA Community edition 🙁
LUA plugin is free, but PHP is available only in IntelliJ IDEA Ultimate (paid / 30 days trial) or as separate application PHPStorm (it’s IntelliJ IDEA with PHP plugin).

Open website http://127.0.0.1 and click link to installation.
Refresh site. Error about IP should disappear.
There will be probably some errors about cache folder.
We got to set cache folder not read-only.
When it asks about ‘To all files and sub-directories’ click Yes.
Click link to Step 1 in left side menu.
Type path to TFS: C:\ots\forgottenserver
C:\ots\forgottenserver

Continue steps 2-5.

Your website should be ready to use!

LUA BASICS for other language programmers

What do you need to know to start scripting in LUA?

1: 0 is true!

local v = 0
if v then
    print('YES! ZERO IS TRUE!')
    print('That is why many functions return "nil" (which is false)')
end

2: elseif != else if

if something then
    print(1)
else if somethingOther then
    print(2)
end

ERROR?! WHAT?! YES!
In LUA else if is one word elseif.
As there are no one-line ifs without end, you need to write:

if something then
    print(1)
elseif somethingOther then
    print(2)
end

or:

if something then<
    print(1)
else
    if somethingOther then
        print(2)
    end
end

Multi-line formatting is ignored, whole LUA program can be in 1 line!

3: Tables are indexed from 1!

Tables/arrays are indexed from 1, not 0!

local table = {1, 2, 3, 4, 5}
for k, v in pairs(table) do
    print(k .. ' = ' .. v)
end
print(table[0])

Result:

1 = 1
2 = 2
3 = 3
4 = 4
5 = 5
nil -- reading not assigned index returns magic "nil" from point 1