Gesior2012 – block using monster names as new player name

In acc. maker in file system/load.compat.php find function check_name_new_char and above return true add:

    if (stripos(",The Queen of Banshee,Rook,Orc,",
            ',' . $name . ',') !== false) {
        return false;
    }

Line where you need to paste it: https://github.com/gesior/Gesior2012/blob/268f477369c5c4a8ba88084224142941cba15654/system/load.compat.php#L142

List of monsters of your OTS you can generate using http://halp.skalski.pro/2020/05/21/ots-generating-list-of-monster-names/

OTS – generating list of monster names

In OTS folder data/monsters create new file list.php

<?php
$monsters = simplexml_load_file('monsters.xml');

$list = [];
foreach($monsters->monster as $monsterData) {
    $monster = simplexml_load_file((string) $monsterData['file']);
    $list[] = (string) $monster['name'];
}

echo ',' . implode(',', $list) . ',' . PHP_EOL;

Now run that code in console. On machines with PHP installed just type:

php list.php

and it will generate list like:

,Sinister Bunny,Kindra,Necron,Terros,Christmass Destroyer,Christmass Destroyer,C hristmass Destroyer,Christmass Destroyer,Christmass Destroyer,Christmass Destroy er,Christmass Destroyer,Christmass Destroyer,Christmass Destroyer,Christmass Des troyer,Christmass Destroyer,Christmass Destroyer,Corrupted Santa,Tasselis,Laevis ,Dianthis,Saul,Hunlath,Khor,Apocalypse,Pumin,Tafariel,Ashfalor,Infernatil,Vermin or,Bazir,Bazir,Apocalypse Envoy,Training Dummy,Midnight Asura,Dawnfire Asura,Mus hroom Sniffer,Angry Destroyer,Fu…

TFS – Jak zrobić skrypt Loop, żeby wykonywał się co sekundę przez określoną w skrypcie ilość razy?

W językach skryptowych nie ma znanego z innych języków polecenia ‘sleep’, żeby poczekać np. sekundę – to zatrzymało by działanie całego serwera gry.
W takich językach najczęściej dostępne są funkcje do ‘planowania zdarzeń’ – to znaczy specjalna lista gdzie są spisane funkcje i czas po jakim mają być wykonane.

Przykład w LUA w serwerze gry TFS 1.3 (funkcja do tego służąca: addEvent ).
Do funkcji addEvent można przekazywać parametry, ale nie mogą to być obiekty zdefiniowane w silniku TFS jak Player, Creature, Item itp. – może to doprowadzić do crasha serwera i każde takie użycie generuje komunikat w konsoli.

Ta funkcja (akcja do dodania w actions) wykona się 3 sekundy po użyciu przedmiotu i wyświetli animacje ‘POFF’ na pozycji gracza.
Zamiast przekazywać jako parametr gracza (obiekt Player), przekazujemy jego ID (numer), a w momencie wykonania ‘zdarzenia’ zamieniamy go ponownie na obiekt Player.

function wyslijAnimacjeNaPozycjeGracza(playerId)
   -- zamieniamy liczbę playerId w obiekt player
   local player = Player(playerId)
   -- UWAGA: gracz moze w tym czasie zginac/wylogowac sie, wiec zawsze sprawdzamy czy udalo sie utworzyc obiekt 'player'
   if player then
      player:getPosition():sendMagicEffect(CONST_ME_POFF)
   end
end

function onUse(player, item, fromPosition, target, toPosition, isHotkey)
   addEvent(wyslijAnimacjeNaPozycjeGraczaZaSekunde, 3000, player:getId())
   return true
end

Ta funkcja zostanie wykonana 2 razy w odstępach sekundy:

function twojaFunkcjaDoWykonaniaKilkaRazy(iloscPowtorzen, czasMiedzyPowtorzeniami)
    -- kod odpowiadajacy za powtarzanie
    iloscPowtorzen = iloscPowtorzen - 1
    if (iloscPowtorzen > 0 ) then
        -- parametry przekazywane do funkcji 'addEvent' to kolejno:
        -- 1: nazwa funkcji ktora ma sie wykonac
        -- 2: czas po jakim ma sie wykonac, 1000 = 1 sekunda
        -- 3 i kolejne - sa opcjonalne - wszystkie kolejne parametry zostana przekazane do wykonywanej funkcji w takiej kolejnosci jak zostaly podane
        addEvent(twojaFunkcjaDoWykonaniaKilkaRazy, czasMiedzyPowtorzeniami, iloscPowtorzen, czasMiedzyPowtorzeniami)
    end

    -- kod ktory ma sie wykonywac (twoj wlasny):
    print('zostalo powtorzen:', iloscPowtorzen)
end

twojaFunkcjaDoWykonaniaKilkaRazy(2, 1000, 'testowy test', 12345)

Przykład z tą samą funkcją, ale teraz z przekazaniem parametrów. W funkcji wykonywanej ‘później’ nie masz dostępu do zmiennych które są dostępne w ‘aktualnie’ wykonywanym skrypcie (tym który ‘planuje’ wykonanie funkcji), więc trzeba je przekazać.

function twojaFunkcjaDoWykonaniaKilkaRazyZParametrami(iloscPowtorzen, czasMiedzyPowtorzeniami, parametr1, parametr2)
   -- kod odpowiadajacy za powtarzanie
   iloscPowtorzen = iloscPowtorzen - 1
   if (iloscPowtorzen > 0 ) then
      addEvent(twojaFunkcjaDoWykonaniaKilkaRazyZParametrami, czasMiedzyPowtorzeniami, iloscPowtorzen, czasMiedzyPowtorzeniami, parametr1, parametr2)
   end

   -- kod ktory ma sie wykonywac:
   print('parametr 1 ma wartosc:', parametr1)
   print('parametr 2 ma wartosc:', parametr2)
end

twojaFunkcjaDoWykonaniaKilkaRazyZParametrami(5, 1000, 'testowy test', 12345)

From Windows 10 to OTS development machine for dummies

I made this tutorial on clean machine just after installing Windows 10 Pro (64bit) on 2020-02-16.
Installing everything took around 1 hour.
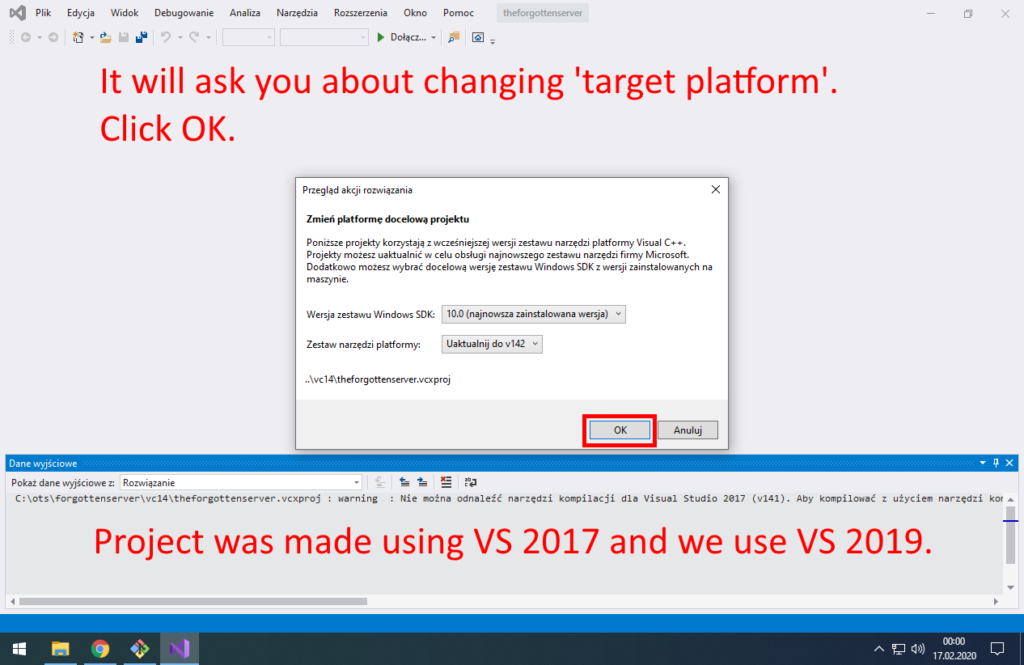
In this tutorial we will use Visual Studio 2019, not 2017 recommended for TFS compilation. It will work!

What do you need before start?

  • Windows 10
  • Web Browser (tutorial created with Google Chrome)

What will you have after completing this tutorial?

  • GIT client integrated with Windows 10
  • ‘linux console’ integrated with Windows 10
  • Visual Studio 2019 Community with C++ dev tools – IDE that let you compile TFS/OTClient easily (generate ‘.exe’ file)
  • vcpkg – C++ Library Manager for Windows, it will let you compile TFS/OTClient without searching for C++ libraries for hours
  • IDEA Community Edition with EmmyLUA plugin – free version of IDE that let you manage ‘data’ folder easily (XML and LUA files)
  • MariaDB database, PHP 7.4 and Apache2 server – website for your OTS
  • The Forgotten Server 1.2+ running on your PC
  • Gesior2012 for TFS 1.2+ running on your PC

1. Install GIT for Windows with environment integration

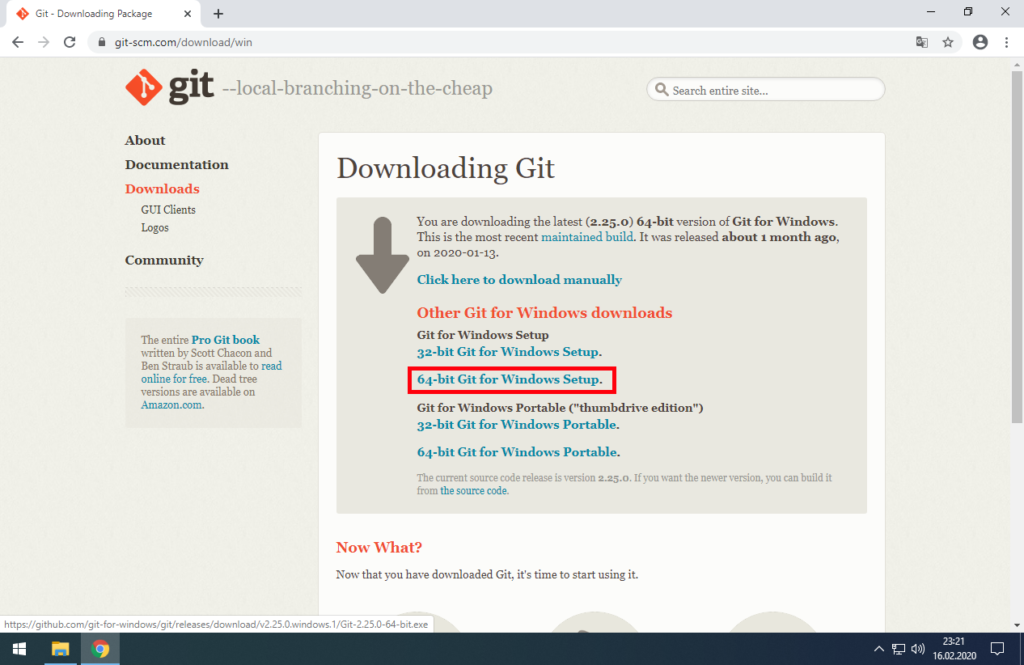
Download it from site (version 64-bit Setup): https://git-scm.com/download/win
‘Setup’ version will integrate Git with Windows explorer.

Download 64-bit Git for Windows Setup.
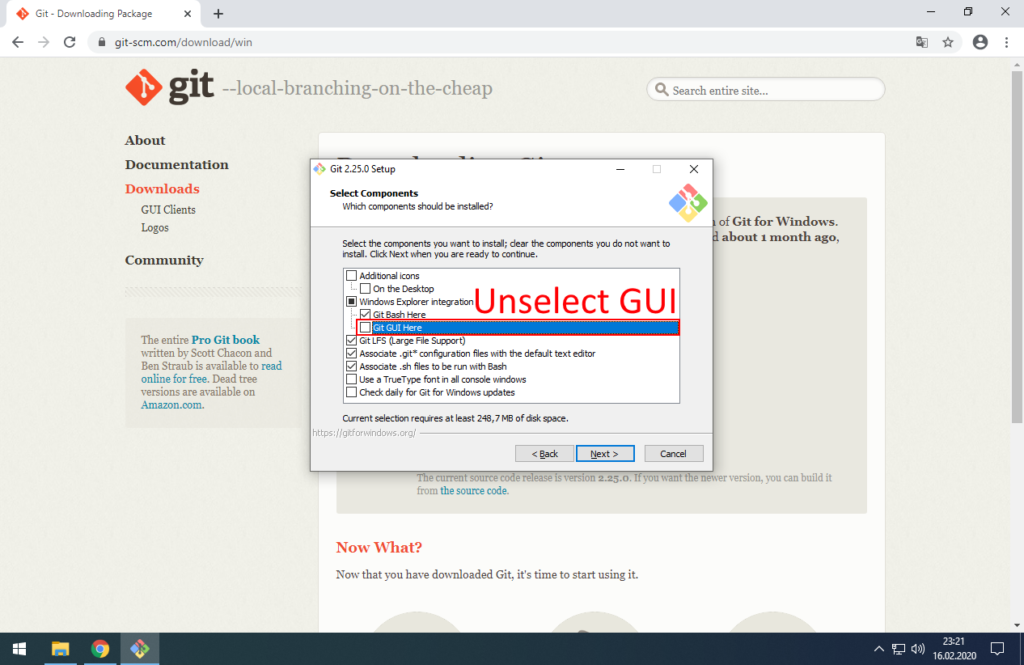
Unselect GUI option. It’s useless. You will have better Git GUI in IDEA.
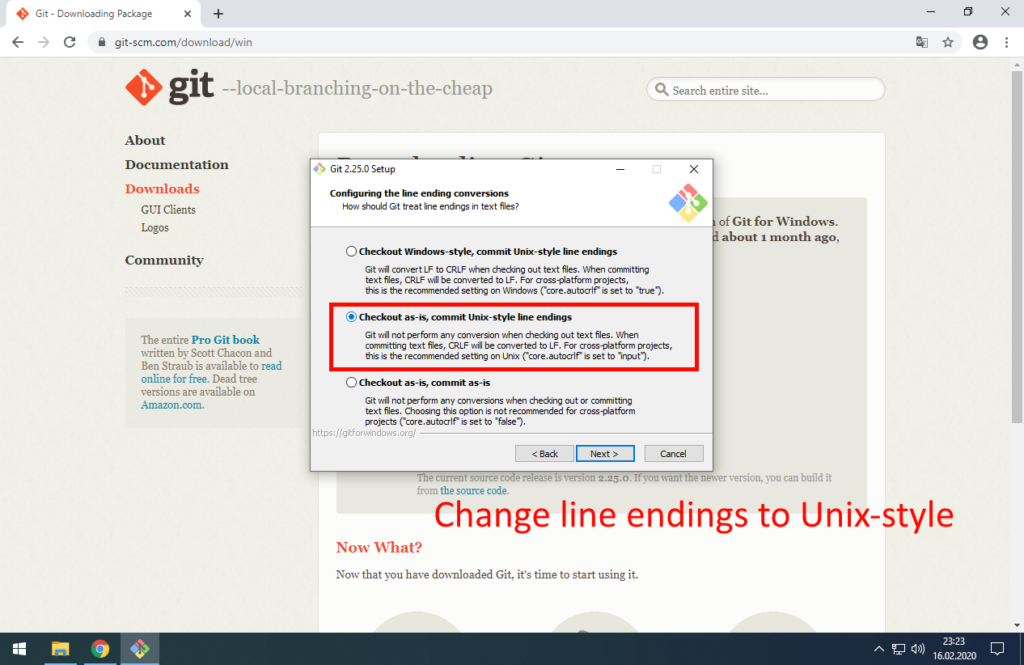
Change line ending to ‘as is’. On GitHub most of code uses Unix-style endings.

2. Install Visual Studio 2019 Community with C++

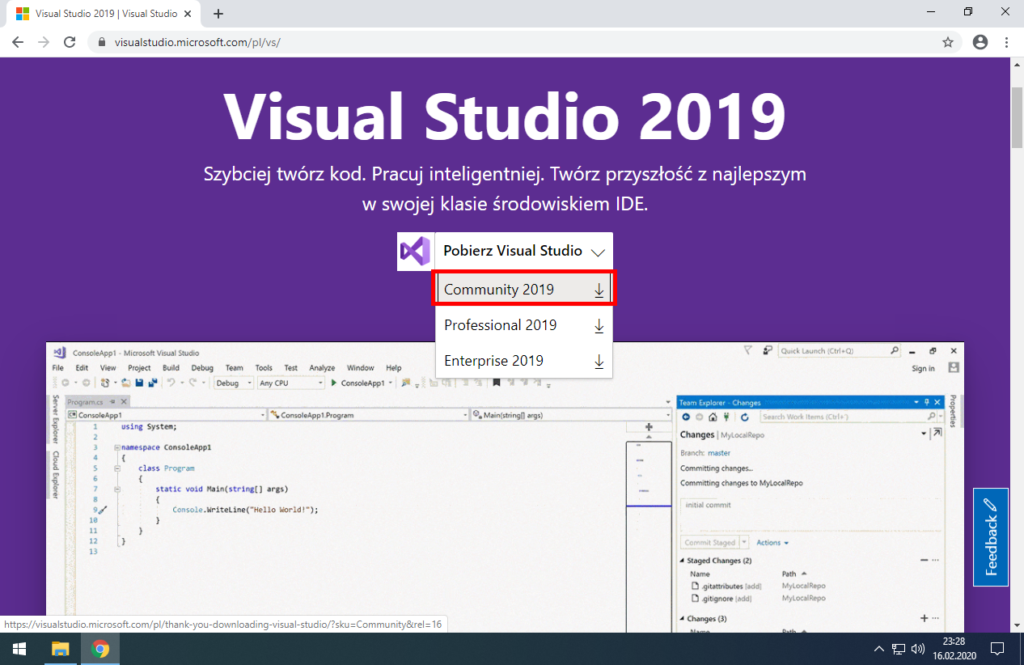
Download it from site: https://visualstudio.microsoft.com/vs/

Select “Community” version. It will start download. After download run installer.
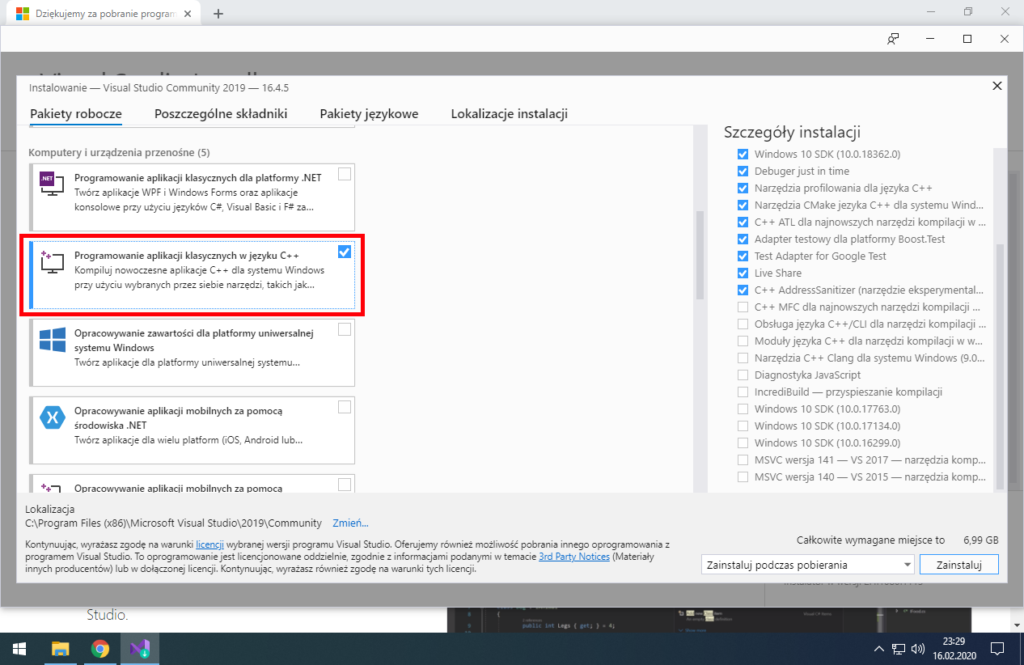
Select packet “Programming classic applications in C++”.
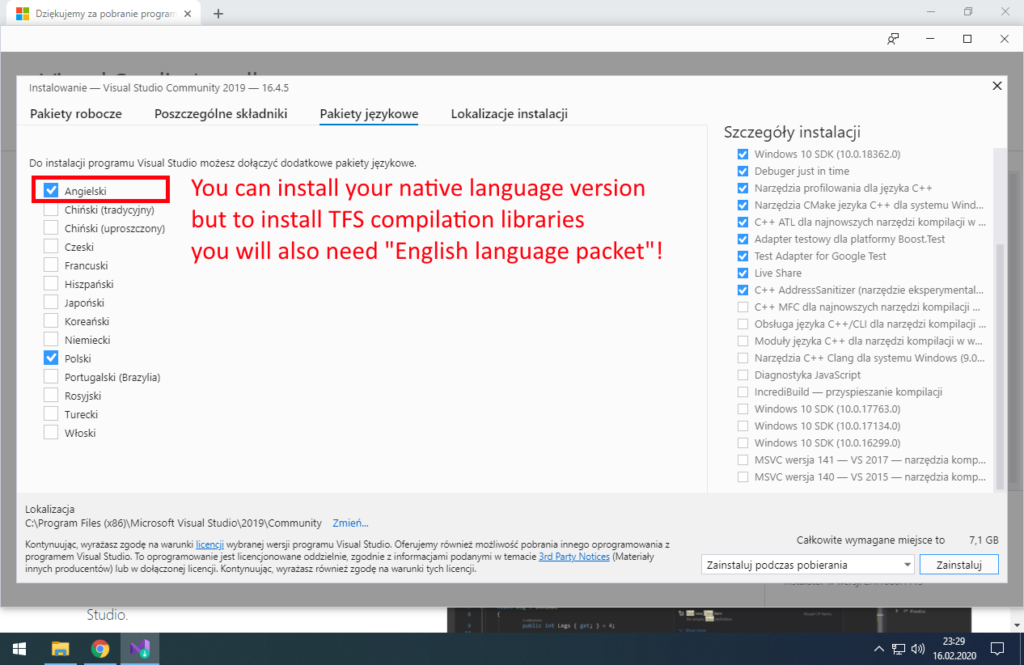
Select packet “English language”. It’s required to install TFS compilation libraries.
After installation run Visual Studio for first time to make it configure itself.
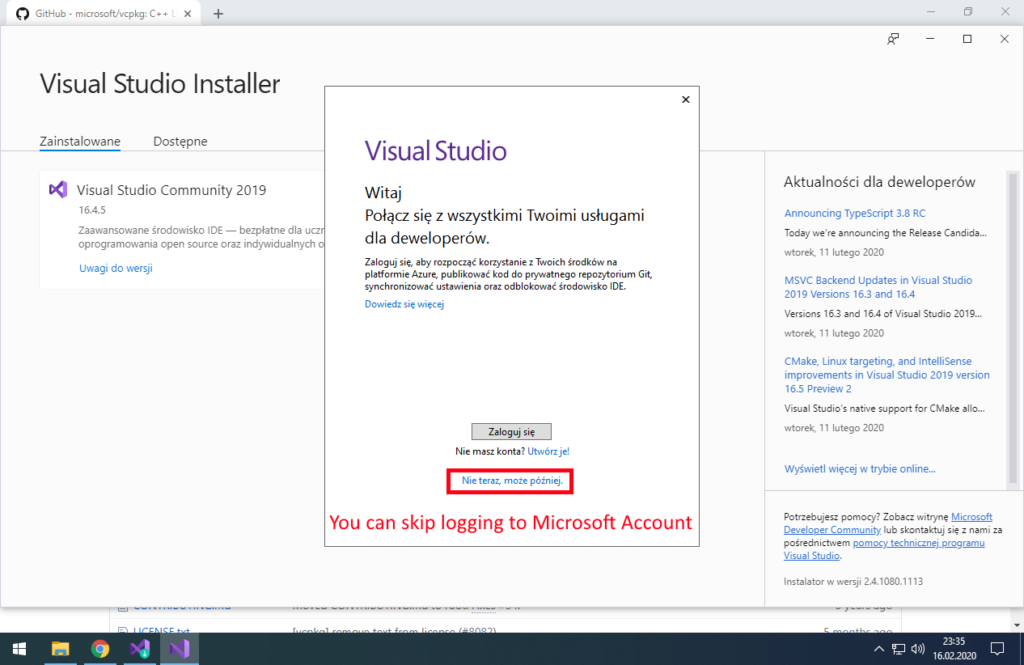
You don’t need Microsoft Account to use it. Click ‘Not now, maybe later’.

3. Install vcpkg – C++ library manager for Windows

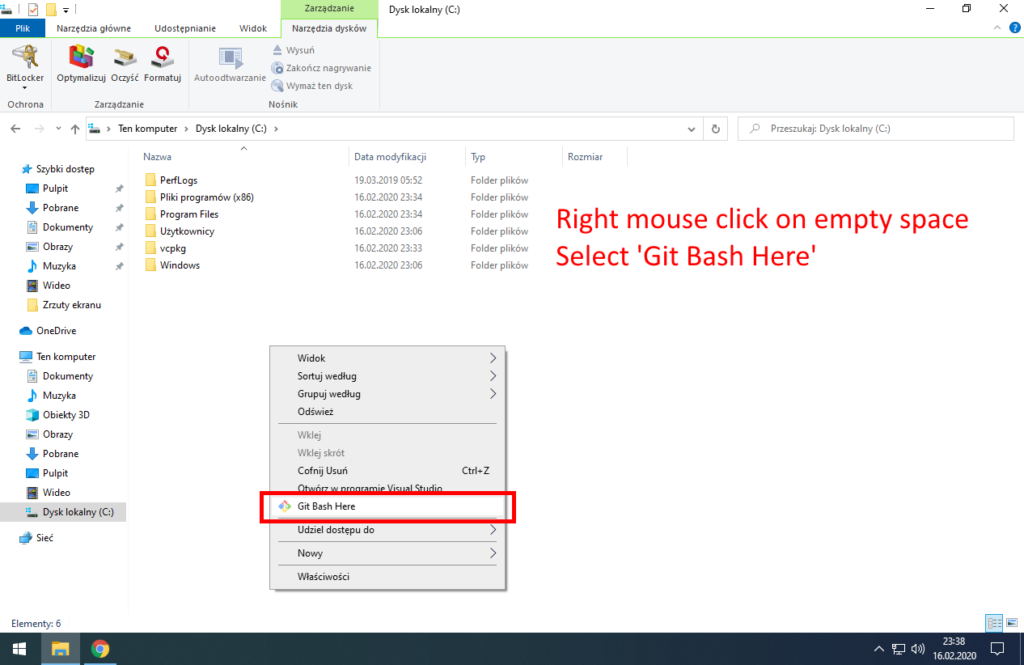
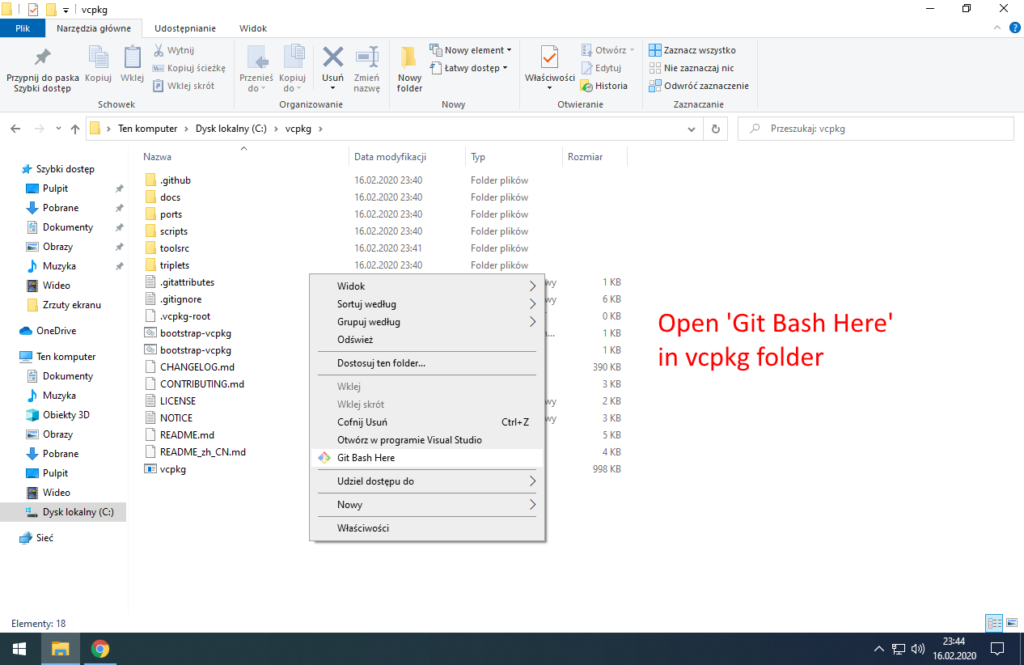
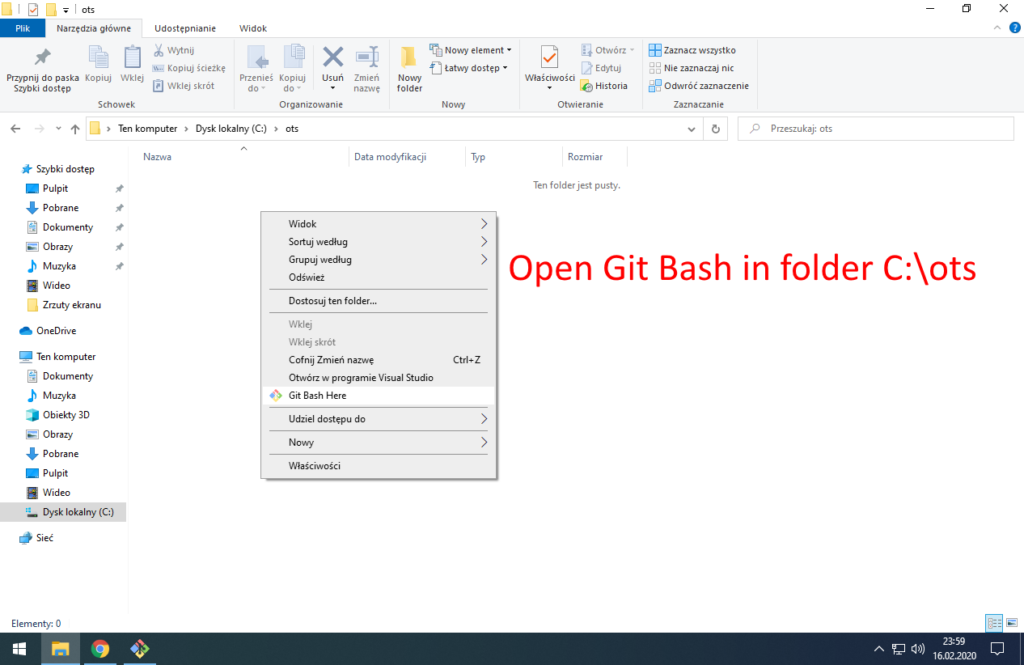
Open Git Bash (‘linux console’) in folder ‘C:\’
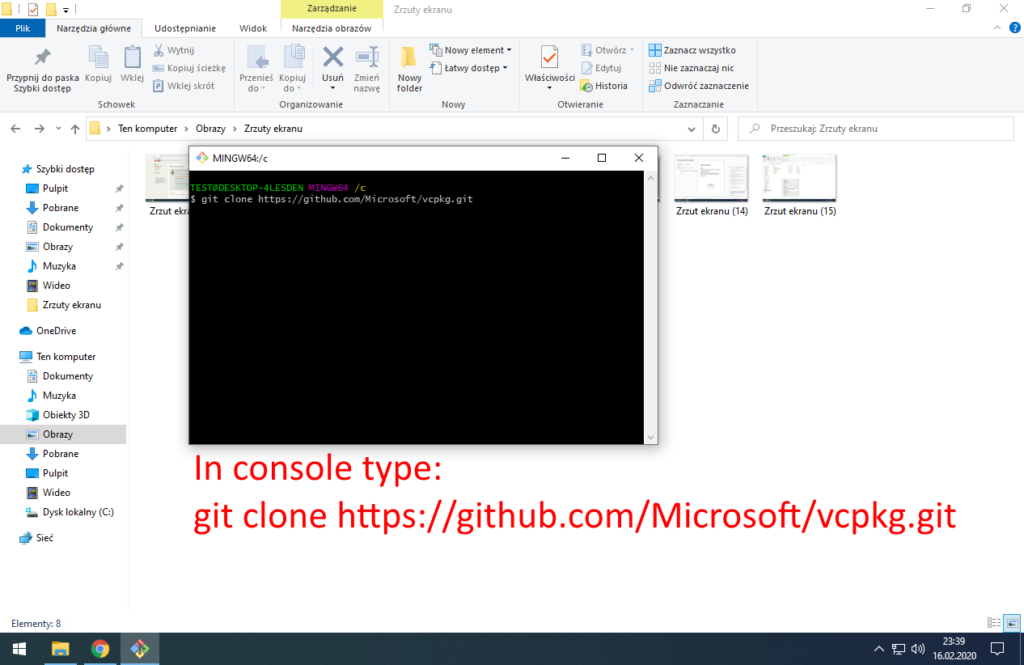
Type in console: git clone https://github.com/Microsoft/vcpkg.git
git clone https://github.com/Microsoft/vcpkg.git
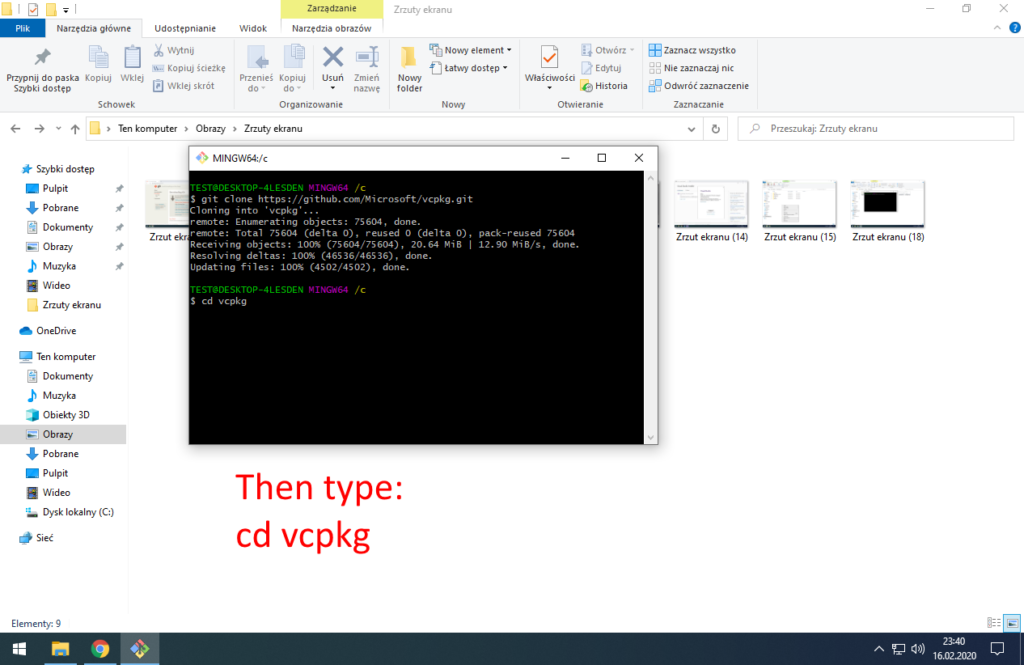
Type in console: cd vcpkg
cd vcpkg
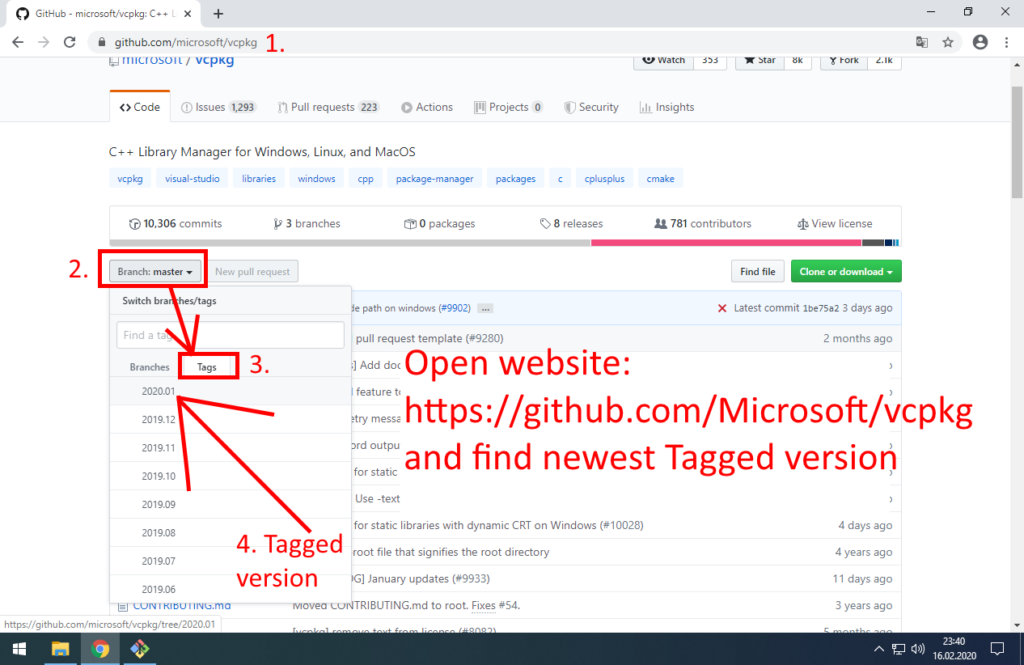
Open website: https://github.com/Microsoft/vcpkg and find newest tagged version

Link: https://github.com/Microsoft/vcpkg
Newest tagged version should be stable. I tried master branch and it did not work with all libraries. You can always use old version, not newest. I used for this tutorial: 2020.01

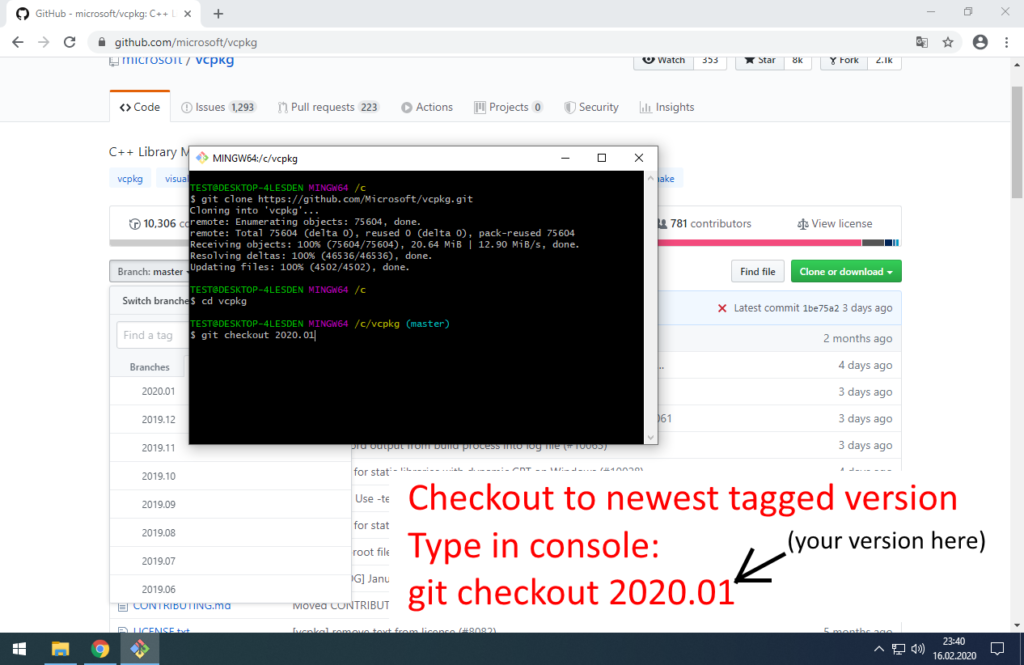
Type in console: git checkout 2020.01
git checkout 2020.01

It will switch version of vcpkg to version from 2020.01

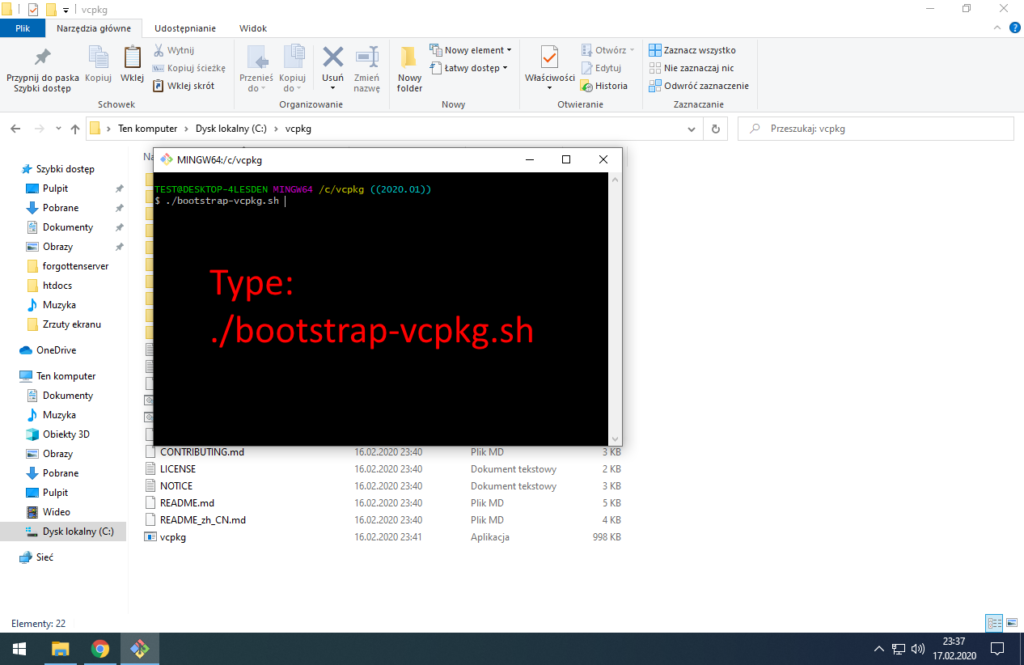
Type: ./bootstrap-vcpkg.bat
./bootstrap-vcpkg.bat

To build vcpkg. You must do it after downloading from GitHub and after every version change.
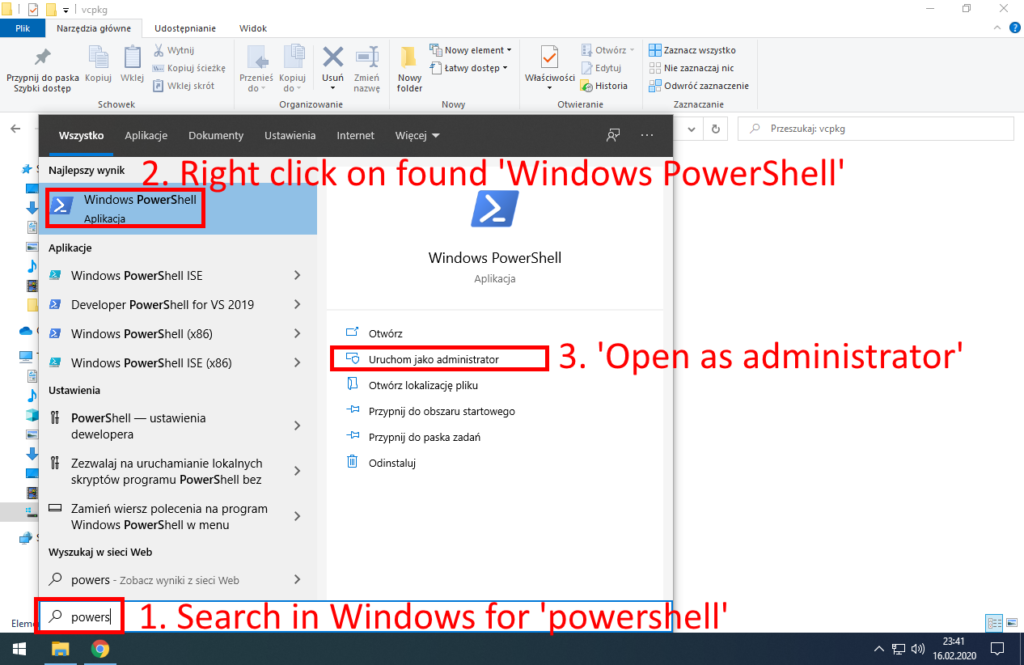
Run Windows PowerShell as Administrator (another black console..)
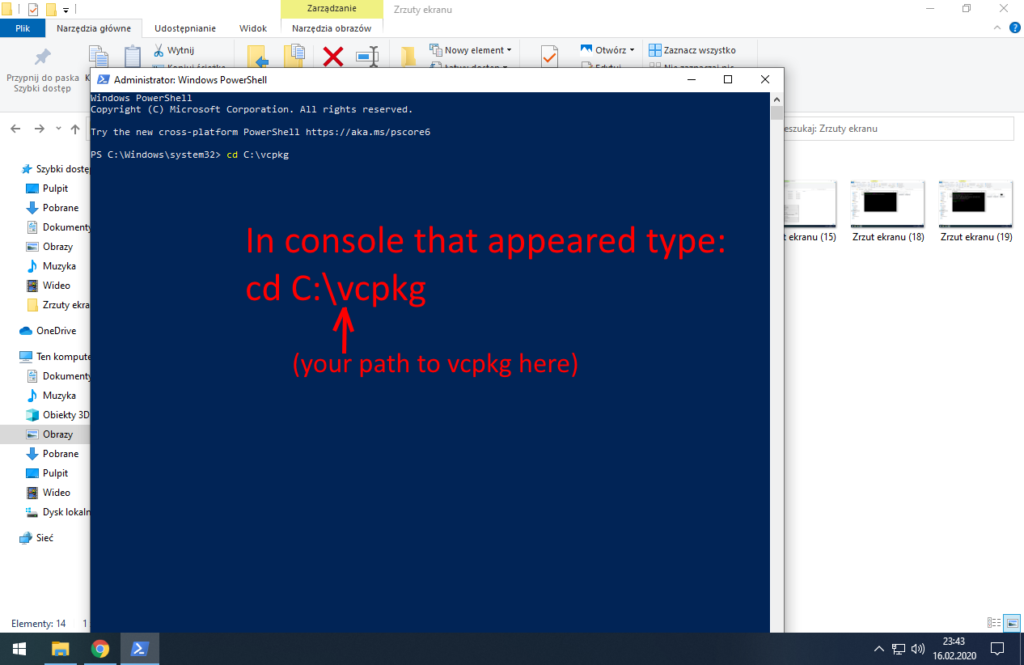
Change path in console to vcpkg path
Type: cd C:\vcpkg
cd C:\vcpkg
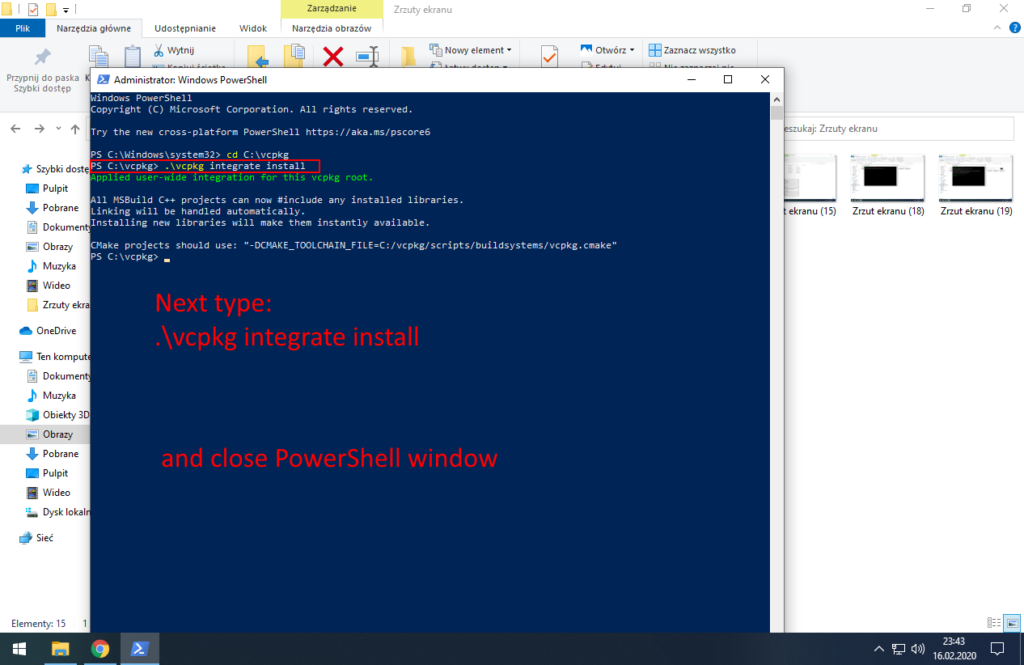
In console type: .\vcpkg integrate install
.\vcpkg integrate install

This will integrate vcpkg C++ library manager with Visual Studio we installed before.
After integrating with Visual Studio close PowerShell. We don’t need administrator rights anymore.

If you closed Git Bash console we opened at start, open it again in vcpkg folder.
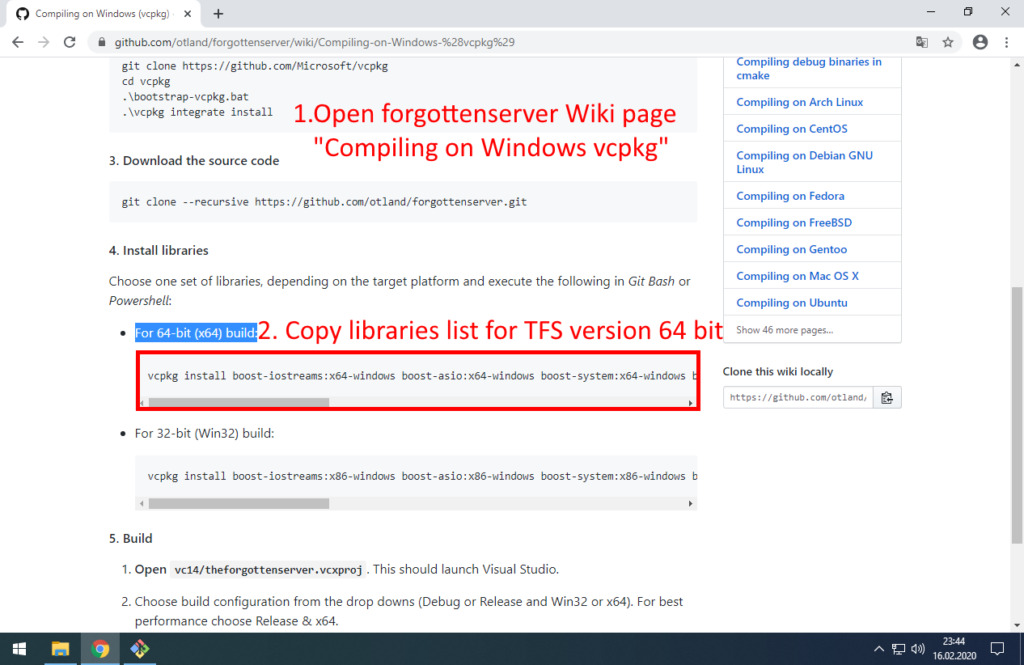
Copy current libraries list from official TFS wiki (for 64-bit): https://github.com/otland/forgottenserver/wiki/Compiling-on-Windows-%28vcpkg%29

Libraries list at 2020-02-17:

vcpkg install boost-iostreams:x64-windows boost-asio:x64-windows boost-system:x64-windows boost-filesystem:x64-windows boost-variant:x64-windows boost-lockfree:x64-windows luajit:x64-windows libmariadb:x64-windows pugixml:x64-windows mpir:x64-windows cryptopp:x64-windows
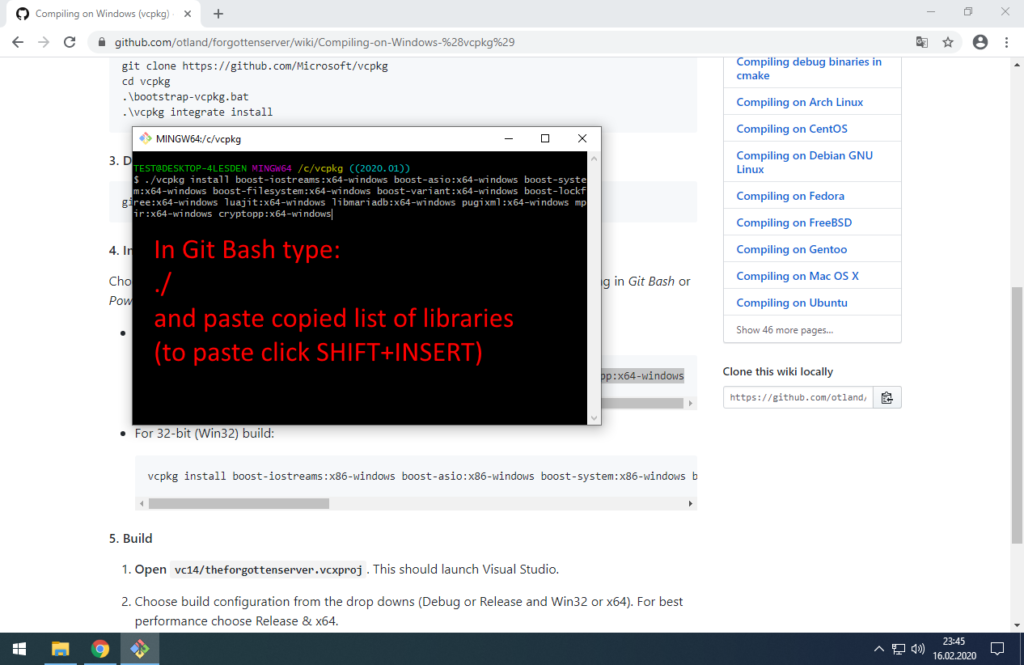
Type in console: ./ and paste list

./ means ‘run’

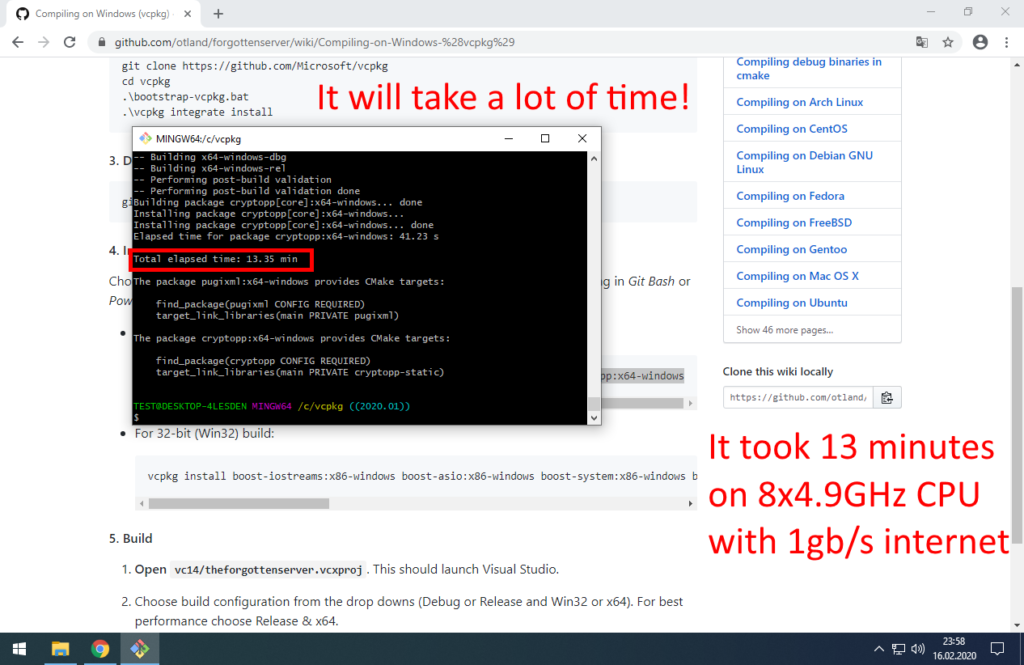
We got all libraries for TFS!

4. Download TFS and compile engine

Create folder:

C:\ots
Open Git Bash in folder C:\ots
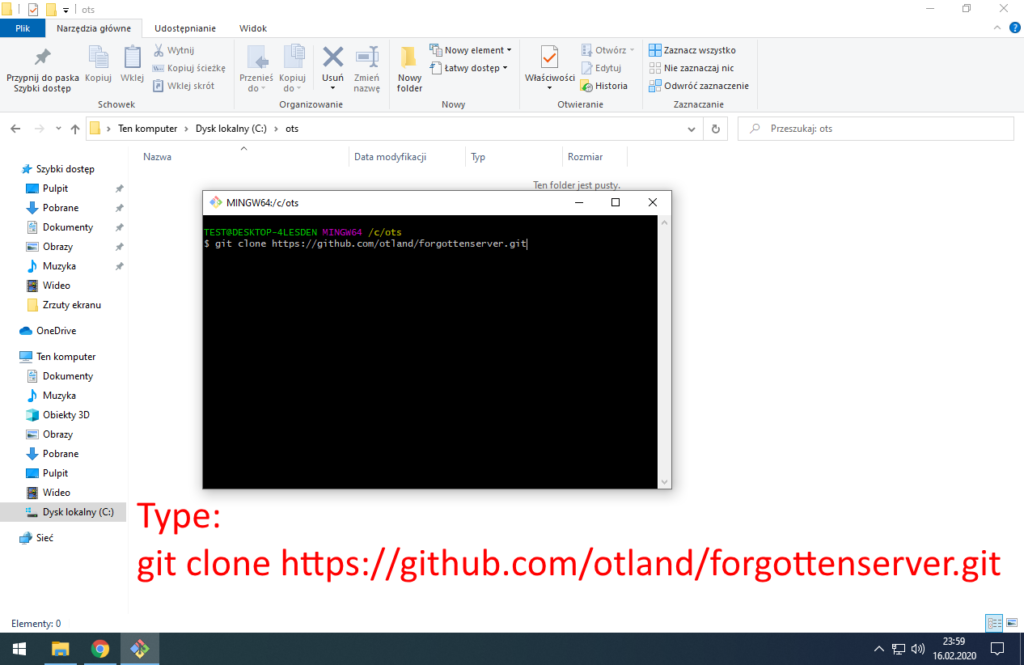
Download newest TFS. Type: git clone https://github.com/otland/forgottenserver.git
git clone https://github.com/otland/forgottenserver.git
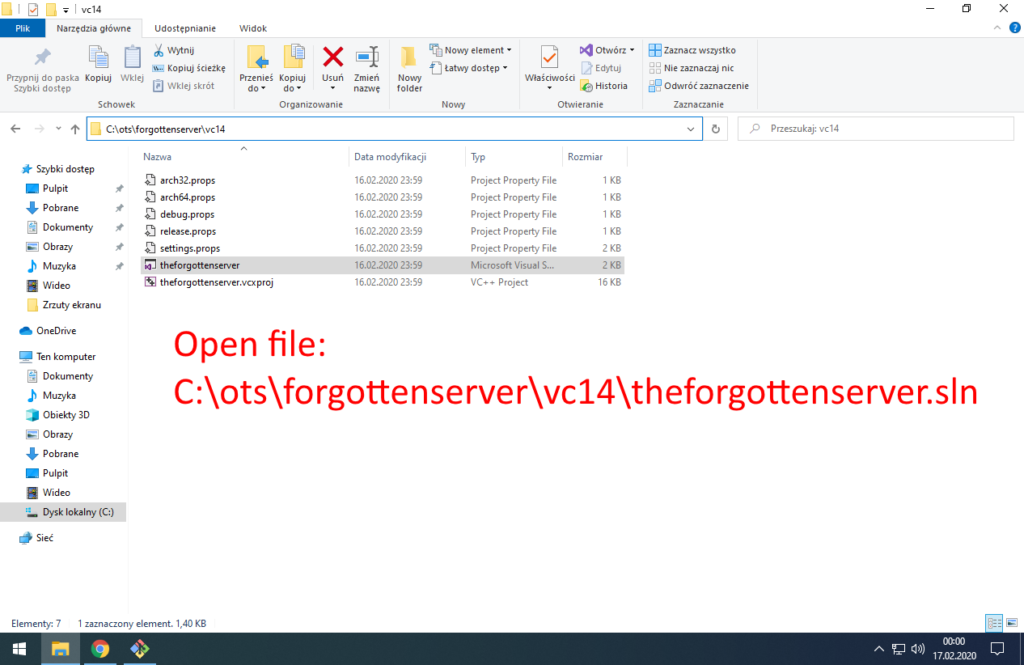
C:\ots\forgottenserver\vc14\theforgottenserver.sln

It will open TFS project in Visual Studio.

Click ‘OK’ when VS ask you about changing target platform.

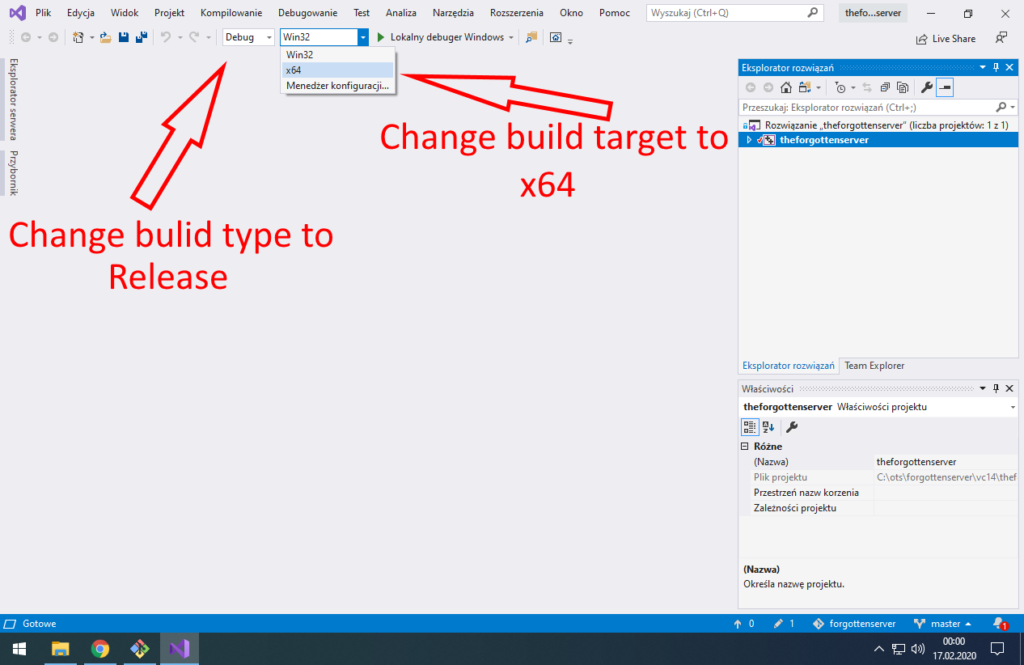
Change build type to Release and build target platform to x64.
Previously we installed C++ libraries for 64-bit platform – we can compile only 64-bit version.

If you plan to do many changes in sources and compile in often, you may try to use Debug build type.
It should link faster and reduce time of building solution.

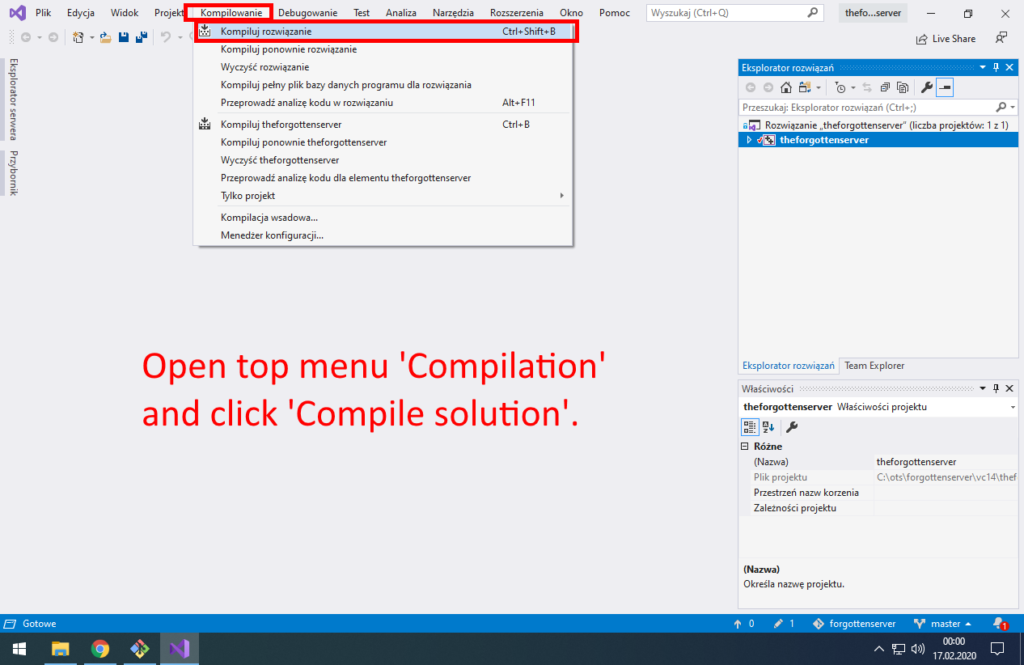
Start compilation of TFS. It can take few minutes.
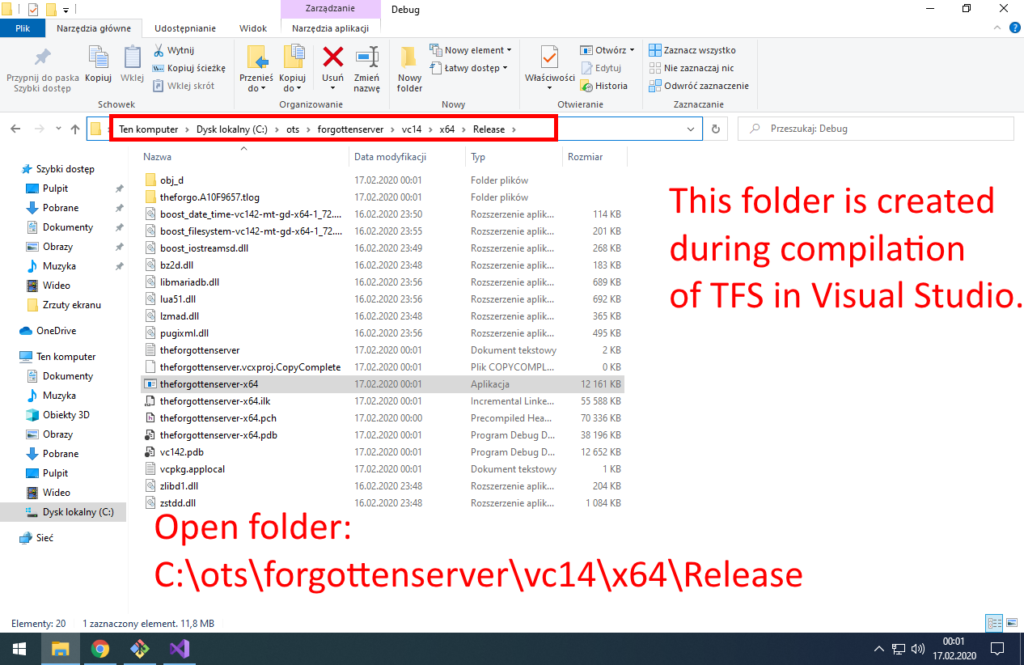
Open folder: C:\ots\forgottenserver\vc14\x64\Release
C:\ots\forgottenserver\vc14\x64\Release
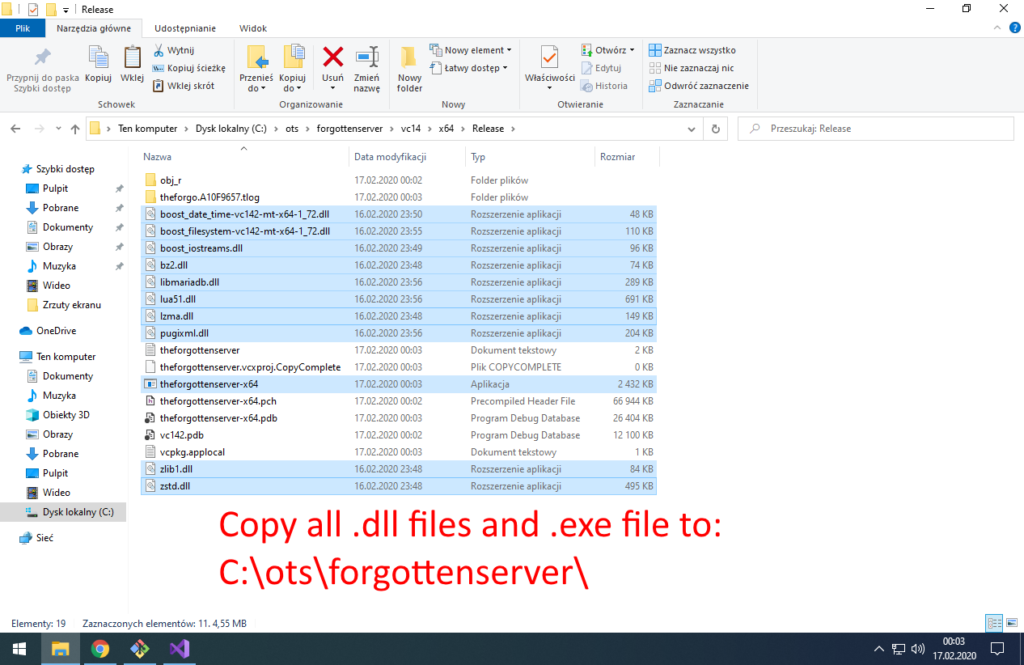
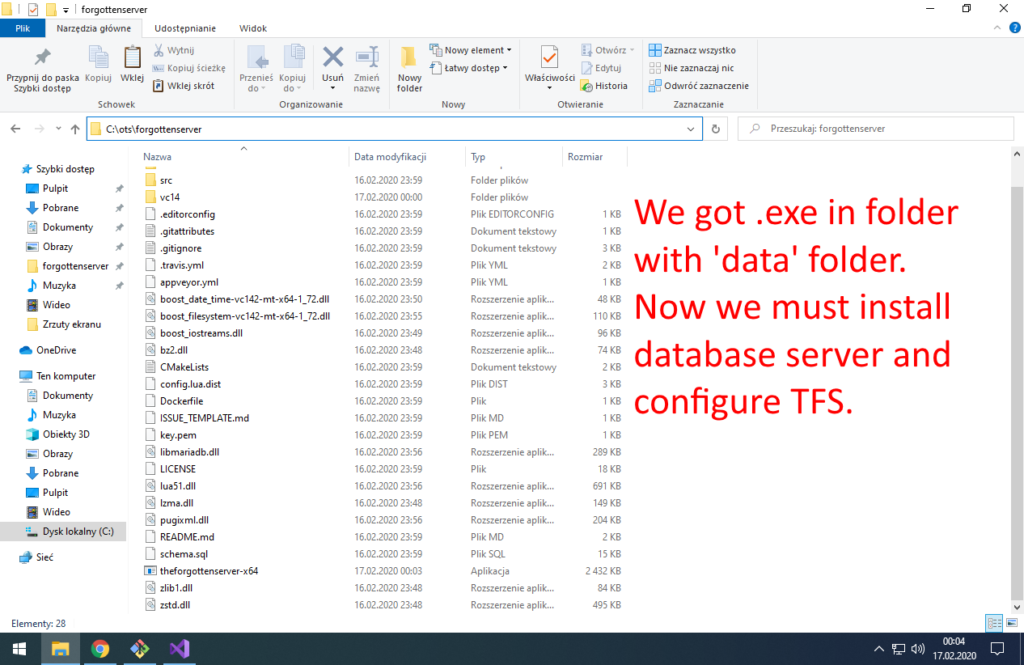
Copy all .dll files and .exe file to folder: C:\ots\forgottenserver\
C:\ots\forgottenserver\
TFS is ready. Now we need to install database server and import TFS database schema.

5. Install MariaDB, PHP and Apache2 servers

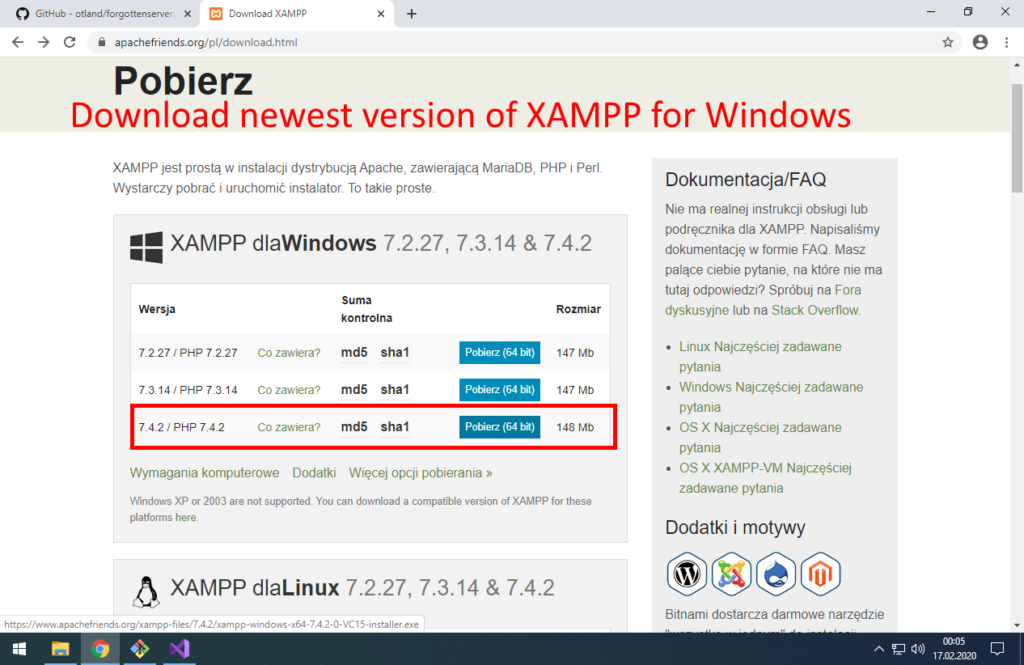
Download newest XAMPP for Windows.

Link: https://www.apachefriends.org/download.html

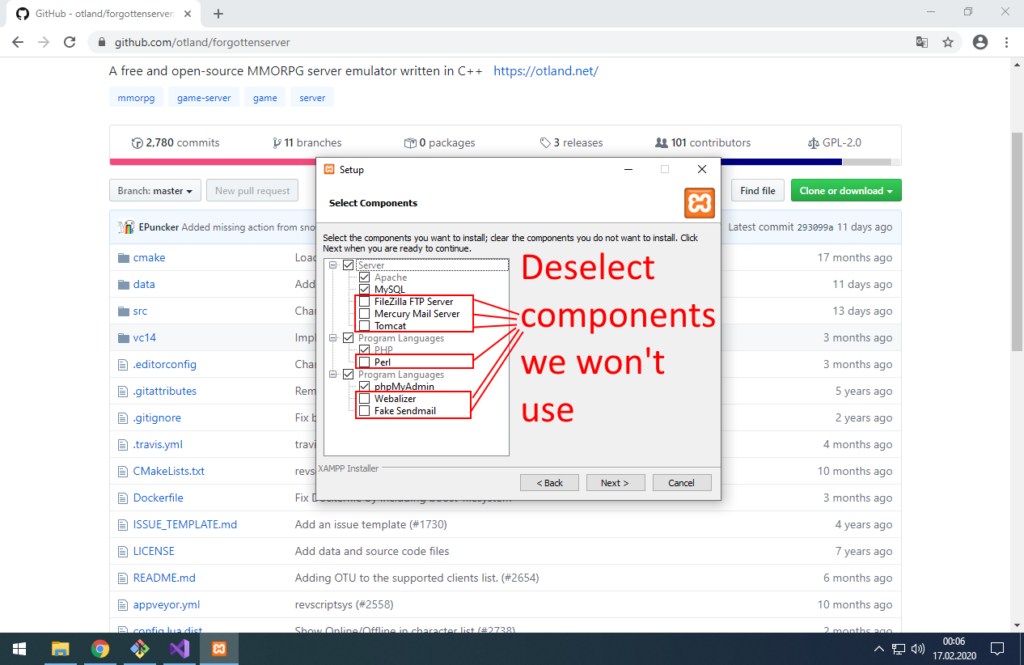
During installation deselect components we won’t use for OTS development.
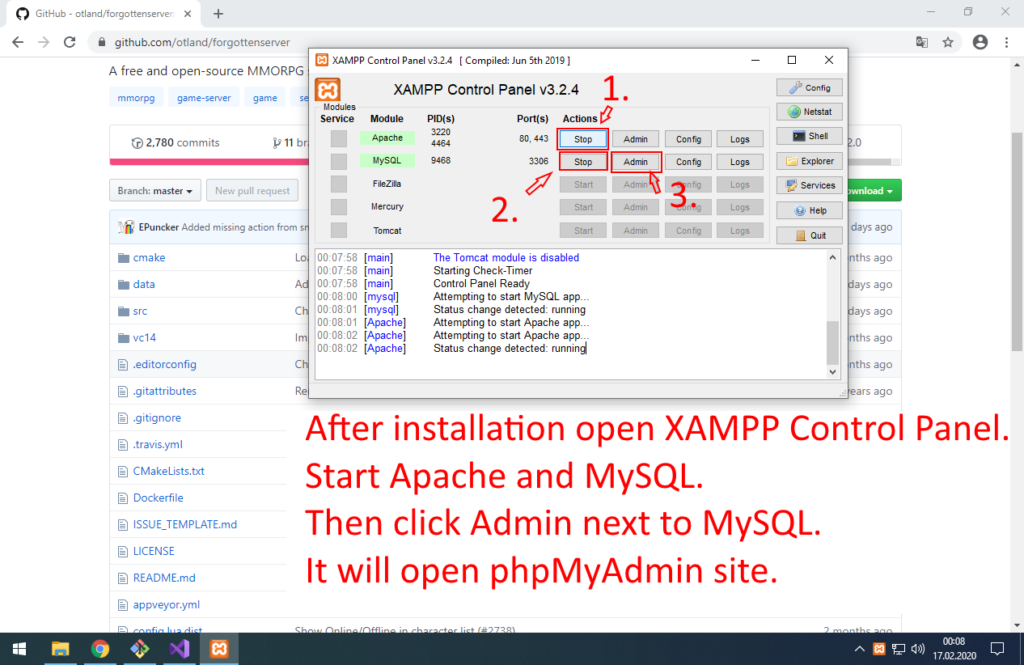
Start Apache, MySQL and open phpMyAdmin site (database administration site).

If Apache fails to start, it’s probably because some other application is already using port 80.
Common problem is Skype. Turn off Skype, start Apache, start again Skype – you got website and Skype working.

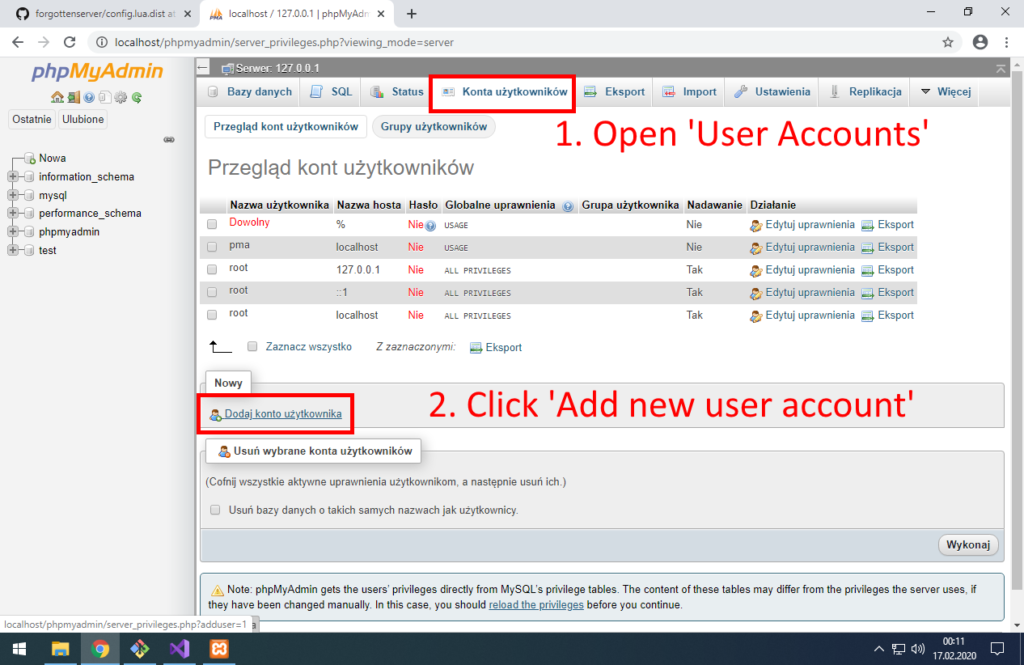
In phpMyAdmin open page with new user account configuration.
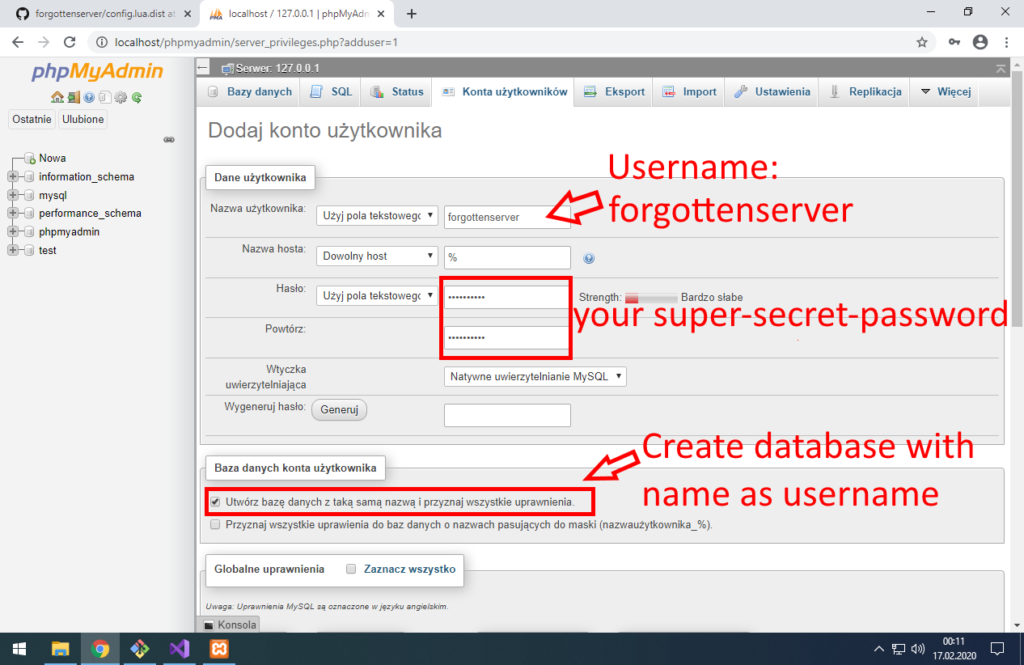
Type username forgottenserver
Type secure password for that user
Check ‘Create database with same name and grant all access.’
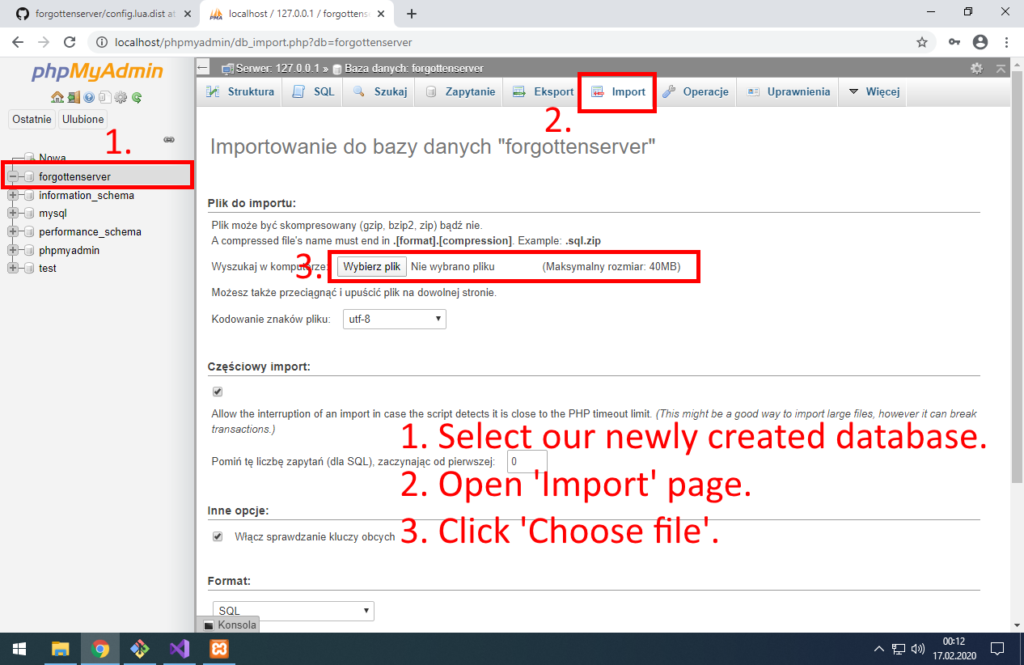
New database will appear in left panel. Click it and go to Import page.
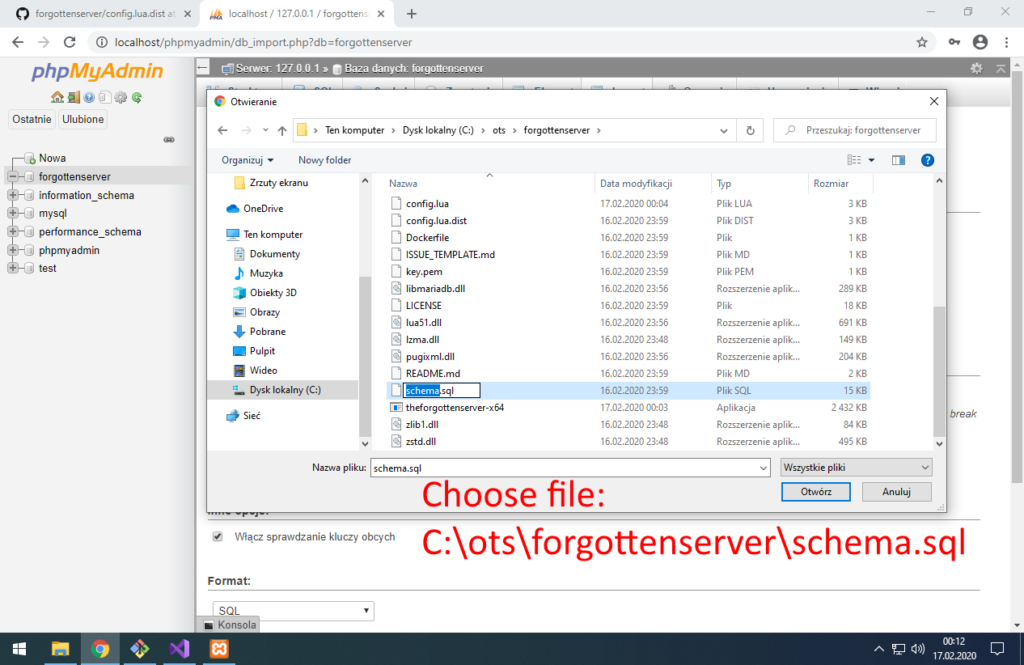
Choose file: C:\ots\forgottenserver\schema.sql
C:\ots\forgottenserver\schema.sql

and click Import.
We got database for our OTS! Time to configure game server.

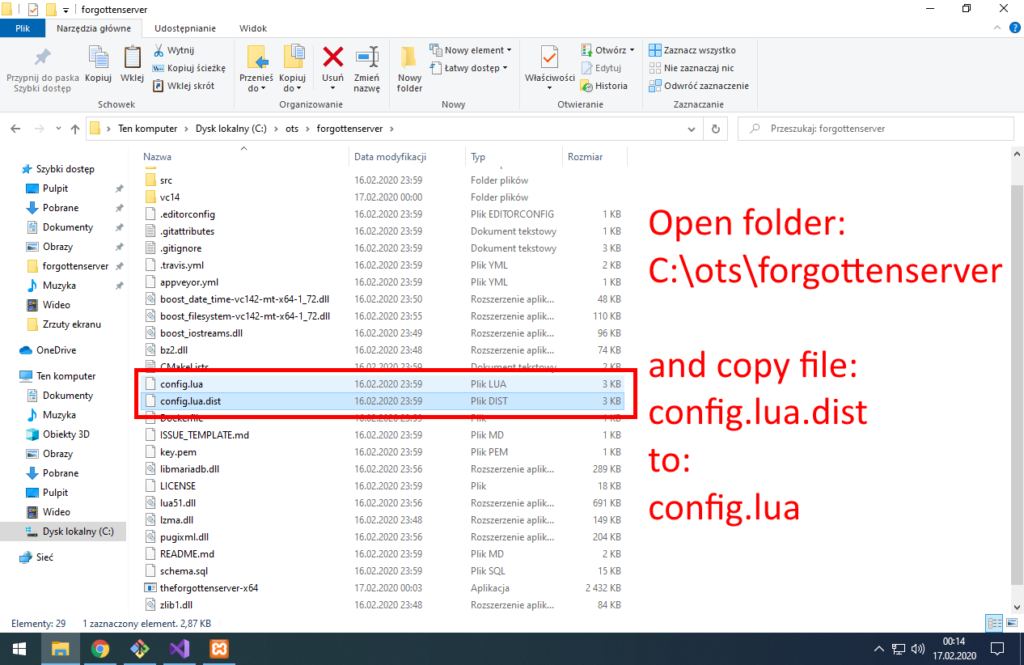
Open folder C:\ots\forgottenserver and copy file config.lua.dist to config.lua

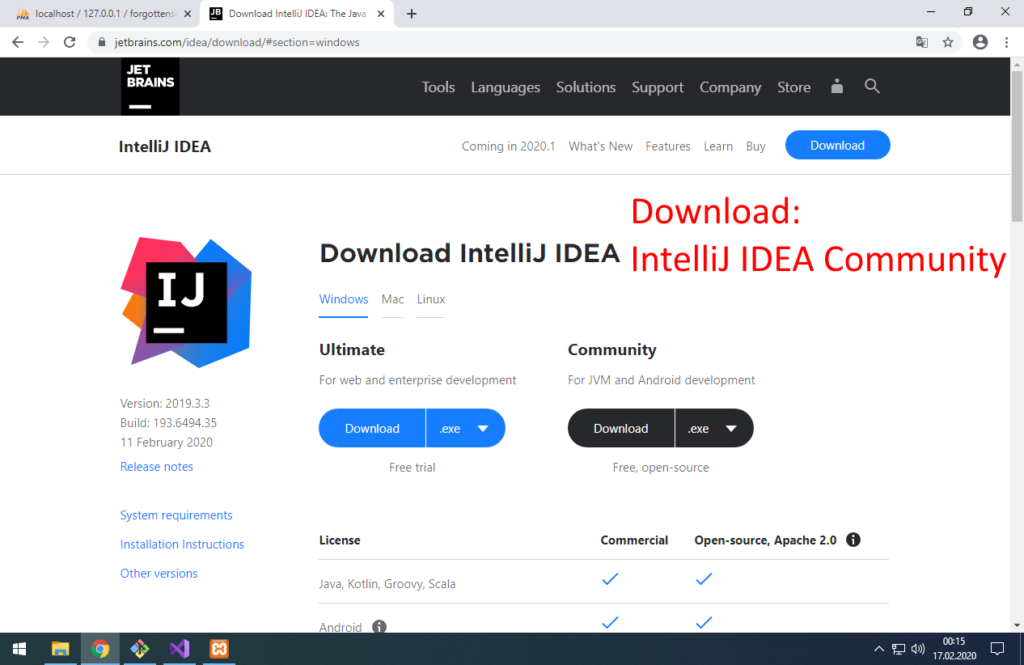
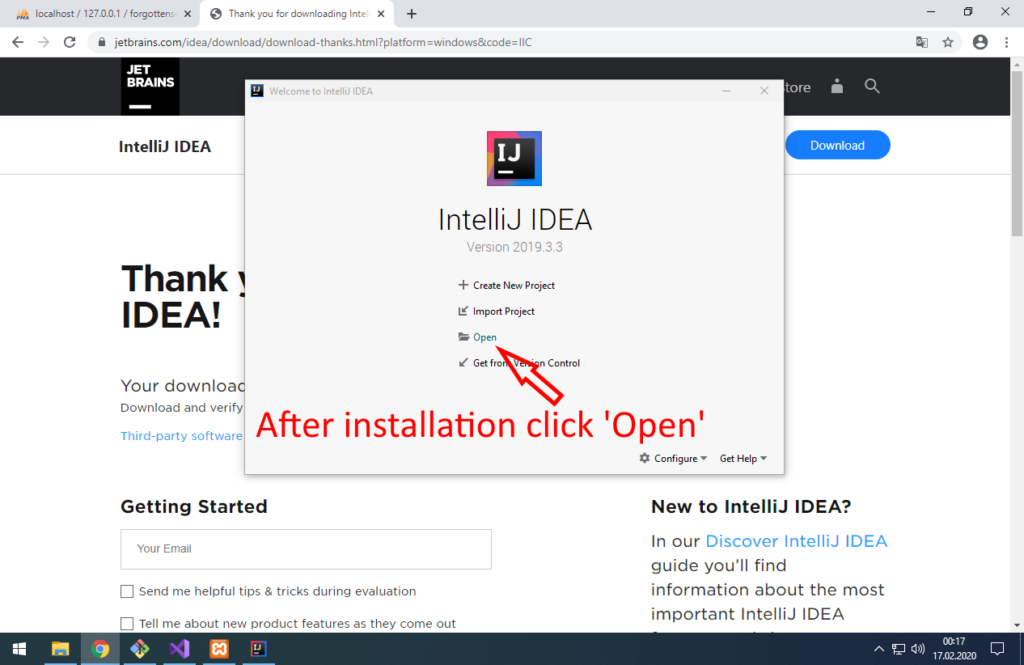
6. Install IntelliJ IDEA, configure game server and run it for first time!

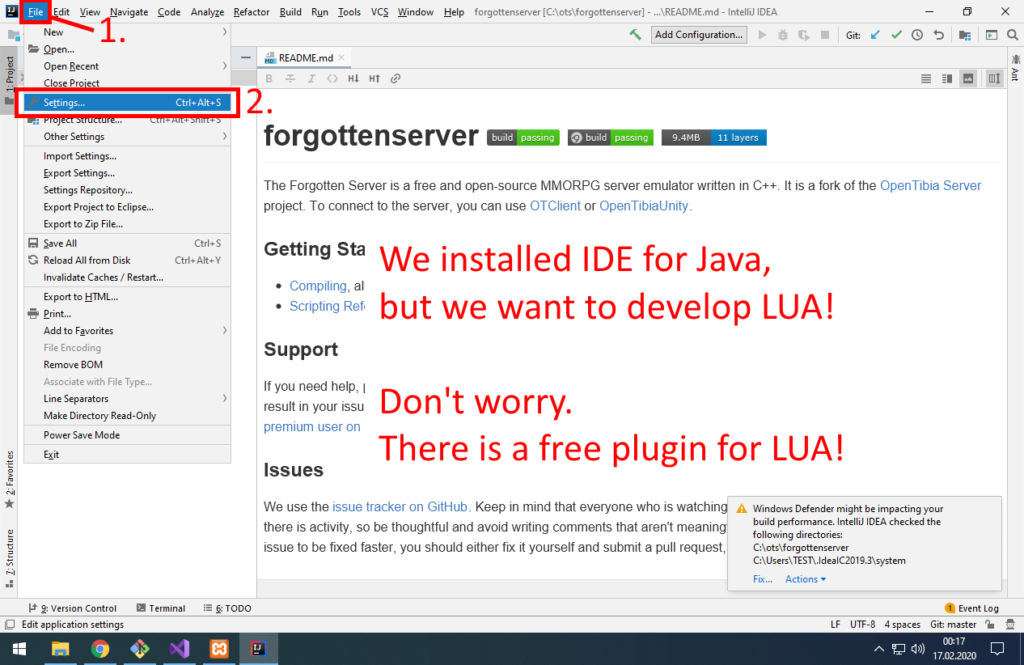
What is IntelliJ IDEA? It’s IDE for Java and Android development.
What is IDE? It’s ‘Integrated Development Environment’.
Why do I need it? To develop code faster, automatically detect simple bugs and make cleaner code.

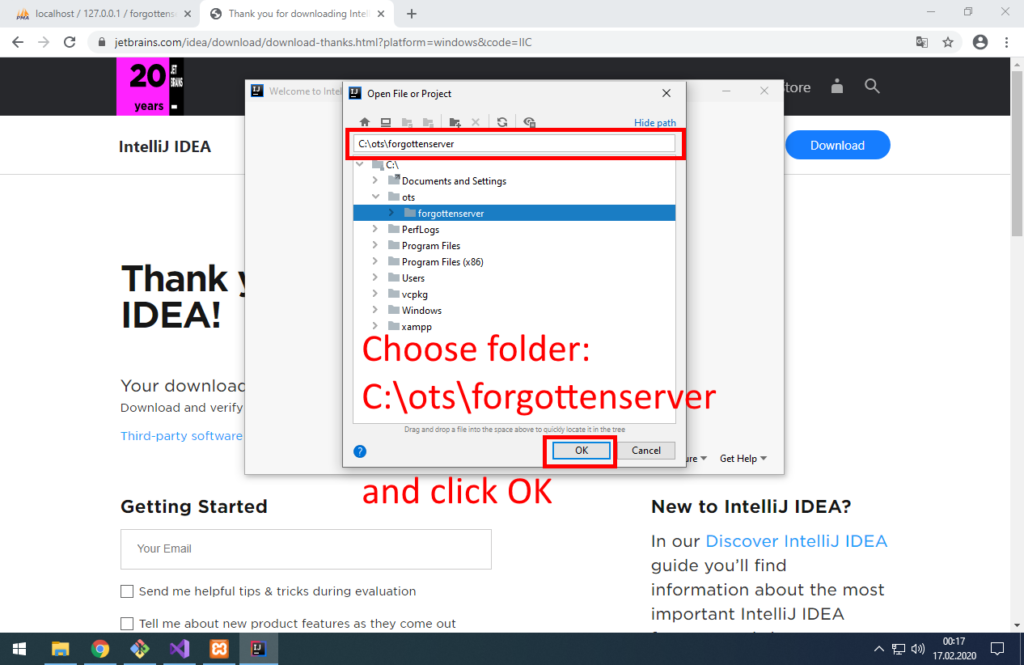
Choose folder: C:\ots\forgottenserver
C:\ots\forgottenserver
Open IntelliJ IDEA Settings
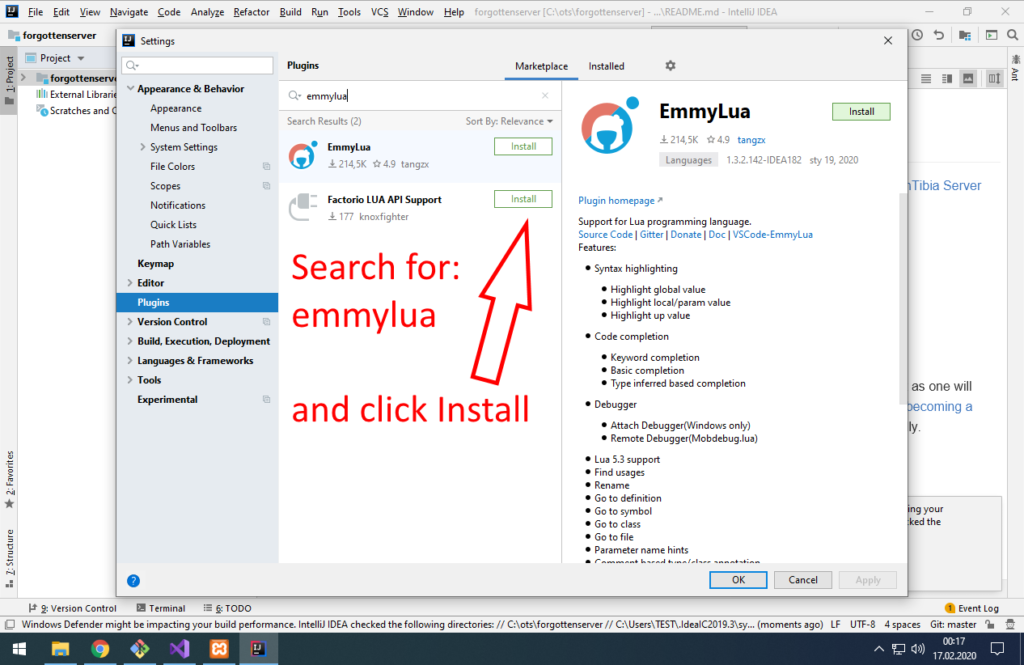
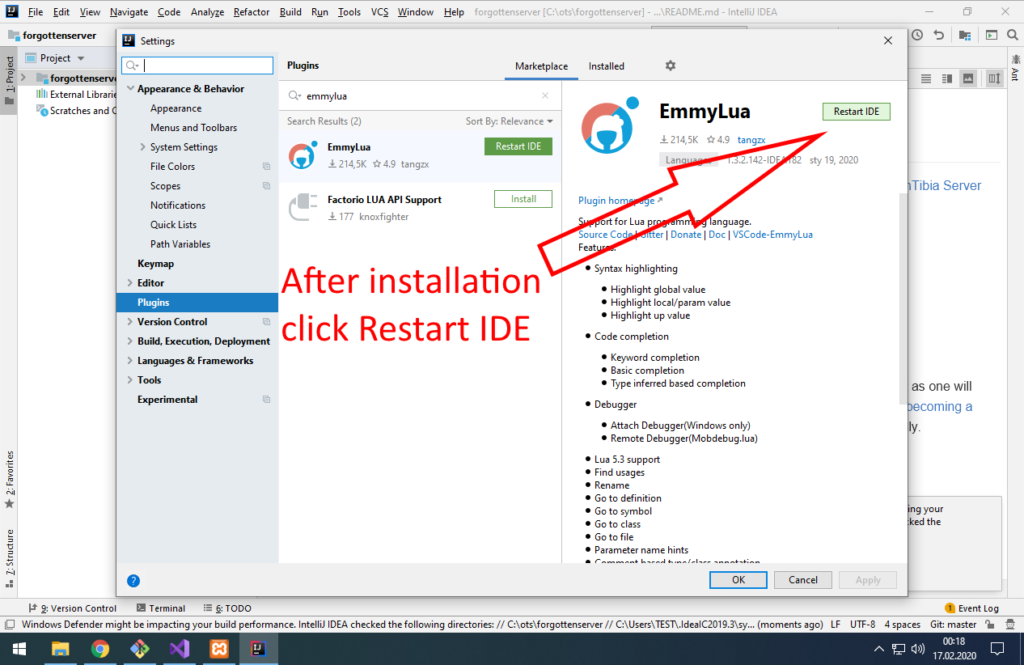
Go to Plugins and install EmmyLua
Restart IDE to make it work with LUA
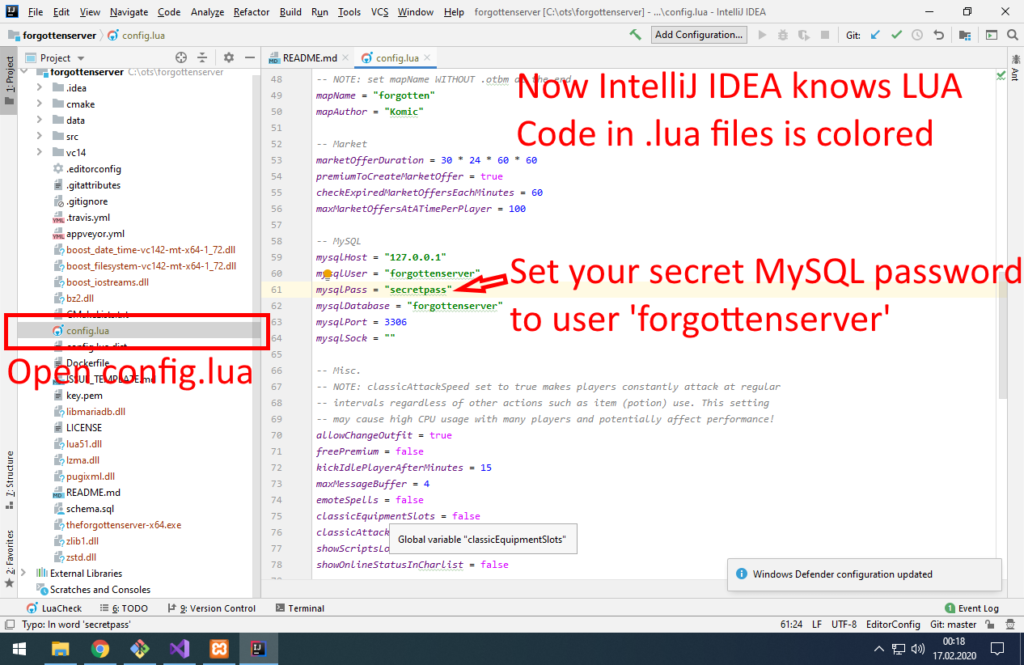
Configure your password to database user forgottenserver in file config.lua
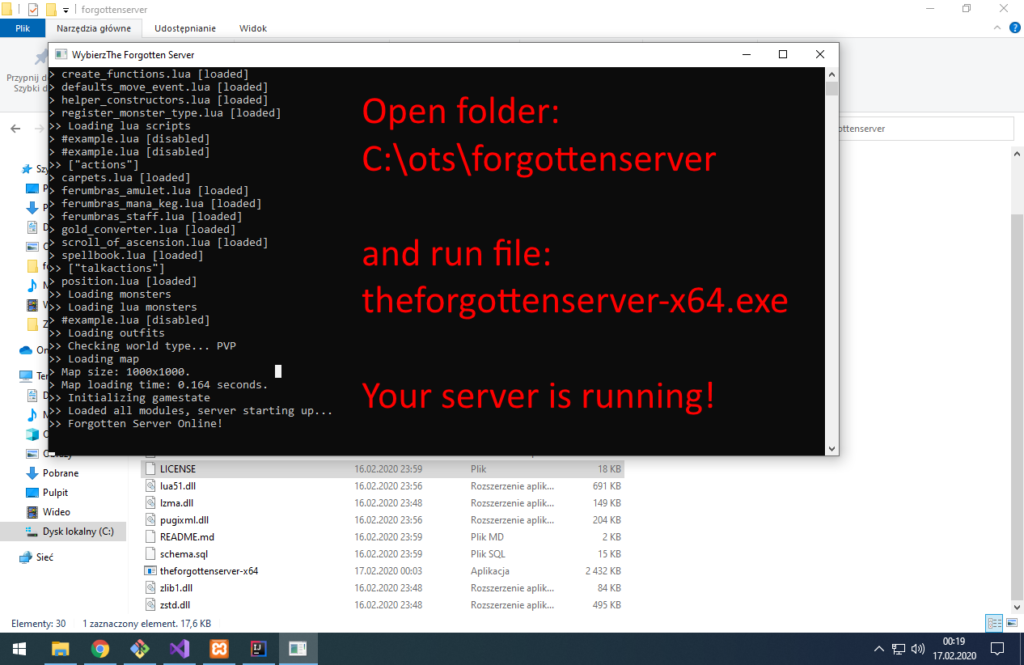
Your server is running!

7. Install website (Gesior2012)

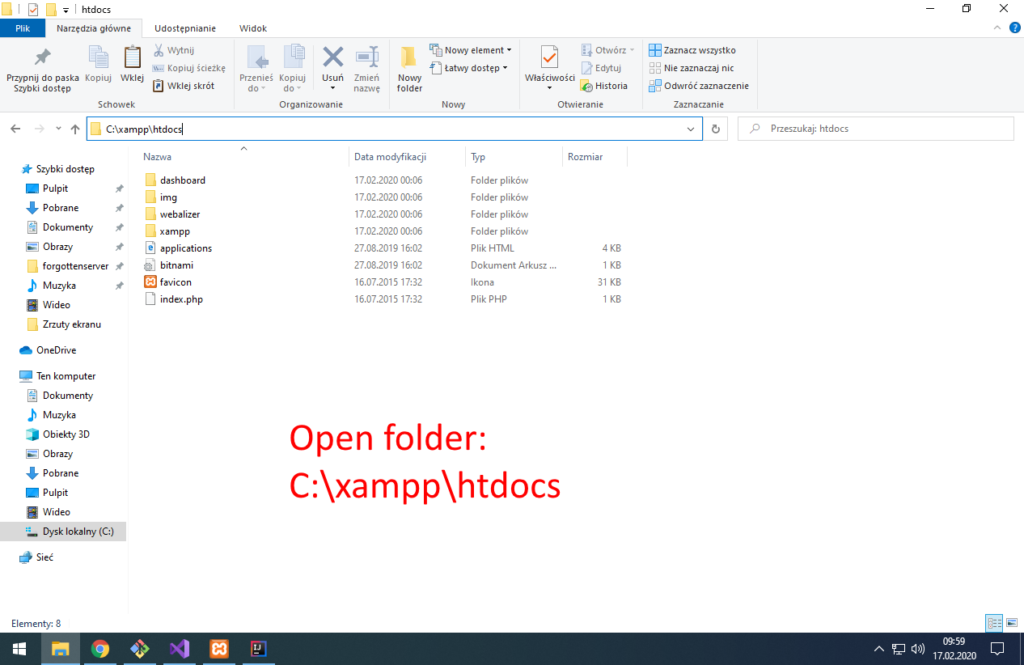
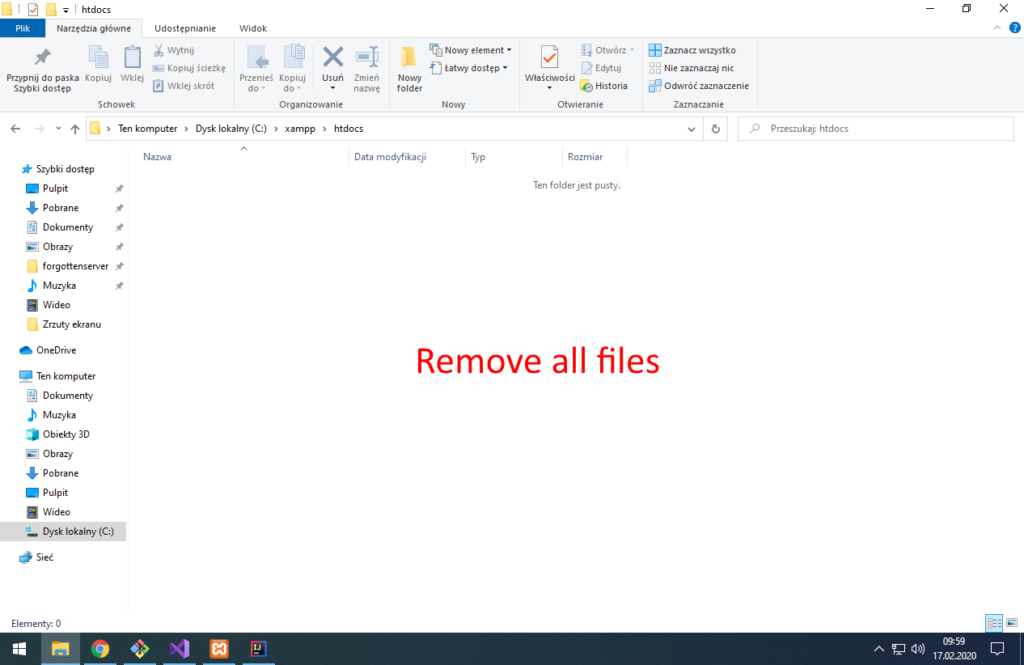
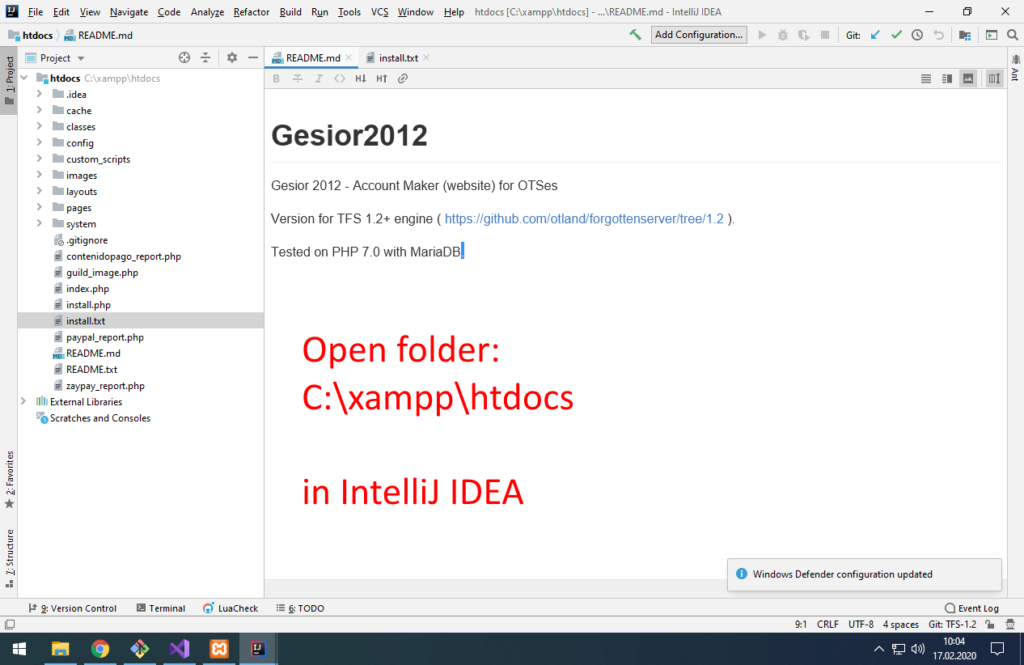
Open folder: C:\xampp\htdocs
 C:\xampp\htdocs
Remove all files from C:\xampp\htdocs
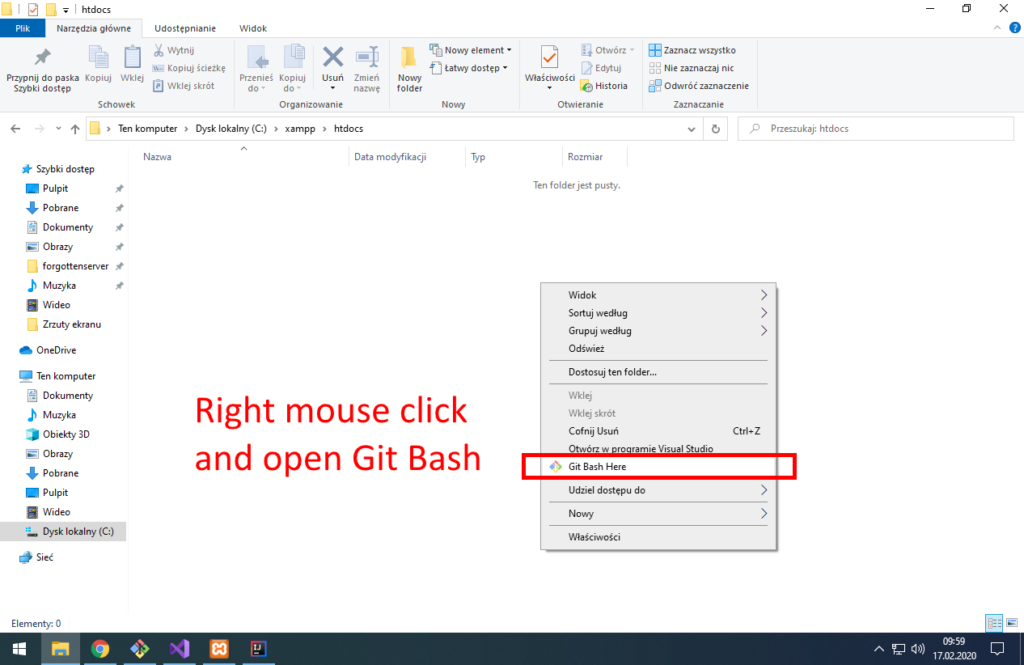
Open Git Bash in folder C:\xampp\htdocs
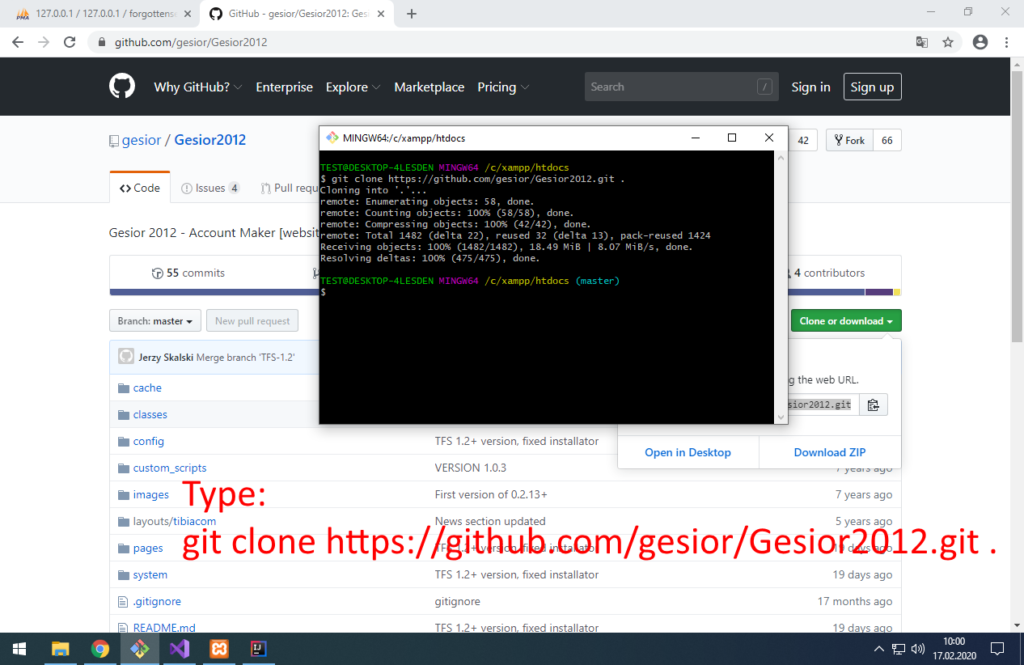
Type: git clone https://github.com/gesior/Gesior2012.git .
git clone https://github.com/gesior/Gesior2012.git .

Yes. There is space and dot at end. We want to download Gesior2012 to current folder. Not to folder C:\xampp\htdocs\Gesior2012

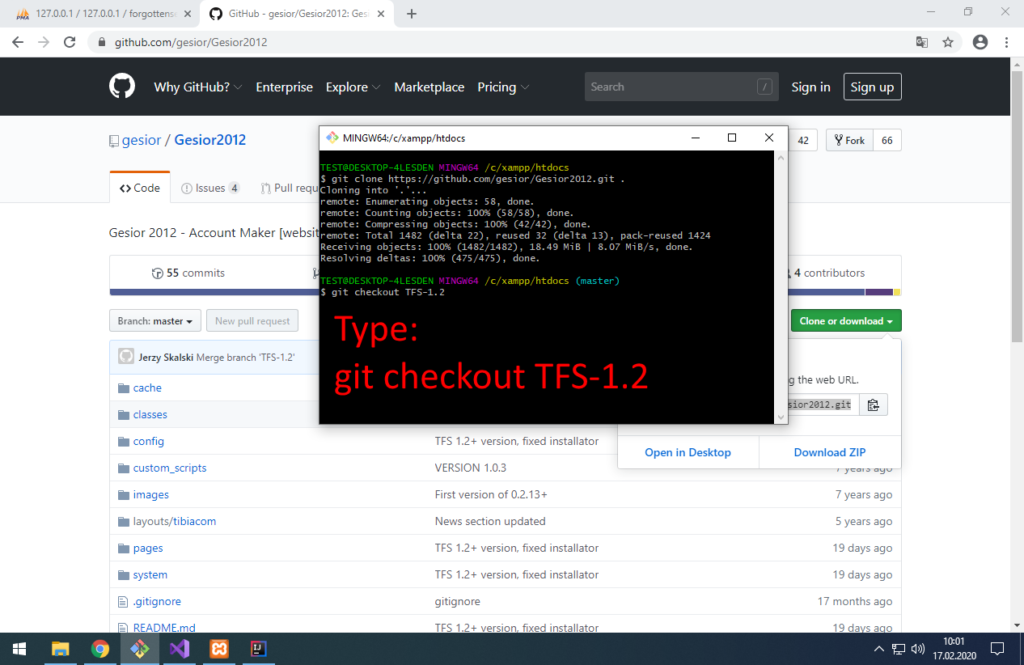
Type: git checkout TFS-1.2
git checkout TFS-1.2

Change Gesior2012 version to TFS-1.2 (exactly change git branch to TFS-1.2)
Same as we did during vcpkg installation. Download from GitHub with git clone and then change version.

From now you will edit every directory in IntelliJ IDEA 🙂

PHP files are not colored in IntelliJ IDEA Community edition 🙁
LUA plugin is free, but PHP is available only in IntelliJ IDEA Ultimate (paid / 30 days trial) or as separate application PHPStorm (it’s IntelliJ IDEA with PHP plugin).

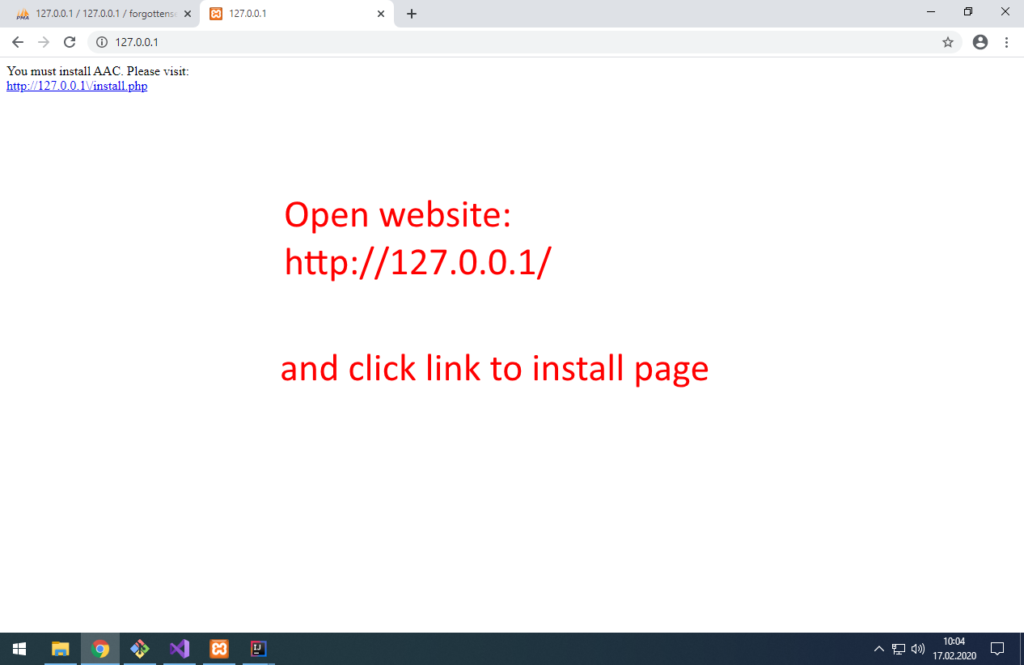
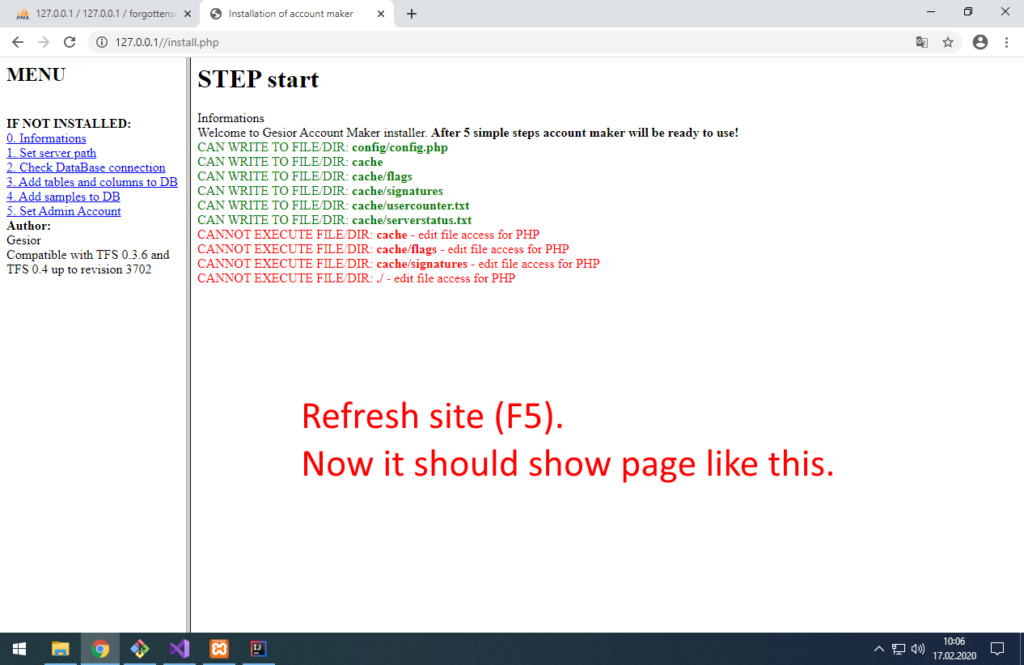
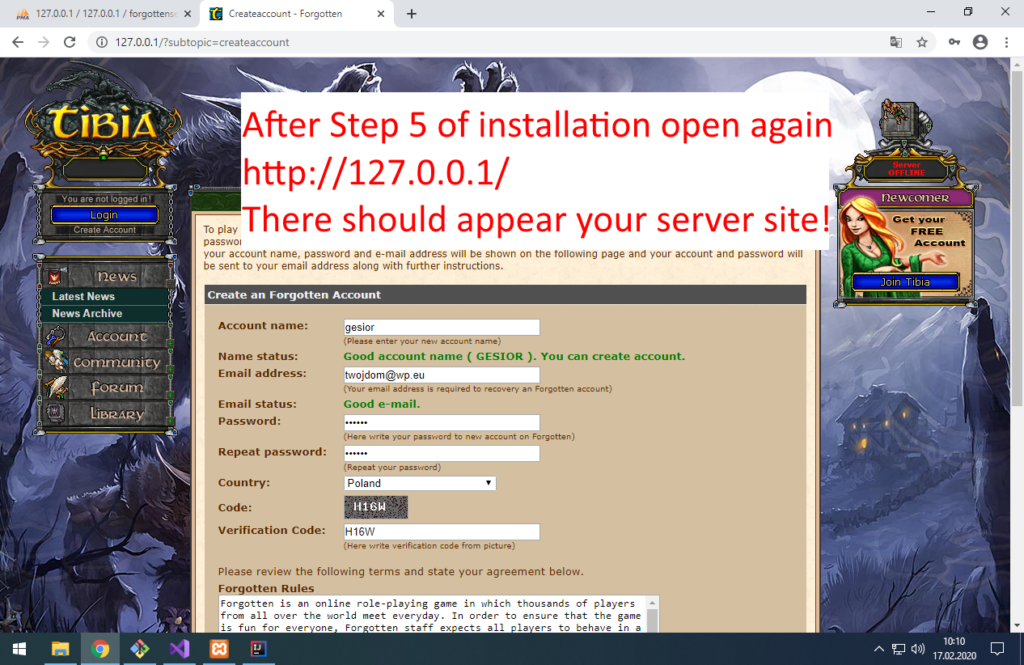
Open website http://127.0.0.1 and click link to installation.
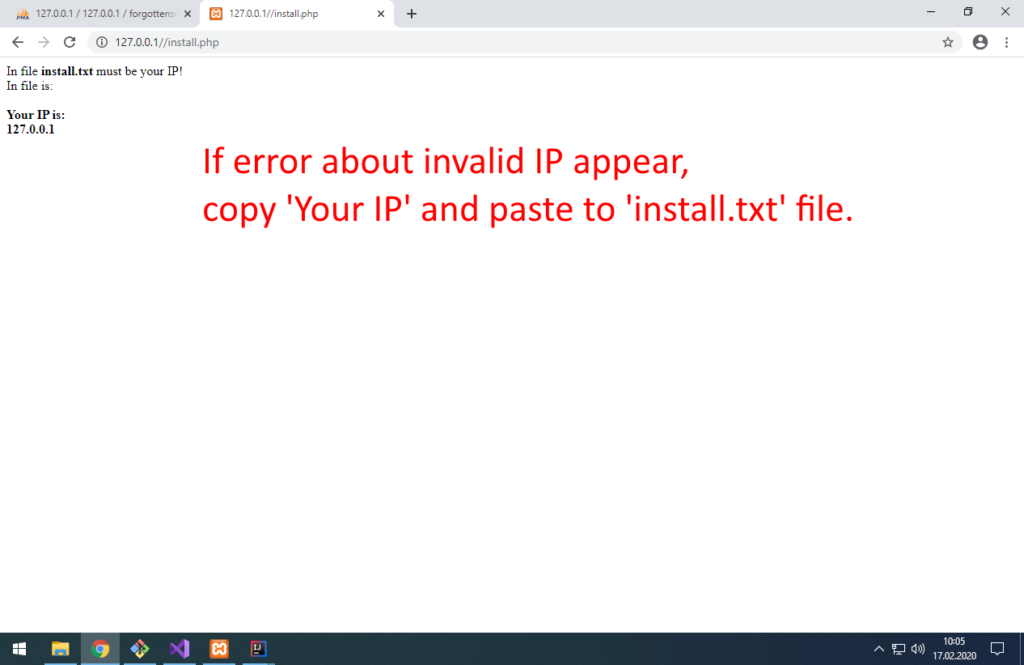
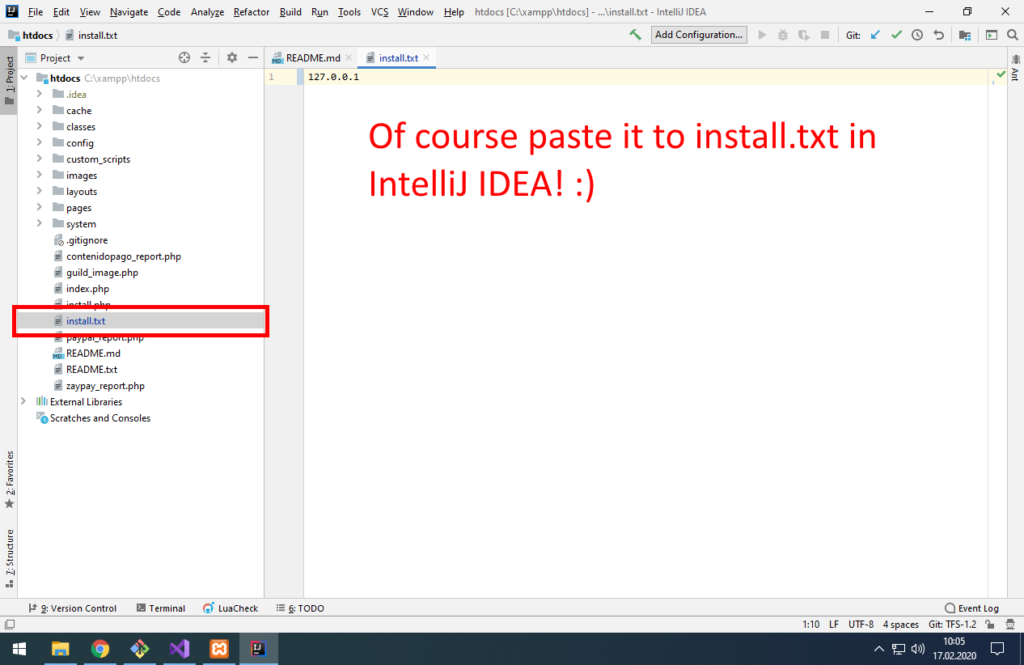
Refresh site. Error about IP should disappear.
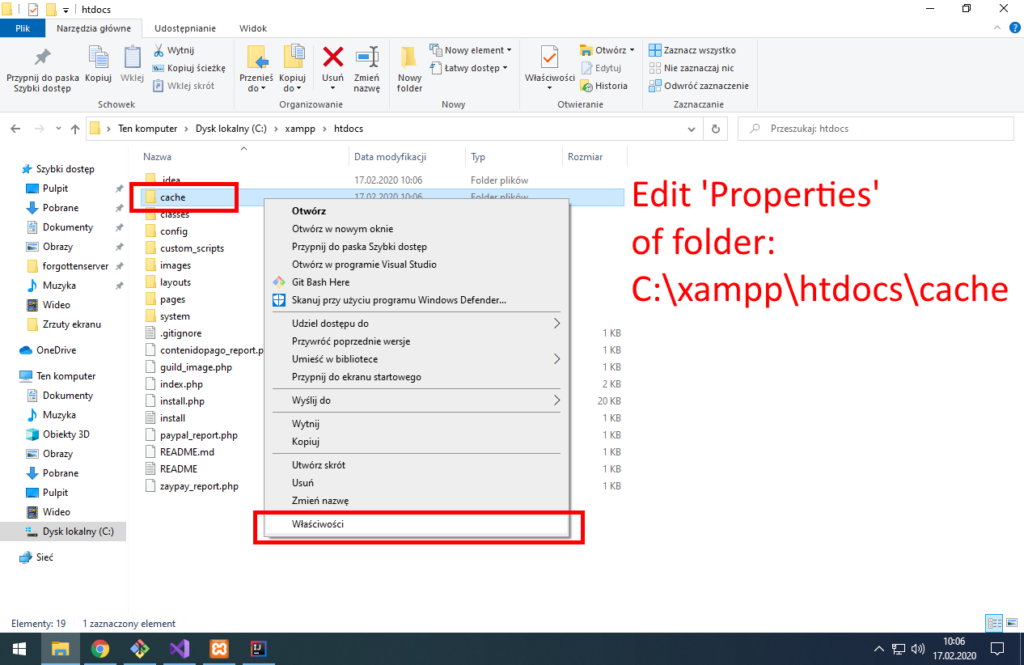
There will be probably some errors about cache folder.
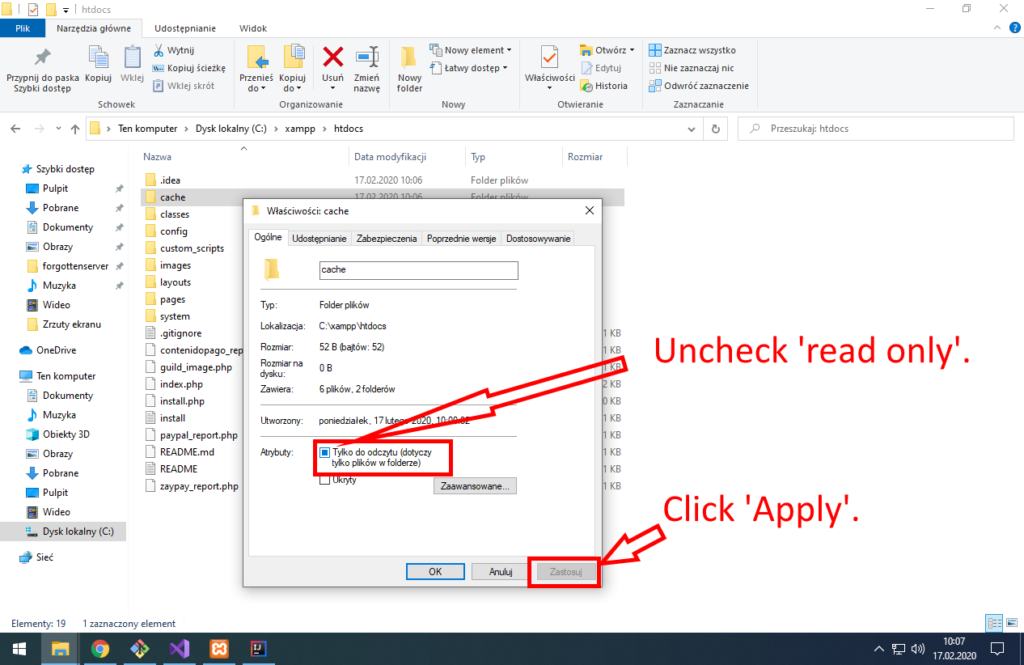
We got to set cache folder not read-only.
When it asks about ‘To all files and sub-directories’ click Yes.
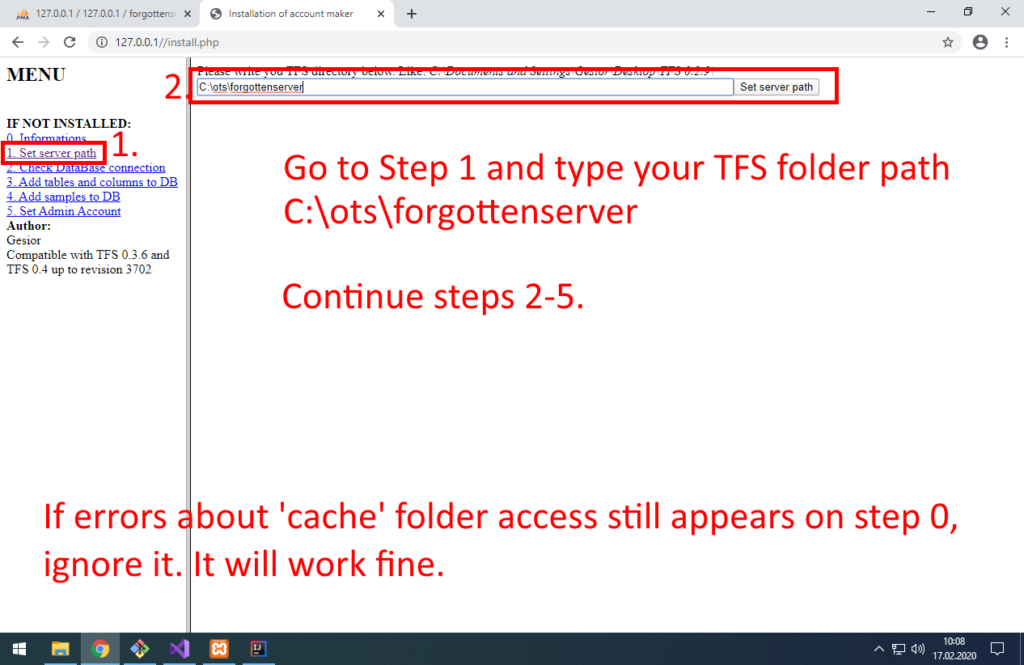
Click link to Step 1 in left side menu.
Type path to TFS: C:\ots\forgottenserver
C:\ots\forgottenserver

Continue steps 2-5.

Your website should be ready to use!

LUA BASICS for other language programmers

What do you need to know to start scripting in LUA?

1: 0 is true!

local v = 0
if v then
    print('YES! ZERO IS TRUE!')
    print('That is why many functions return "nil" (which is false)')
end

2: elseif != else if

if something then
    print(1)
else if somethingOther then
    print(2)
end

ERROR?! WHAT?! YES!
In LUA else if is one word elseif.
As there are no one-line ifs without end, you need to write:

if something then
    print(1)
elseif somethingOther then
    print(2)
end

or:

if something then<
    print(1)
else
    if somethingOther then
        print(2)
    end
end

Multi-line formatting is ignored, whole LUA program can be in 1 line!

3: Tables are indexed from 1!

Tables/arrays are indexed from 1, not 0!

local table = {1, 2, 3, 4, 5}
for k, v in pairs(table) do
    print(k .. ' = ' .. v)
end
print(table[0])

Result:

1 = 1
2 = 2
3 = 3
4 = 4
5 = 5
nil -- reading not assigned index returns magic "nil" from point 1

Set/change PHP version command [Ubuntu/Debian]

Command to change PHP version in system and Apache2 with multiple PHP versions installed (from https://launchpad.net/~ondrej/+archive/ubuntu/php )

#!/bin/sh

if [ -z "$1" ]
then
        echo 'PHP version required'
else
        if test -f "/usr/bin/php"$1; then
                sudo a2dismod php7.0 > /dev/null
                sudo a2dismod php7.1 > /dev/null
                sudo a2dismod php7.2 > /dev/null
                sudo a2dismod php7.3 > /dev/null
                sudo a2dismod php7.4 > /dev/null
                sudo a2enmod php$1 > /dev/null
                systemctl restart apache2

                sudo ln -fs /usr/bin/php$1 /etc/alternatives/php
                sudo ln -fs /usr/bin/php-config$1 /etc/alternatives/php-config
                sudo ln -fs /usr/bin/phpdbg$1 /etc/alternatives/phpdbg
                sudo ln -fs /usr/bin/phpize$1 /etc/alternatives/phpize
                sudo ln -fs /usr/bin/phar$1 /etc/alternatives/phar
                sudo ln -fs /usr/bin/phar.phar$1 /etc/alternatives/phar.phar
                echo 'Changed PHP version to: '$1
        else
                echo 'Wrong PHP version: '$1
        fi
fi

Reset TFS database without removing accounts, players and guilds

SQL queries to reset database to ‘server start’ without removing accounts, players and guilds. All players are set to level 30 with valid hp, mana and cap for their vocations.

UPDATE `players`
SET
`health` = 185 + 22 * 5,
`healthmax` = 185 + 22 * 5,
`mana` =  35 + 22 * 30,
`manamax` = 35 + 22 * 30,
`cap` = 470 + 22 * 10,
`level` = 30,
`experience` = 368300,
`maglevel` = 30,
`soul` = 100,
`manaspent` = 0,
`lookaddons` = 0,
`posx` = 0,
`posy` = 0,
`posz` = 0, 
`conditions` = '',
`skull` = 0,
`skulltime` = 0,
`blessings` = 0,
`offlinetraining_time` = 43200,
`offlinetraining_skill` = -1,
`stamina` = 2520,
`skill_fist` = 10,
`skill_club` = 10,
`skill_sword` = 10,
`skill_axe` = 10,
`skill_dist` = 10,
`skill_shielding` = 10,
`skill_fishing` = 10,
`skill_fist_tries` = 0,
`skill_club_tries` = 0,
`skill_sword_tries` = 0,
`skill_axe_tries` = 0,
`skill_dist_tries` = 0,
`skill_shielding_tries` = 0,
`skill_fishing_tries` = 0
WHERE `vocation` =  1 OR `vocation`= 5  OR `vocation`= 2 OR `vocation`= 6;

UPDATE `players`
SET
`health` = 185 + 22 * 10,
`healthmax` = 185 + 22 * 10,
`mana` =  35 + 22 * 15,
`manamax` = 35 + 22 * 15,
`cap` = 470 + 22 * 20,
`level` = 30,
`experience` = 368300,
`maglevel` = 5,
`soul` = 100,
`manaspent` = 0,
`lookaddons` = 0,
`posx` = 0,
`posy` = 0,
`posz` = 0, 
`conditions` = '',
`skull` = 0,
`skulltime` = 0,
`blessings` = 0,
`offlinetraining_time` = 43200,
`offlinetraining_skill` = -1,
`stamina` = 2520,
`skill_fist` = 10,
`skill_club` = 10,
`skill_sword` = 10,
`skill_axe` = 10,
`skill_dist` = 30,
`skill_shielding` = 10,
`skill_fishing` = 10,
`skill_fist_tries` = 0,
`skill_club_tries` = 0,
`skill_sword_tries` = 0,
`skill_axe_tries` = 0,
`skill_dist_tries` = 0,
`skill_shielding_tries` = 0,
`skill_fishing_tries` = 0
WHERE `vocation` =  3 OR `vocation`= 7;

UPDATE `players`
SET
`health` = 185 + 22 * 15,
`healthmax` = 185 + 22 * 15,
`mana` =  35 + 22 * 5,
`manamax` = 35 + 22 * 5,
`cap` = 470 + 22 * 25,
`level` = 30,
`experience` = 368300,
`maglevel` = 2,
`soul` = 100,
`manaspent` = 0,
`lookaddons` = 0,
`posx` = 0,
`posy` = 0,
`posz` = 0, 
`conditions` = '',
`skull` = 0,
`skulltime` = 0,
`blessings` = 0,
`offlinetraining_time` = 43200,
`offlinetraining_skill` = -1,
`stamina` = 2520,
`skill_fist` = 10,
`skill_club` = 30,
`skill_sword` = 30,
`skill_axe` = 30,
`skill_dist` = 10,
`skill_shielding` = 10,
`skill_fishing` = 10,
`skill_fist_tries` = 0,
`skill_club_tries` = 0,
`skill_sword_tries` = 0,
`skill_axe_tries` = 0,
`skill_dist_tries` = 0,
`skill_shielding_tries` = 0,
`skill_fishing_tries` = 0
WHERE `vocation` =  4 OR `vocation`= 8;

DELETE FROM `account_ban_history`;
DELETE FROM `account_bans`;
DELETE FROM `house_lists`;
DELETE FROM `houses`;
DELETE FROM `market_history`;
DELETE FROM `market_offers`;
DELETE FROM `player_deaths`;
DELETE FROM `player_depotitems`;
DELETE FROM `player_inboxitems`;
DELETE FROM `player_items`;
DELETE FROM `player_spells`;
DELETE FROM `player_storage`;
DELETE FROM `players_online`;
DELETE FROM `tile_store`;

OTC Module – Debug UI

When you create new module, you always got problems with OTUI design. Why X element is on that position? What am I clicking?

I can’t solve all these problems, but my module can help you debug your UI without milion prints to console.

With this module you can easily view tree of elements on given position (under mouse cursor):

It also works before login:

modules/client_ui_debug/client_ui_debug.otmod

Module
  name: client_ui_debug
  description: Draws tree of widgets on mouse position
  author: Gesior.pl
  reloadable: false
  sandboxed: true
  scripts: [ client_ui_debug ]
  @onLoad: init()
  @onUnload: terminate()

modules/client_ui_debug/client_ui_debug.otui

HighlightWidget < Panel
  id: highlightWidget
  background-color: #AA000099
  focusable: false
  phantom: true

Panel
  id: clientUiDebug
  anchors.top: parent.top
  anchors.left: parent.left
  anchors.right: parent.right
  height: 20
  margin-top: 1
  focusable: false

  UILabel
    id: clientUiDebugLabel
    color: #FF7777
    background-color: #00000099
    anchors.fill: parent
    text-align: left
    text-auto-resize: false
    padding: 2
    font: verdana-11px-antialised

modules/client_ui_debug/client_ui_debug.lua

local clientUiDebug
local clientUiDebugLabel
local clientUiDebugHighlightWidget

function onClientUiDebuggerMouseMove(mouseBindWidget, mousePos, mouseMove)
    local widgets = rootWidget:recursiveGetChildrenByPos(mousePos)

    local smallestWidget
    for _, widget in pairs(widgets) do
        if (widget:getId() ~= 'highlightWidget' and widget:getId() ~= 'toolTip') then
            if (not smallestWidget or
                    (widget:getSize().width <= smallestWidget:getSize().width and widget:getSize().height <= smallestWidget:getSize().height)
            ) then
                smallestWidget = widget
            end
        end
    end
    if smallestWidget then
        clientUiDebugHighlightWidget:setPosition(smallestWidget:getPosition())
        clientUiDebugHighlightWidget:setSize(smallestWidget:getSize())
        clientUiDebugHighlightWidget:raise()
    end

    local widgetNames = {}
    for wi = #widgets, 1, -1 do
        local widget = widgets[wi]
        if (widget:getId() ~= 'highlightWidget') then
            table.insert(widgetNames, widget:getClassName() .. '#' .. widget:getId())
        end
    end
    clientUiDebugLabel:setText(table.concat(widgetNames, " -> "))
end

function init()
    connect(rootWidget, {
        onMouseMove = onClientUiDebuggerMouseMove,
    })
    clientUiDebug = g_ui.displayUI('client_ui_debug')
    clientUiDebugLabel = clientUiDebug:getChildById('clientUiDebugLabel')
    clientUiDebugHighlightWidget = g_ui.createWidget('HighlightWidget', rootWidget)
end

function terminate()
    disconnect(rootWidget, {
        onMouseMove = onClientUiDebuggerMouseMove,
    })
    clientUiDebug:destroy()
    clientUiDebugHighlightWidget:destroy()
end

at end of modules list in modules/client/client.otmod add:

- client_ui_debug

items.xml sorter – by id/fromid

Simple PHP code to sort file items.xml by id/fromid attribute

<?php
$path_to_file = 'data/items/items.xml';
$xml = simplexml_load_string(file_get_contents($path_to_file));
$trees = $xml->xpath('/items/item');

function sort_trees($t1, $t2)
{
    $a = isset($t1['id']) ? $t1['id'] : $t1['fromid'];
    $b = isset($t2['id']) ? $t2['id'] : $t2['fromid'];
    return $a - $b;
}

usort($trees, 'sort_trees');

foreach ($trees as $tree) {
    echo '<item ';
    foreach ($tree->attributes() as $k => $v) {
        echo $k . '="' . $v . '" ';
    }
    if (count($tree->attribute) > 0) {
        echo '>' . PHP_EOL;
        foreach ($tree->attribute as $k => $v) {
            echo '<attribute key="' . $v->attributes()['key'] . '" value="' . htmlspecialchars($v->attributes()['value'], ENT_XML1 | ENT_QUOTES, 'UTF-8') . '" />' . PHP_EOL;
        }
        echo '</item>' . PHP_EOL;
    } else {
        echo '/>' . PHP_EOL;
    }
}

[TFS 1.x+] Generate big depot

LUA code to generate backpack full of backpacks:

function fillContainer(container, level, innerContainerCount)
    if level > 0 then
        for i = 1, innerContainerCount do
            local innerContainer = Game.createItem(2000)
            container:addItemEx(innerContainer)
            fillContainer(innerContainer, level - 1, innerContainerCount)
        end
    else
        for i = 1, 20 do
            local item = Game.createItem(i % 2 == 0 and 2376 or 2400)
            container:addItemEx(item)
        end
    end
end

function generateBigContainer(player, innerContainerCount, deepness)
    local item = player:getTile():addItem(2000)
    fillContainer(item, deepness, innerContainerCount)
    return item
end

Code to call it:

!lua generateBigContainer(player, 20, 2)

Requires !lua debug:

https://otland.net/threads/debug-lua-scripts-with-talkaction.112027/

https://otland.net/threads/tfs-1-x-luajit-debug-lua-scripts-with-talkaction.260910/

https://otland.net/threads/tfs-1-3-lua-5-2-debug-lua-scripts-with-talkaction.266086/