Press CTRL+O and Enter to save, CTRL+X to leave nano
2. Edit file /etc/netplan/50-cloud-init.yaml :
sudo nano /etc/netplan/50-cloud-init.yaml
In addresses: section add your new IP with /32 at end. Example files edits at end of this post.
3. Test your new config:
sudo netplan try
It will count down from 120 seconds: – open second SSH connection to server, to make sure that network still works – ping new additional IP, server should return ping
If SSH and ping works, press Enter to stop countdown and then run:
sudo netplan apply
If connection to SSH is blocked or ping does not work, wait these 120 seconds, so it will revert your network changes. If you accept invalid network config, it may disable network on your dedic/VPS. Then you will have to reinstall operating system on machine or run Rescue Mode in OVH panel, but it may take around 30 minutes to fix server network config – OS reinstall is faster.
If you want to disable IPv6, you are probably running project with some old code that is not able to process IPv6 REMOTE_ADDR in PHP. I assume you do not use CF API at all, so fastest option will be to use global API key to disable IPv6 and then generate new global API key. Get your CF account global API key from CF user panel: https://dash.cloudflare.com/profile/api-tokens
Execute in terminal with curl installed (ex. Linux) or Postman:
If you execute this curl line on your Linux server without space as start of line, your CF global API key will be stored in Linux command line history. Generate new global API key in CF panel, it will disable old API key.
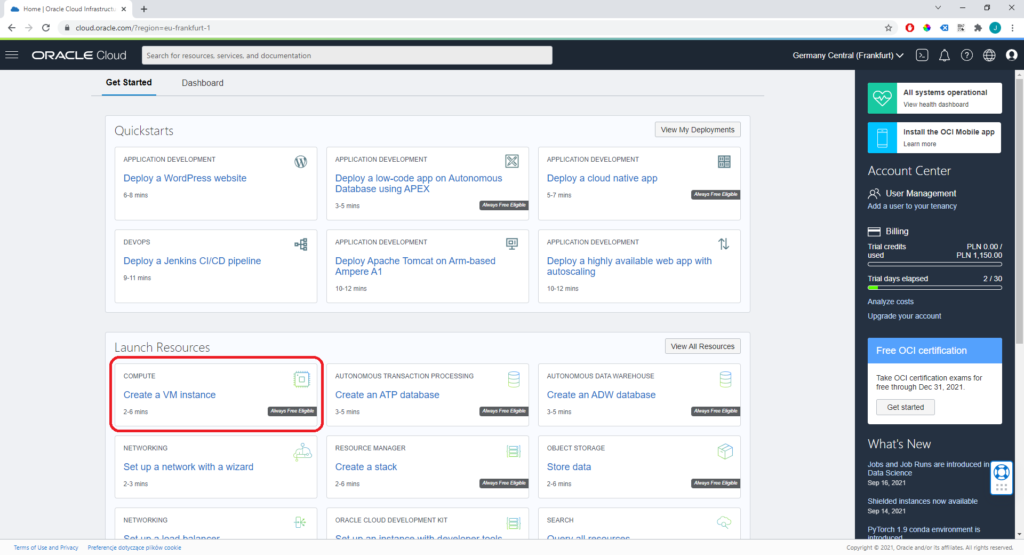
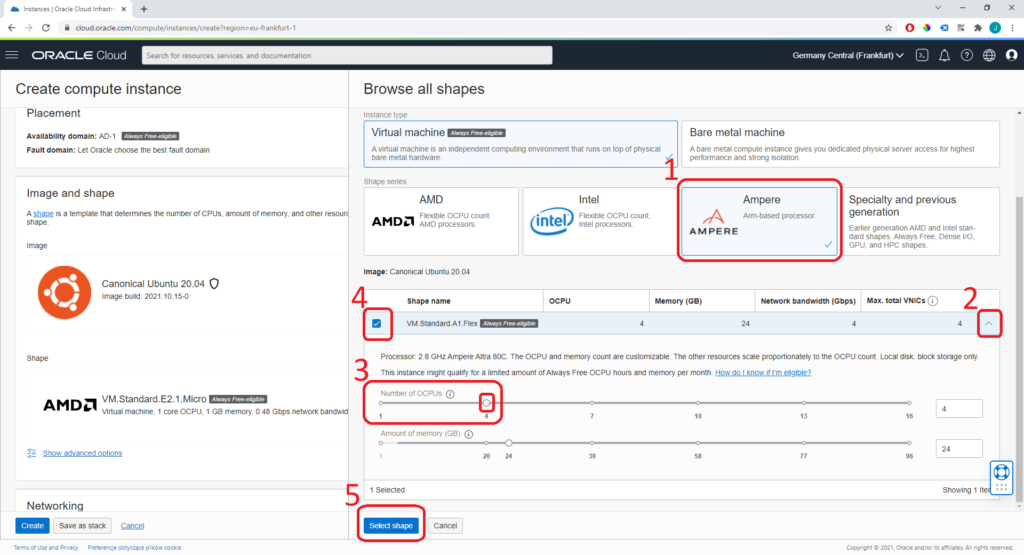
There is new always-free offer on Oracle site: – AMD Epyc CPU: 2 servers, each with: 1 core, 1 GB ram, 50 GB HDD, 480 mb/s connection – Ampere ARM CPU: 4 servers, each with: 1 core 2.8GHz, 6 GB ram, 50 GB HDD, 1gb/s connection – 10 TB/month transfer limit for all your machines together
These 4 Ampere servers you can combine into 1 server: 4×2.8GHz, 24 GB ram, 50 GB HDD with 4gb/s connection! You can also create 6 VPSes for 6 small projects.
Registration: https://www.oracle.com/pl/cloud/free/ You will have to add credit card to account. Virtual/prepaid cards are not accepted. Revolut virtual card generated in smartphone application is not accepted, but physical Revolut card is ok.
It takes around 15 minutes to activate account after you register.
How to order free 4 core VPS and unlock internet access
When you order any dedic or VPS, it always comes with all internet access opened by default. Here we get machine with almost everything closed (except port 22 for SSH). Every port is blocked in Oracle Cloud panel and in Ubuntu. If you install nginx on it, it will say in webbrowser that site is offline. Read next 16 steps to unlock all ports.
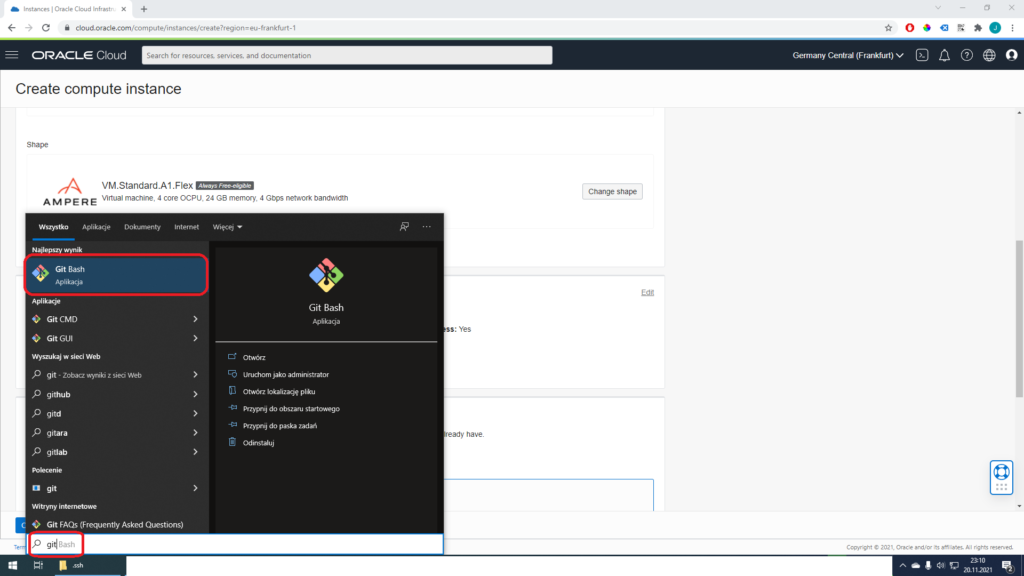
Run Git Bash using Windows Search. Just type ‘git’, it should find it.
In Git Bash window type:
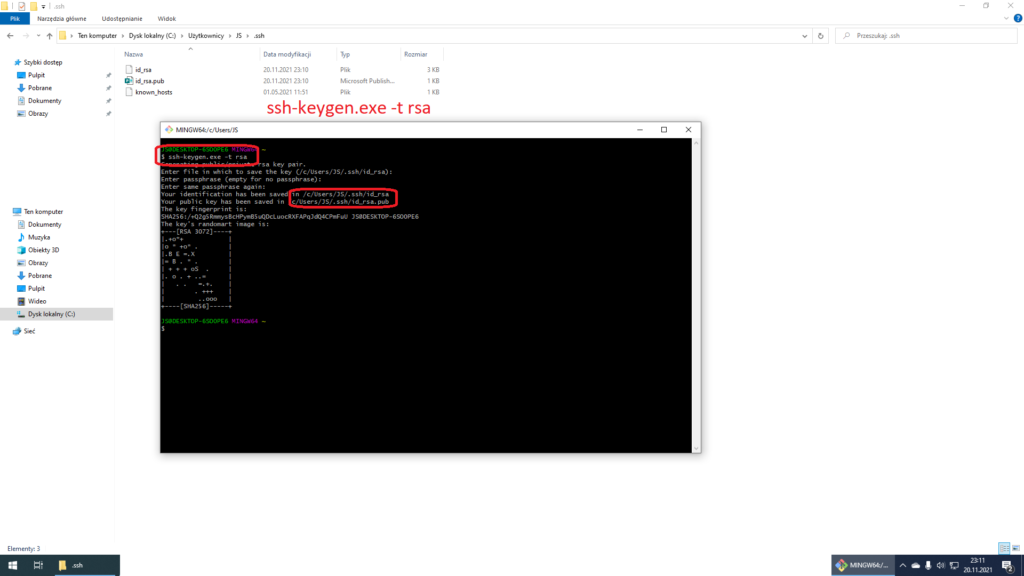
ssh-keygen.exe -t rsa
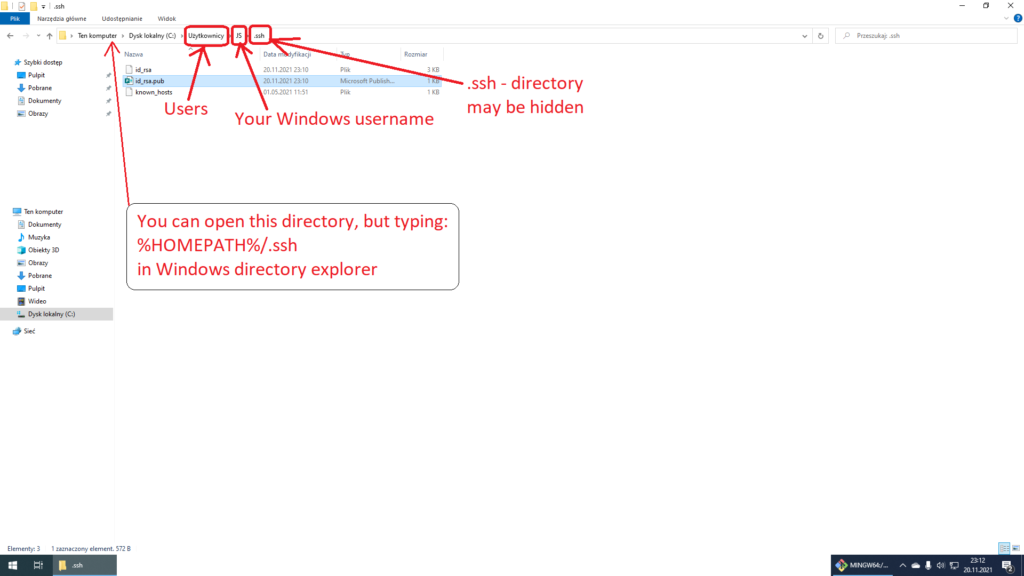
It will generate SSH key pair and save it in your Windows user directory, in subdirectory .ssh. This directory may be hidden (depends on Windows settings), so you can’t easily navigate there. In this case, you can open any directory in Windows explorer, click on address bar, type:
%HOMEPATH%/.ssh
and click Enter. It should open folder with your id_rsa.pub file. You can copy it on desktop or to Downloads folder, to make it easy to find.
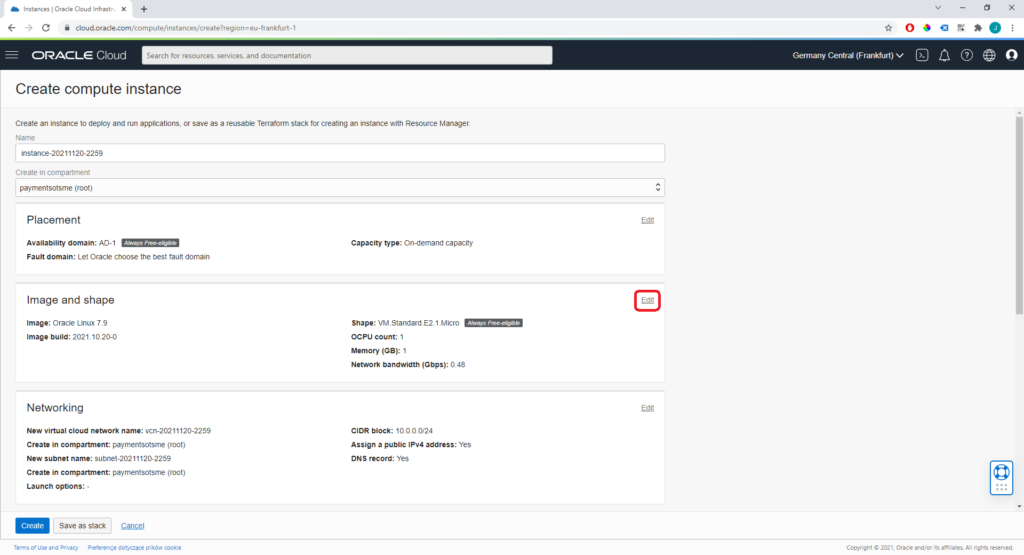
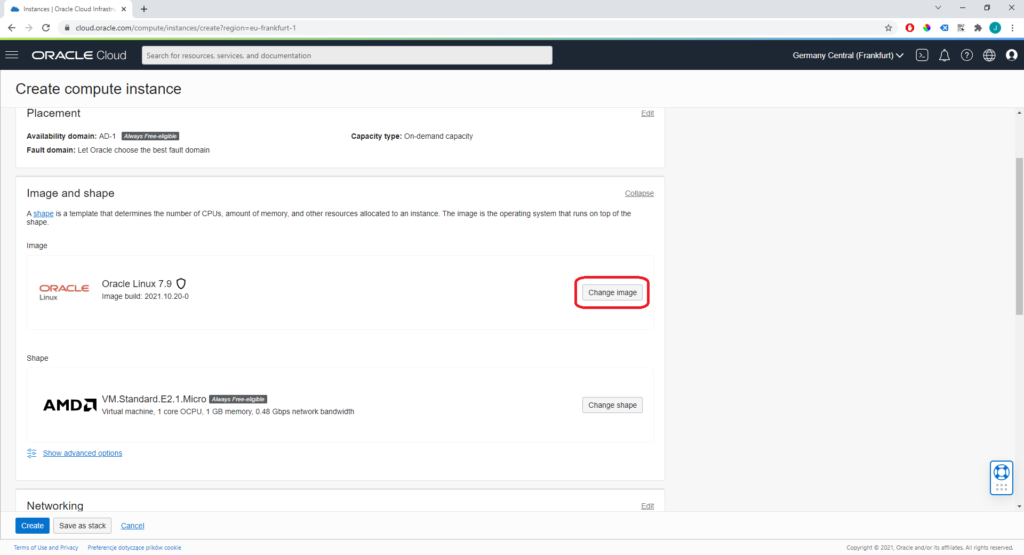
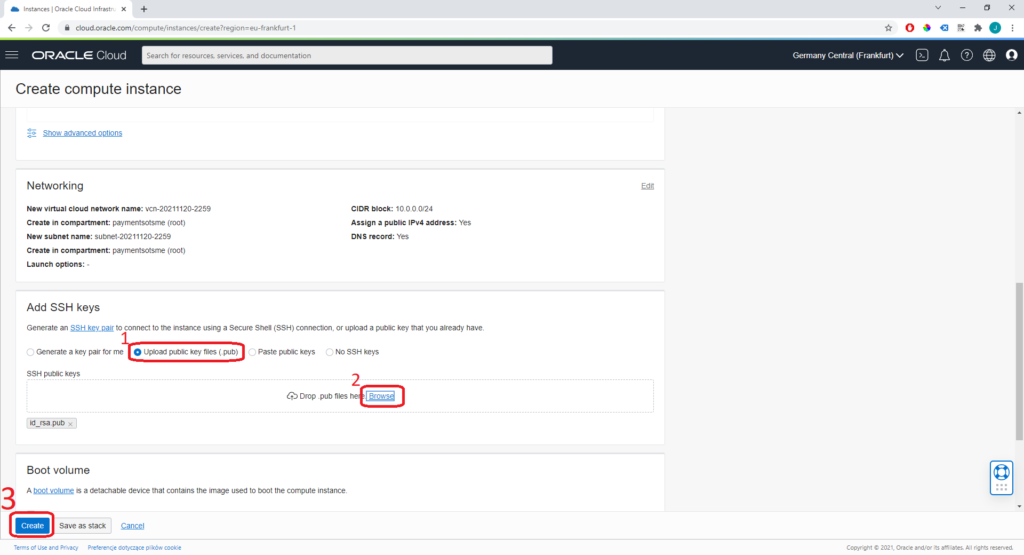
On Oracle page scroll to ‘Add SSH Keys’ and select option ‘Upload public key files (.pub)’.
Select file ‘id_rsa.pub’ we generated in previous 3 steps in file picker (button ‘Browse’). Oracle will upload it to your new VPS. Git Bash with automatically login to your server using this key – using all keys which are in .ssh directory – when you use ‘ssh’ command in it.
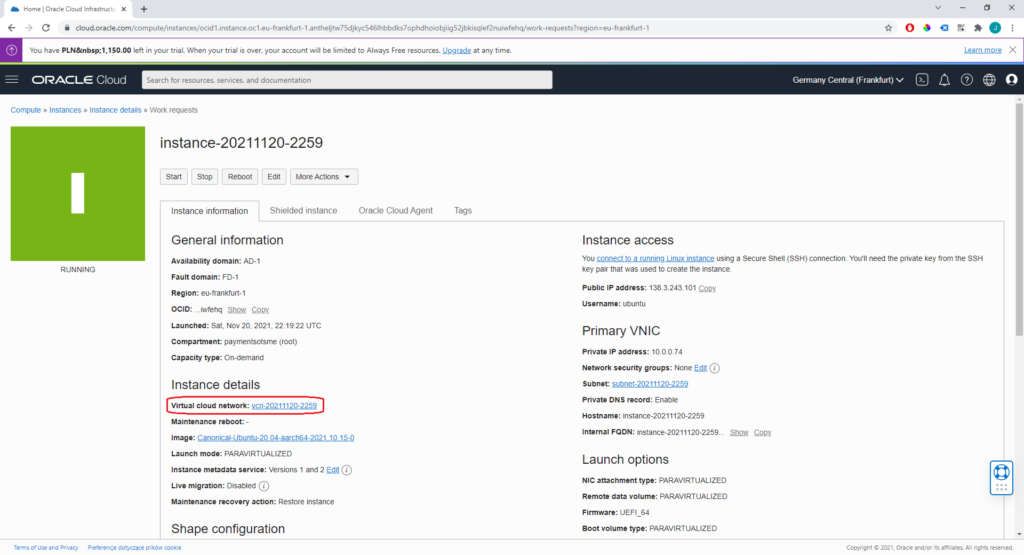
Your machine should change status to ‘Running’ within 1 minute. On right top side of page, there will appear IP of your server. Copy it. We will use it later.
There will also appear ‘Virtual cloud network’ with some random name. Click on it.
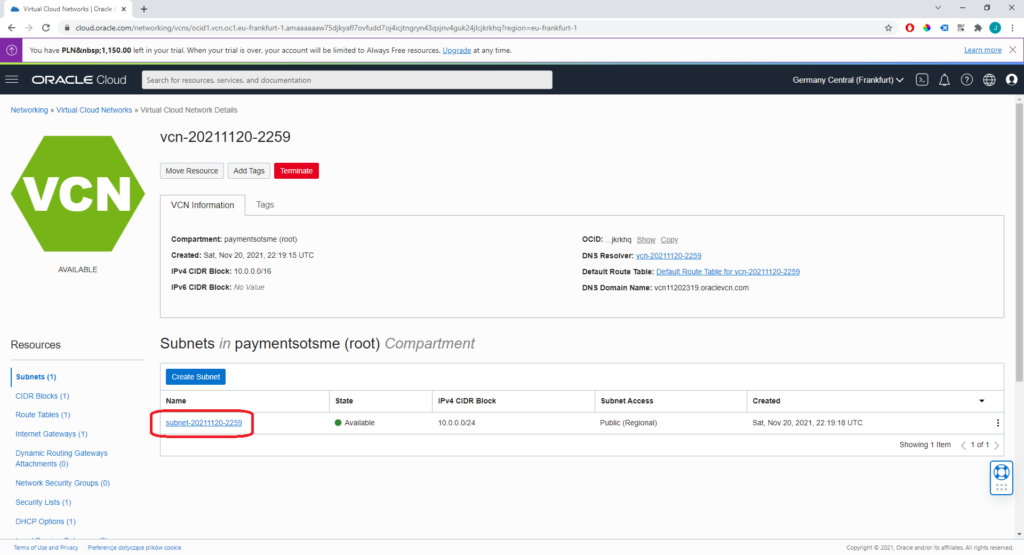
Click on Subnet name – again some random value.
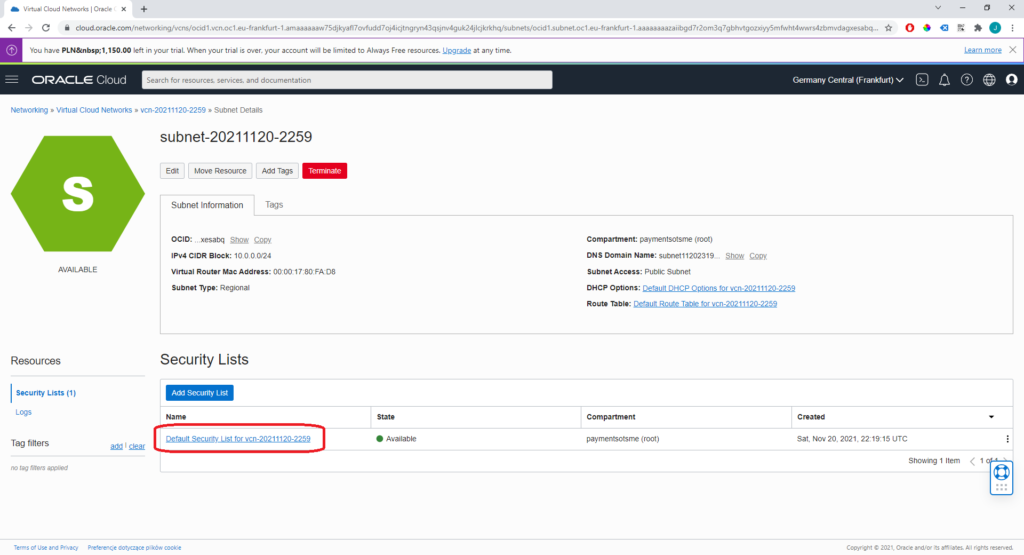
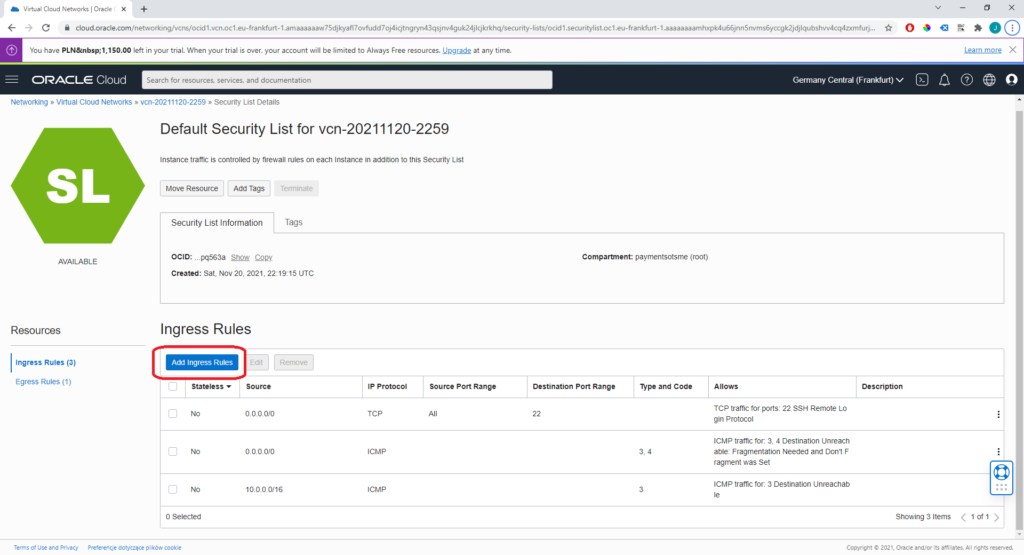
Click on Default Security List name – again some random value.
Click ‘Add Ingress Rules’.
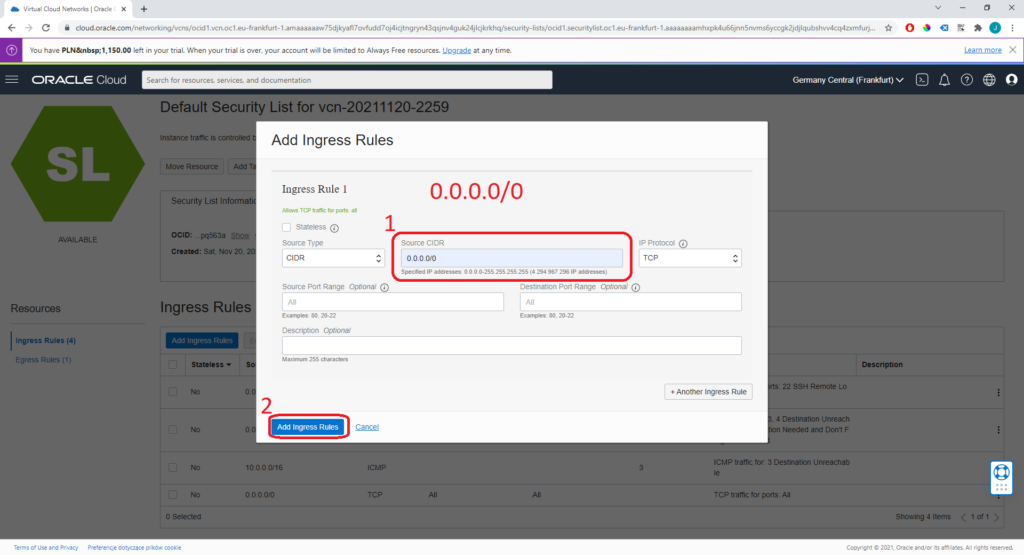
In ‘source CIDR’ type:
0.0.0.0/0
and click ‘Add Ingress Rules’.
Network TCP – like Tibia and www – traffic is unlocked in Oracle Cloud panel. You may also unblock UDP protocol traffic, if you plan to host TeamSpeak or other application which uses UDP.
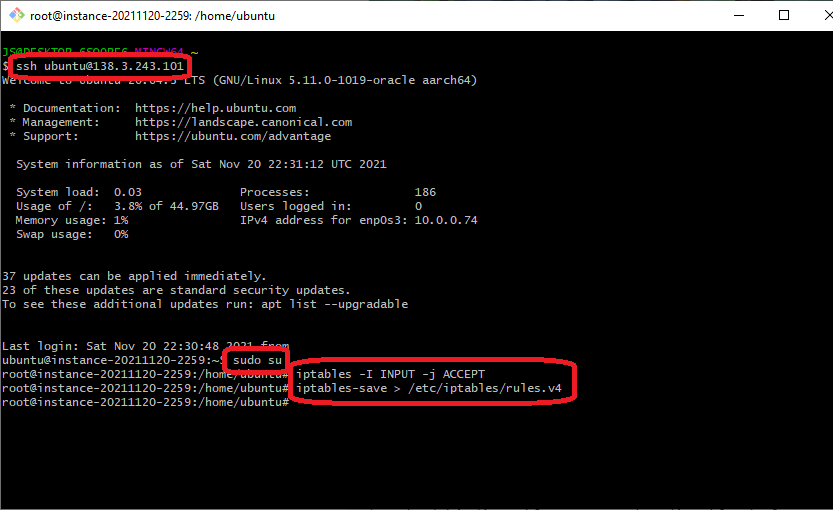
Now we got to unlock traffic in Ubuntu. Open Git Bash and type:
ssh ubuntu@x.x.x.x
with your server IP in place of x.x.x.x, like ssh ubuntu@138.3.243.101 On first connection it will ask you, if you are sure that you connected to valid server. Type ‘yes’ and press Enter.
You are now connected to your VPS, but you still can’t run web server or OTS on it. Type:
sudo su
iptables -I INPUT -j ACCEPT
iptables-save > /etc/iptables/rules.v4
Dockerfiles tested on 2021-08-24. You can comment otservbr / forgottenserver part to compile just one sources.
Ubuntu 20.04
FROM ubuntu:20.04

RUN apt-get update

ARG DEBIAN_FRONTEND=noninteractive
ENV TZ=Europe/London

RUN apt-get -y install tzdata

# 1: forgottenserver (TFS)
RUN apt-get -y install git cmake build-essential libluajit-5.1-dev zip ca-certificates pkg-config autoconf libmariadb-dev-compat libboost-date-time-dev libboost-filesystem-dev libboost-system-dev libboost-iostreams-dev libpugixml-dev libcrypto++-dev libfmt-dev

RUN cd /home/ && git clone --depth 1 https://github.com/otland/forgottenserver.git

RUN cd /home/forgottenserver/ && mkdir build && cd build && cmake ..
RUN cd /home/forgottenserver/build/ && make -j 16

# 2: otservbr-global
RUN apt-get install -y git cmake build-essential libluajit-5.1-dev zip ca-certificates curl zip unzip tar pkg-config yasm autoconf

RUN cd /home/ && git clone https://github.com/microsoft/vcpkg && cd vcpkg && ./bootstrap-vcpkg.sh
RUN cd /home/vcpkg/ && ./vcpkg --triplet x64-linux install boost-asio boost-filesystem boost-iostreams boost-lockfree boost-system boost-variant cryptopp curl jsoncpp libmariadb pugixml spdlog

RUN cd /home/ && git clone --depth 1 https://github.com/opentibiabr/otservbr-global.git && cd otservbr-global && git checkout develop
RUN cd /home/otservbr-global/ && mkdir build && cd build && cmake -DCMAKE_TOOLCHAIN_FILE=../../vcpkg/scripts/buildsystems/vcpkg.cmake ..
RUN cd /home/otservbr-global/build/ && make -j 16
Debian 11
FROM debian:11

RUN apt-get update

ARG DEBIAN_FRONTEND=noninteractive
ENV TZ=Europe/London

RUN apt-get -y install tzdata

# 1: forgottenserver (TFS)
RUN apt-get -y install git cmake build-essential libluajit-5.1-dev zip wget ca-certificates pkg-config autoconf libmariadb-dev-compat libboost-date-time-dev libboost-filesystem-dev libboost-system-dev libboost-iostreams-dev libpugixml-dev libcrypto++-dev libfmt-dev

RUN apt remove -y libfmt-dev
RUN cd /root/ && wget https://github.com/fmtlib/fmt/releases/download/7.1.3/fmt-7.1.3.zip && unzip fmt-7.1.3.zip
RUN cd /root/fmt-7.1.3/ && mkdir build && cd build && cmake .. && make -j 16 && make install

RUN cd /home/ && git clone --depth 1 https://github.com/otland/forgottenserver.git

RUN cd /home/forgottenserver/ && mkdir build && cd build && cmake ..
RUN cd /home/forgottenserver/build/ && make -j 16

# 2: otservbr-global
RUN apt-get install -y git cmake build-essential libluajit-5.1-dev wget zip ca-certificates curl zip unzip tar pkg-config yasm autoconf

RUN apt remove -y cmake
RUN cd /root/ && wget https://github.com/Kitware/CMake/releases/download/v3.21.1/cmake-3.21.1.tar.gz
RUN cd /root/ && tar -zxvf cmake-3.21.1.tar.gz && cd cmake-3.21.1 && ./bootstrap -- -DCMAKE_USE_OPENSSL=OFF && make -j 16 && make install

RUN cd /home/ && git clone https://github.com/microsoft/vcpkg && cd vcpkg && ./bootstrap-vcpkg.sh
RUN cd /home/vcpkg/ && ./vcpkg --triplet x64-linux install boost-asio boost-filesystem boost-iostreams boost-lockfree boost-system boost-variant cryptopp curl jsoncpp libmariadb pugixml spdlog

RUN cd /home/ && git clone --depth 1 https://github.com/opentibiabr/otservbr-global.git && cd otservbr-global && git checkout develop
RUN cd /home/otservbr-global/ && mkdir build && cd build && cmake -DCMAKE_TOOLCHAIN_FILE=../../vcpkg/scripts/buildsystems/vcpkg.cmake ..
RUN cd /home/otservbr-global/build/ && make -j 16
Debian 10
FROM debian:10

RUN apt-get update

ARG DEBIAN_FRONTEND=noninteractive
ENV TZ=Europe/London

RUN apt-get -y install tzdata

# 1: forgottenserver (TFS)
RUN apt-get -y install git cmake build-essential libluajit-5.1-dev zip wget ca-certificates pkg-config autoconf libmariadb-dev-compat libboost-date-time-dev libboost-filesystem-dev libboost-system-dev libboost-iostreams-dev libpugixml-dev libcrypto++-dev

RUN apt remove -y libfmt-dev
RUN cd /root/ && wget https://github.com/fmtlib/fmt/releases/download/7.1.3/fmt-7.1.3.zip && unzip fmt-7.1.3.zip
RUN cd /root/fmt-7.1.3/ && mkdir build && cd build && cmake .. && make -j 16 && make install

RUN cd /home/ && git clone --depth 1 https://github.com/otland/forgottenserver.git

RUN cd /home/forgottenserver/ && mkdir build && cd build && cmake ..
RUN cd /home/forgottenserver/build/ && make -j 16

# 2: otservbr-global
RUN apt-get install -y git cmake build-essential libluajit-5.1-dev wget zip ca-certificates curl zip unzip tar pkg-config yasm autoconf

RUN apt remove -y cmake
RUN cd /root/ && wget https://github.com/Kitware/CMake/releases/download/v3.21.1/cmake-3.21.1.tar.gz
RUN cd /root/ && tar -zxvf cmake-3.21.1.tar.gz && cd cmake-3.21.1 && ./bootstrap -- -DCMAKE_USE_OPENSSL=OFF && make -j 16 && make install

RUN cd /home/ && git clone https://github.com/microsoft/vcpkg && cd vcpkg && ./bootstrap-vcpkg.sh
RUN cd /home/vcpkg/ && ./vcpkg --triplet x64-linux install boost-asio boost-filesystem boost-iostreams boost-lockfree boost-system boost-variant cryptopp curl jsoncpp libmariadb pugixml spdlog

RUN cd /home/ && git clone --depth 1 https://github.com/opentibiabr/otservbr-global.git && cd otservbr-global && git checkout develop
RUN cd /home/otservbr-global/ && mkdir build && cd build && cmake -DCMAKE_TOOLCHAIN_FILE=../../vcpkg/scripts/buildsystems/vcpkg.cmake ..
RUN cd /home/otservbr-global/build/ && make -j 16